I was recently checking out the new version of Digg, when I hit their error page.

Nice job leveraging Oregon Trail guys.
Founder of Kernl.us. Working and living in Raleigh, NC. I manage teams of software engineers and work in Python, Django, TypeScript, Node.js, React+Redux, Angular, and PHP. I enjoy hanging out with my wife and kids, lifting weights, and PC gaming in my free time.
As a plugin developer or WordPress hacker, accessing the database used by a WordPress install is vital. This can be accomplished through a few different means, but the best is by using the WPDB class that is provided. The only requirement for using this class is that your code exists within the WordPress install (plugins, themes, etc).
WPDB Queries
Let’s say that you would like to run a simple query that returns all of the rows in the “posts” table. With the WPDB class, all you need to do is execute:
1 | $rows = $wpdb->get_results( "SELECT * FROM $wpdb->posts" ); |
$rows = $wpdb->get_results( "SELECT * FROM $wpdb->posts" );
When this code is executed, it returns the entire table “posts” ($wpdb->posts) as an array of objects into the $rows variable. From there, it’s easy enough to iterate over the array using a foreach loop.
WPDB Insert
Inserting data into a table is easy using the WPDB class. All you need to know are the column name(s), the table name, and data you want to store. I’ll lead with an example:
1 | $wpdb->insert( 'links', array( 'link_url' => 're-cycledair.wploadtest.xyz', 'visit' => 12 ), array( '%s', '%d' ) ); |
$wpdb->insert( 'links', array( 'link_url' => 're-cycledair.wploadtest.xyz', 'visit' => 12 ), array( '%s', '%d' ) );
This example of $wpdb->insert, inserts “re-cycledair.wploadtest.xyz” and “12” into the link_url and visit columns of the “links” table respectively. The third argument in this function is one that tells the WPDB what type these values are. The first value is a string, so we use “%s”, and the second is an integer, so we use “%d”.
If you would like to know the auto-incremented id of this insert, simply call:
1 | $wpdb->insert_id |
$wpdb->insert_id
WPDB Update
Updating rows in a table is also easy with the WPDB class. Here is an example of an update.
1 | $wpdb->update( 'links', array( 'link_url' => 'wordpress.org'), array( 'ID' => 15), array( '%s'), array( '%d' ) ) |
$wpdb->update( 'links', array( 'link_url' => 'wordpress.org'), array( 'ID' => 15), array( '%s'), array( '%d' ) )
As you can see, this works a lot like $wpdb->insert. The first argument is the table name. The second argument is an array of column-value pairs. The third argument is the where condition (if ID is equal to 15). The fourth argument tells the WPDB class that you are updating a string, and the fifth argument says the WHERE condition is an integer.
WPDB Prepare: Protect Against SQL Injection
One thing every WordPress developer needs to know about is SQL injection. SQL injection is when someone is able to modify your SQL query to execute their own. To prevent this kind of malicious attack, the WPDB class has a method called “prepare”. “Prepare” will take your input data an sanitize it, so that it cannot be used in a SQL injection attack. An example is as follows:
1 2 3 4 5 | $wpdb->query( $wpdb->prepare( " INSERT INTO $wpdb->posts ( post_id, post_content ) VALUES ( %d, %s)", 15, "this is un'safe" ) ); |
$wpdb->query( $wpdb->prepare( " INSERT INTO $wpdb->posts ( post_id, post_content ) VALUES ( %d, %s)", 15, "this is un'safe" ) );
As with previous examples, the “%d” and “%s” function as placeholders for the sanitized data.
With those functions and a little bit of work, you should be writing WordPress database queries with the WPDB class in no time!
For the longest time, web developers were stuck submitting their forms in the normal way: Click a button, go to a processing page, redirect back. However, now it is possible to submit a form without ever leaving the page with Ajax. Ajax stands for Asynchronous JavaScript, which as stated before, basically means you can submit a form without ever leaving the page.
So how do you use form Ajax? First of all, we’re going use a JavaScript library called jQuery. Don’t be scared of it though, jQuery makes JavaScript easy. What jQuery allows us to do is use form Ajax without having to muck around with all the tedious JavaScript details (which trust me, is a GOOD thing). Without further a due, here is how to submit a form with Ajax.
To download the full working code for this, click here.
Form Ajax Step 1: The HTML Page.
1 2 3 4 5 6 7 8 9 10 11 12 13 14 15 16 17 18 19 20 21 22 23 24 25 26 27 28 29 30 31 32 33 34 35 | <html> <head> <title>Form Ajax Tutorial</title> <script type="text/javascript" src="jquery-1.4.2.min.js"></script> <script type="text/javascript"> //After the document has loaded, it adds the following handlers //to the web page. $(document).ready(function() { //When the form with id="myform" is submitted... $("#myform").submit(function() { //Send the serialized data to formProcessor.php. $.post("formProcessor.php", $("#myform").serialize(), //Take our repsonse, and replace whatever is in the "formResponse" //div with it. function(data) { $("#formResponse").html(data); } ); return false; }); }); </script> <head> <body> <h2>Form Ajax Tutorial</h2> <p> Fill out some information </p> <form id="myform"> <input type="text" name="firstName" value="" /><br /> <input type="text" name="lastName" value="" /><br /> <input type="submit" name="submit" value="Submit" /> </form> <div id="formResponse"> </div> </body> </html> |
<html> <head> <title>Form Ajax Tutorial</title> <script type="text/javascript" src="jquery-1.4.2.min.js"></script> <script type="text/javascript"> //After the document has loaded, it adds the following handlers //to the web page. $(document).ready(function() { //When the form with id="myform" is submitted... $("#myform").submit(function() { //Send the serialized data to formProcessor.php. $.post("formProcessor.php", $("#myform").serialize(), //Take our repsonse, and replace whatever is in the "formResponse" //div with it. function(data) { $("#formResponse").html(data); } ); return false; }); }); </script> <head> <body> <h2>Form Ajax Tutorial</h2> <p> Fill out some information </p> <form id="myform"> <input type="text" name="firstName" value="" /><br /> <input type="text" name="lastName" value="" /><br /> <input type="submit" name="submit" value="Submit" /> </form> <div id="formResponse"> </div> </body> </html>
For anyone who is used to HTML programming, this should all look very familiar. The only confusing part is the JavaScript, but I’ll explain that here. The first bit just includes the jQuery library. This is crucial for form ajax to work. The rest of the function is explained below:
Form Ajax Step 2: The Processing Page
1 2 3 4 5 6 7 8 9 10 11 | <?php //Get the information that was sent from the form. $firstName = $_POST['firstName']; $lastName = $_POST['lastName']; //Get the unix time stamp. $unixTimeStamp = time(); //Print output for out web page to catch. echo "Hello $firstName $lastName. The local unix time is <b>$unixTimeStamp</b>"; ?> |
<?php //Get the information that was sent from the form. $firstName = $_POST['firstName']; $lastName = $_POST['lastName']; //Get the unix time stamp. $unixTimeStamp = time(); //Print output for out web page to catch. echo "Hello $firstName $lastName. The local unix time is <b>$unixTimeStamp</b>"; ?>
The processing page is very important for making form ajax work correctly. What this file does is catch the data sent by the form, and then prints out some information. The form is waiting for this information, and then will add it to your page. Note: This file is a .PHP file. You need to be running a web server (or have access to one) that can process php files.
Form Ajax Step 3: You’re Done!
Form Ajax used to be pretty difficult, but now that their are JavaScript libraries like jQuery, MooTools, and Scriptaculous, it’s easier than ever. To download the full working code for this example, click here.
One of the most frustrating experiences when setting up a new web server is trying to get your virtual hosts to work correctly. The program Webmin is supposed to make this easier, however you’re are often left by Webmin with a virtual host (or hosts) that is not working. There are a few tell-tale signs that your virtual host files are broken or not working correctly, and the most obvious is that you go to one site, but get another. For instance, lets say that you have a virtual host set up for apacheWebSite.com and it points to /home/apacheWebSite.com/htdocs. Now let’s assume you have another virtual host setup for nginxWebSite.com and it points to /home/nginxWebSite.com/htdocs. Webmin has configured your virtual host wrong if you go to apacheWebSite.com and get nginxWebSite.com’s content (or vice-versa). To fix it, do the following:
1: Open /etc/apache2/apache2.conf in the editor of your choice.
2: Comment out (using ‘#’) or delete the line that says:
# Include the virtual host configurations:
Include /etc/apache2/sites-enabled/
3: Add the following to the bottom of the same file (substituting your site information) and then follow it as a template for adding more virtual hosts in the future.
#Virtualhosts
<VirtualHost *:80>
DocumentRoot /var/www
</VirtualHost><VirtualHost *:80>
DocumentRoot “/home/wrestlingaddix.com/htdocs”
ServerName wrestlingaddix.com
ServerAlias www.wrestlingaddix.com
<Directory “/home/wrestlingaddix.com/htdocs”>
allow from all
Options +Indexes
</Directory>
</VirtualHost><VirtualHost *:80>
DocumentRoot “/home/dansbikeshop.org/htdocs/dansbikesWP”
ServerName dansbikeshop.org
ServerAlias www.dansbikeshop.org
<Directory “/home/dansbikeshop.org/htdocs/dansbikesWP”>
allow from all
Options +Indexes
</Directory>
</VirtualHost>
4: Reload Apache by executing /etc/init.d/apache2 reload.
That’s it! It’s really much simpler to create the virtual hosts without Webmin.
When trying to view PDF files on the internet, you have a very limited number of choices. The obvious one is to let the user handle viewing PDFs with something like Adobe Acrobat Reader. However, some users don’t have Acrobat installed. Or the file gets downloaded instead. If you want an easy way to view PDF files online though, look no further than Google Docs.
The Google Docs Javascript PDF Viewer will embed the same javascript pdf viewer that Google Docs uses right in to your page via an IFrame. It’s really that easy. It even allows for searching of documents (which is quite handy!). If this sounds like what you’re looking for, the link is below.
One of the things that is seemingly lacking in WordPress is a way to restrict page access for authenticated users. Sure, you can password protect posts, but what if you want to restrict a page or post to only authenticated users? Or restrict a page or post to only a certain group of people? Without a 3rd party plugin, this isn’t possible.
Enter User Access Manager.
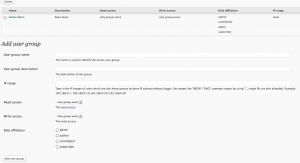
With the User Access Manager plugin, you can restrict your posts and pages easily with WordPress. It’s a fairly robust plugin, and allows you to create user groups, set access by category, and even limit access to uploaded files. Check out the screen shots below to see it in action.
Awhile ago on the internet, there was a big debate going on about the value of URL shortening services like Bit.ly. I was following the debate with some interested when I decided to create my own URL shortener. It does only one thing, and that is shorten URLs. Fwds.Me is still young, so the possibility of getting REALLY short URLs is very real. If you are looking for a simple url shortener, then look no further than Fwds.Me.
One of the most touted new features in WordPress 3 is the integration of WordPress MU into the main branch of WordPress. What this allows you to do is run multiple WordPress sites or blogs, while only needing one install. The only issue is that this functionality is not enabled by default.
To enable multisite in WordPress 3, you need to add the following line somewhere in wp-config.php. [Note: Make sure you disable all of your plugins first.]
define('WP_ALLOW_MULTISITE', true); |
define('WP_ALLOW_MULTISITE', true);
After you set WP_ALLOW_MULTISITE to true, you’ll get a new menu item called “Network” under the tools menu.