Categories
Kernl News Wordpress Development

Load Testing the WP Super Cache Plugin with Kernl

So you have a WordPress site and you are expecting a spike of traffic to it. Do you know when your site will fall over? How many users can be browsing it at once and still have a good experience? If you can’t answer these questions then you need to load test your site! Through the course of this article I’ll use a new load testing tool by Kernl to test enabling WP Super Cache on Kernl’s blog. Kernl WordPress load testing doesn’t require any coding or load testing experience and by the end you’ll know how to test any performance optimizations of your WordPress site.

What is Kernl.us?

Kernl.us is a WordPress developer tool service. It does a lot of different things to help WordPress developers be more productive including:

What we’re going to focus on is the WordPress load testing portion of Kernl. Most WordPress developers never really consider load testing for a number of different reasons. Maybe they think that their site can handle lots of load already or perhaps they don’t know know where to start with load testing. Luckily Kernl can help with both of those problems.

So lets get started! The Kernl blog runs on a $5/month Digital Ocean droplet. It has 1GB of RAM and 1 CPU. It runs your typical LAMP setup (Linux, Apache, MySQL, PHP 7). In general this setup is not known to scale well out of the box and requires quite a bit of tweaking to be performant. For this blog post though we’re only going to add a caching plugin and see how that changes performance.

Getting Started

Before starting any WordPress performance optimizations we need to know what our current WordPress performance characteristics look like. Kernl makes this a 2 step process:

  1.  Create a template – Kernl uses the WP JSON API to fetch your site’s layout. It then creates a load test template that you can tweak based on the data that it fetched. A template simply tells Kernl what routes it should test and also how frequently it should visit a given route.
  2. Start a load test – Once you have a template you can start a load test. The load test reads the template, spins up the load testing infrastructure, and then reports back the status of the load test.

For each load test we’re going to throw traffic at https://blog.kernl.us using the following parameters:

  • 200 users
  • 10 minute duration
  • 2 users per second spawn rate
  • Traffic will be produced from Digital Ocean‘s London data center. Kernl’s blog is hosted in Digital Ocean’s NYC3 (New York City) data center.

The Template

The template that we used for this blog post looks like this:
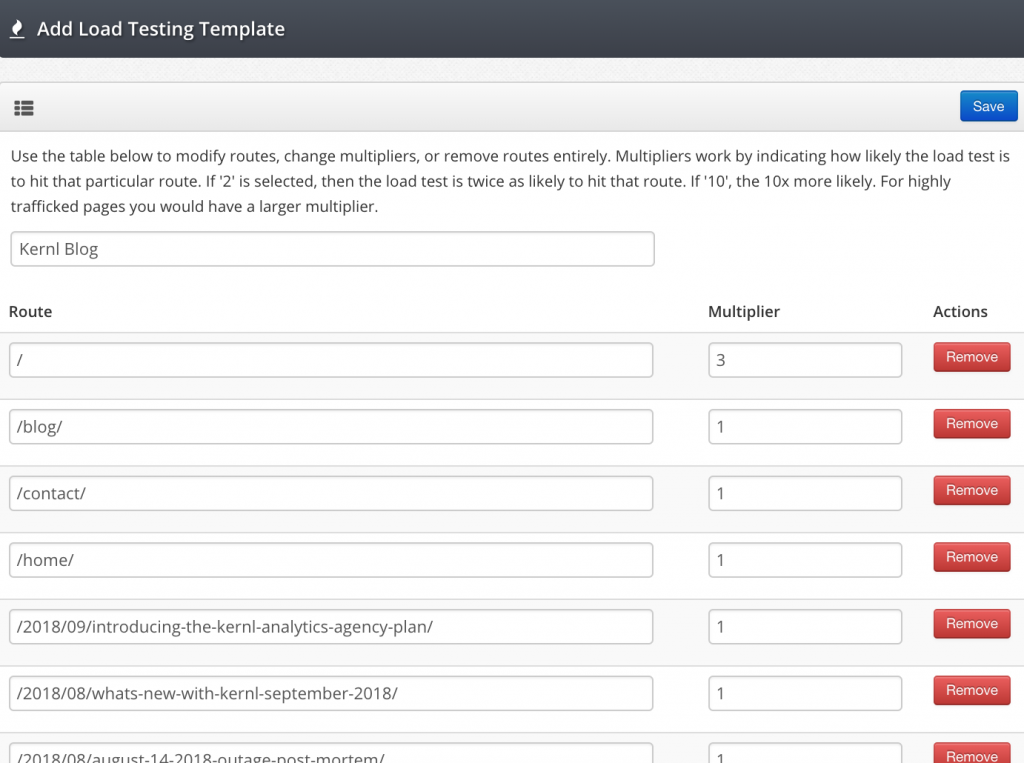
Kernl WordPress Load Test Template

As you can see its pretty straight forward. Each route it accompanied by a multiplier. The multiplier simply tells the load test software how much traffic it should send to a given route relative to the other routes.  So in the example above the “/” route has a 3x multiplier. That means it will receive 3x as much traffic as any of the other 1x routes.

Baseline Load Test
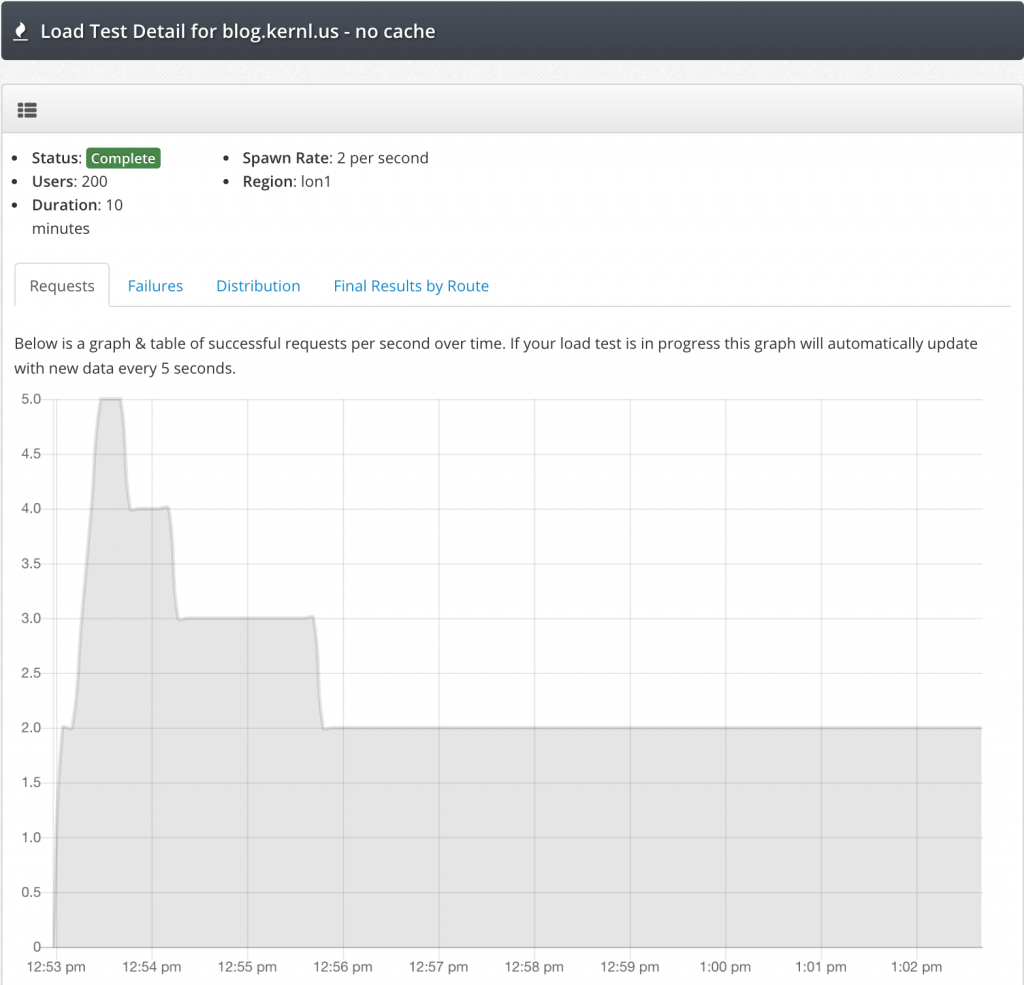
Load Test Baseline - No Cache
Load Test Baseline – No Cache (Requests)

For the baseline load test we can see that within 30 seconds or so we hit our peak throughput. After that some portion of the LAMP stack starts to get overwhelmed and can only handle processing 2 requests per second. 2 requests per second is not great performance.
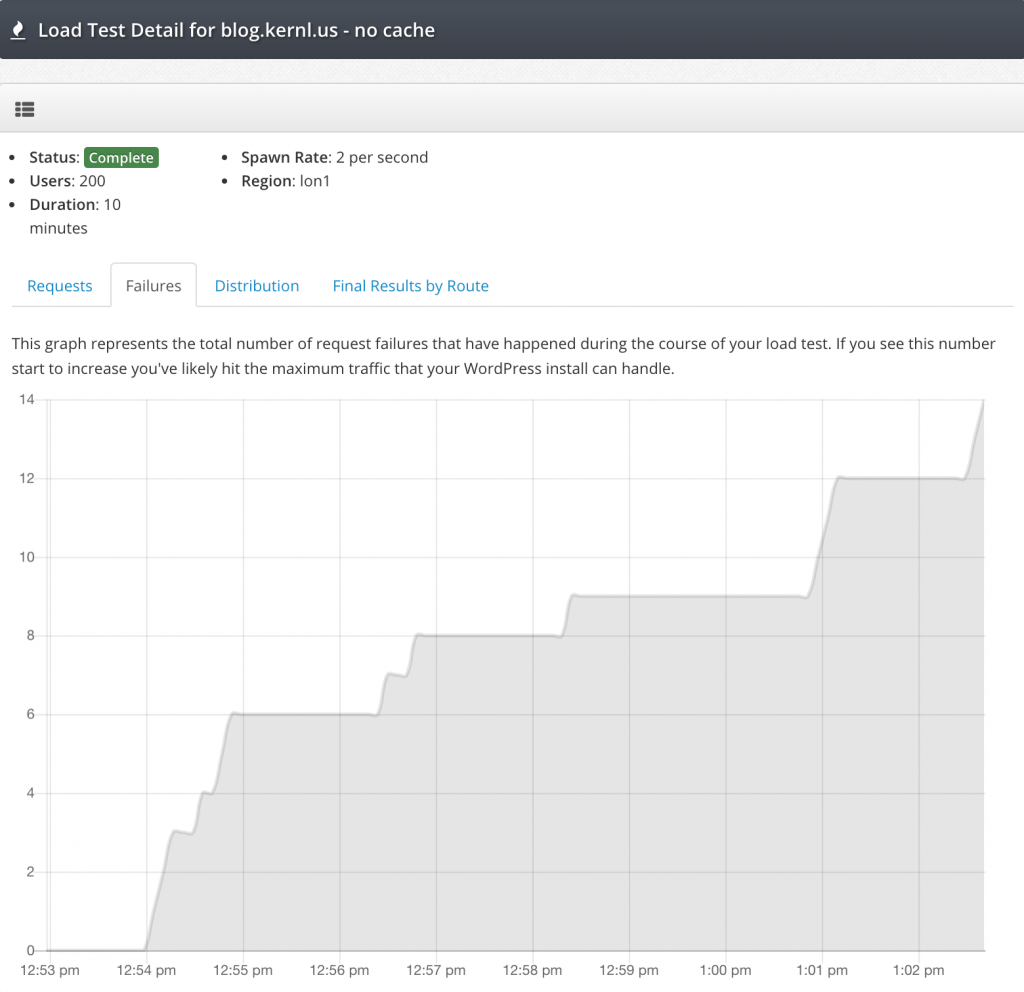
Load Test Baseline - No Cache
Load Test Baseline – No Cache (Failures)

You can see from the failure graph that at right around the time the requests graph slows down to 2 requests/s failures start to occur. If you start to see your failure graph climb like this you’ll know that you’ve reached your maximum capacity.

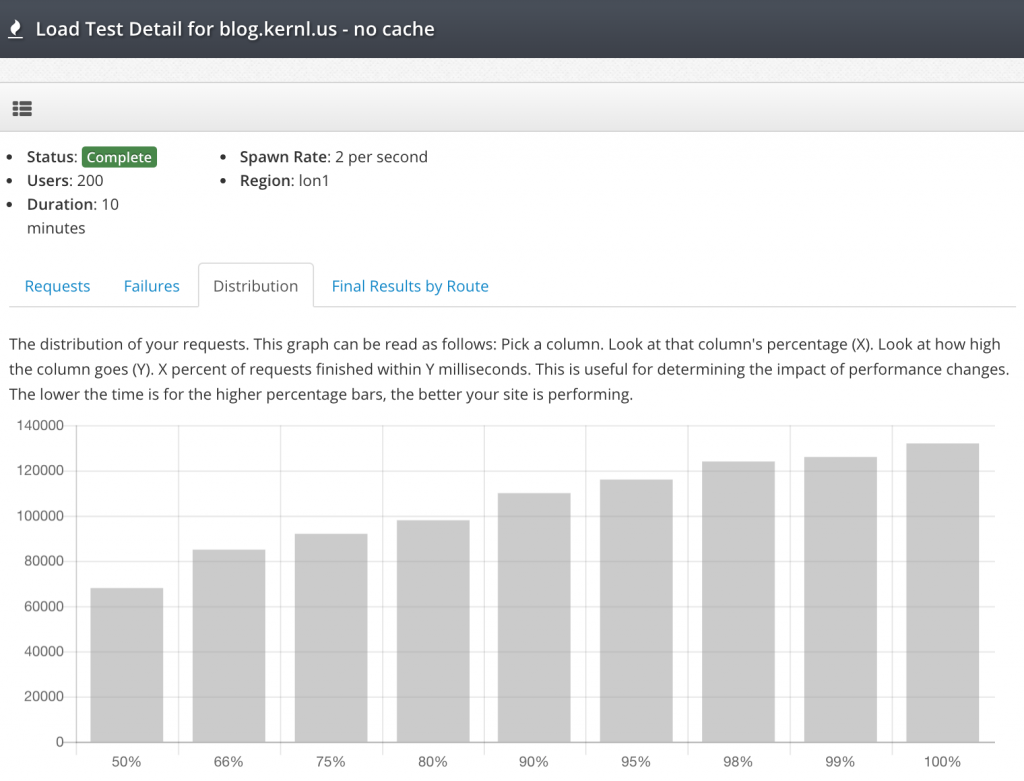
The last and most important part of the baseline load test is the request distribution graph. This graph tells us a lot about how users experience our site when it is under load.
Load Test Baseline - No Cache
Load Test Baseline – No Cache (Distribution)

This graph can be a little confusing to read at first, but isn’t bad at all once you get the hang of it. Read it like this:

  1. Pick a column. We’ll use the “90%” column.
  2. Now read the value of the column. The value is milliseconds.
  3. Combine your knowledge! 90% of requests were completed in 110000 milliseconds (110 seconds).

In the context of this load test this is a really bad user experience. If you look at the 50% column you can see that it’s hovering around 70000 milliseconds (70 seconds). This means that 50% of all traffic in the load test took at least 70 seconds to complete 🙁

Cache Enabled Load Test

Now that the baseline load test is complete we can enable a caching plugin and see how much better it makes our site perform! For this test we’re using the excellent WP Super Cache plugin. To make sure we were comparing performance in an “apples to apples” manner, we’re going to use the exact same Kernl load test configuration as we did for the first test.
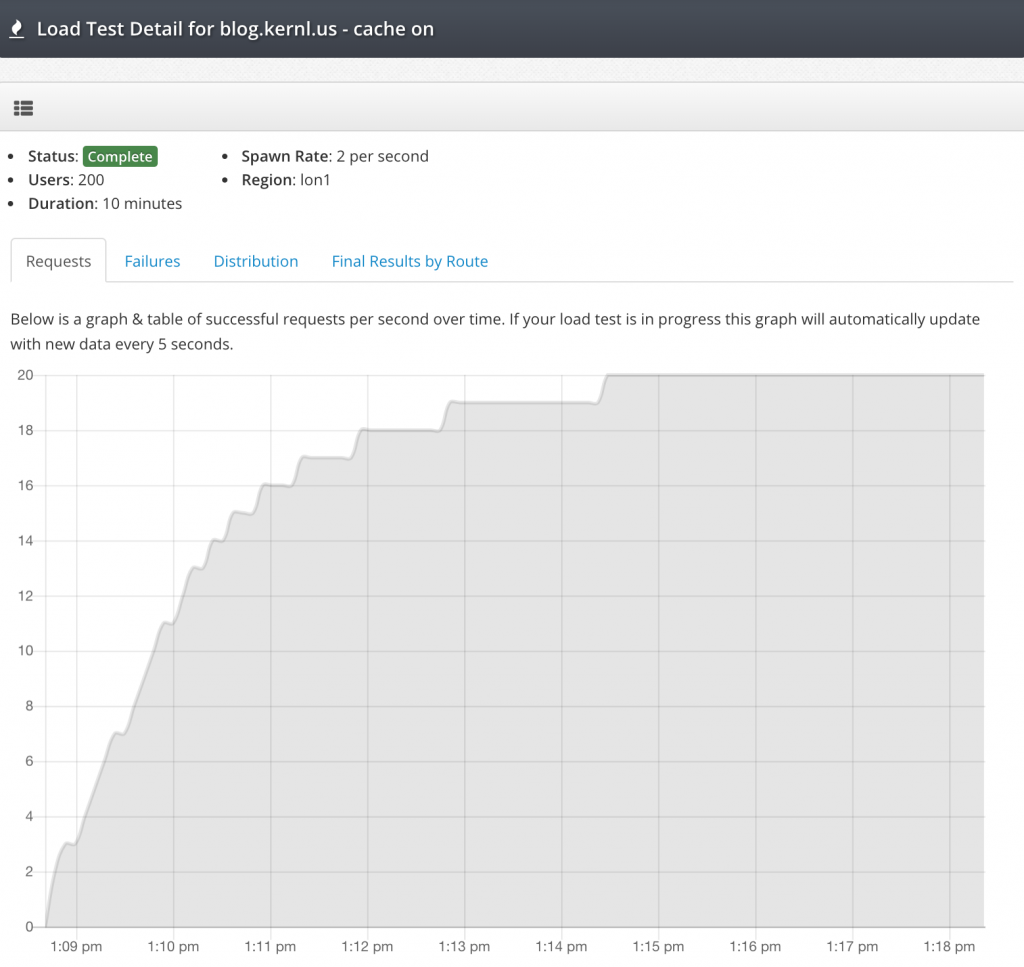
Load Test With Cache Enabled (Requests)

WOW! WP Super Cache made a huge difference in the throughput that the Kernl blog could handle. We maxed out at around 20 requests/s sustained which is a 10x improvement over our baseline sustained requests. And what about request failures?
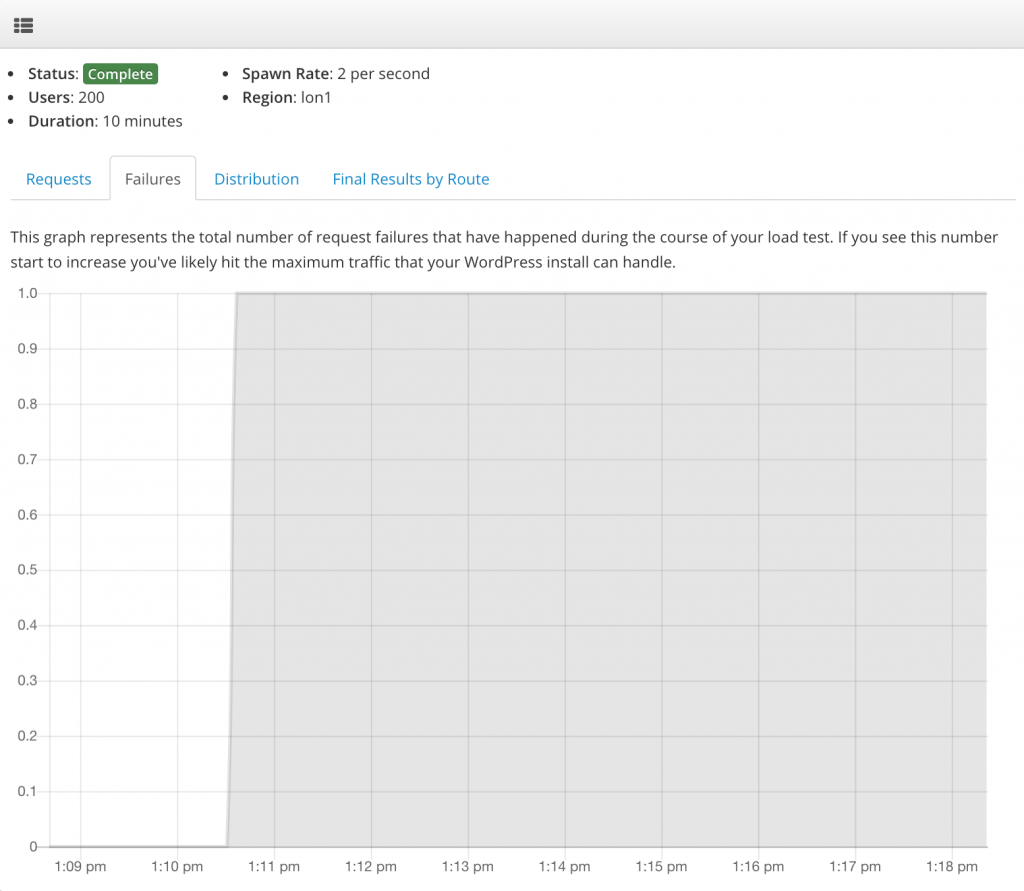
Load Test With Cache Enabled (Failures)

Once again, pretty fantastic results. Through the entire load test only a single request failed. To put that number in to perspective a bit: 12,174 requests were made during the 10 minute load test. Only one failed. Thats a failure rate of 0.008%!

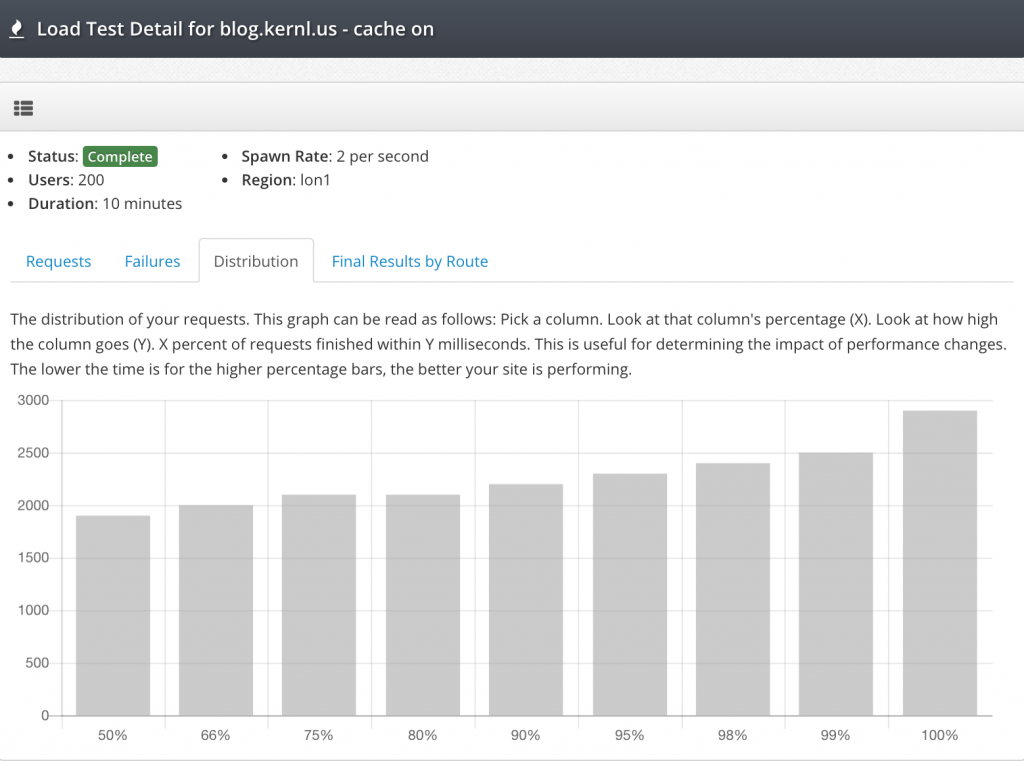
High throughput and low failures are great, but what about the distribution? If the user has to wait for 20 seconds for the page to load the site may as well be down. Lets check out the graph.
Load Test With Cache Enabled (Distribution)

As you can see the distribution with caching enabled tells a very different story than without caching enabled. All requests finished in under 3 seconds and 50% of requests finish in under 2 seconds. Not perfect performance but certainly usable by an end user. Its also worth remembering a few things:

  • This is a $5/month droplet on Digital Ocean.
  • No server tuning was done.
  • No WP Super Cache tuning was done.
  • 20 requests/s is about 1.7 million requests per day.

Next time you need to test performance improvements to your WordPress site, be sure to check out Kernl so that you can be confident in your site’s ability to handle traffic.

Categories
PHP Programming Wordpress Development

Kernl Goes Beta!

Screen Shot 2015-11-22 at 3.02.31 PM

In May of this year I launched the Kernl alpha with hopes that WordPress developers would be interested in it.  And interested they were!  6 months later Kernl has over 65 users from all around the globe and a host of new capabilities to make WordPress plugin and theme development easier.  For instance, since launch we’ve added:

  • Continuous Integration with BitBucket
  • Continuous Integration with GitHub
  • Purchase Code Validation

But new features aren’t all that make a service great.  For people to trust in something it must be reliable, and thats what the beta phase of Kernl is all about: improving reliability.  We’ve reached a point where we feel Kernl provides enough value to the WordPress community to allow us to take some time to refactor code and add a lot more tests.

What does this mean for you?  Not much.  If we do our job right you won’t notice anything.  The beta is still free and everyone will get big “heads up” before we start charging for the service.

Thank you to all of the alpha users who have made this possible.  Without you Kernl wouldn’t be where it is today.


Categories
PHP Programming Wordpress Development

Continuous Deployment of WordPress Plugins Using Kernl

One of the problems I’ve always had with WordPress plugin development is doing it in a modern build pipeline. I really wanted to be able to merge a branch into master, build the zip file, and push the update out to my clients. For the longest time I wasn’t able to do this, so I built Kernl to enable a more modern development approach to WordPress plugin development.

What is Continuous Deployment?

Continuous Deployment (or Continuous Delivery) is a software development strategy where you ship code frequently. Your pipeline is fully automated, so as soon as some event on your version control repository is triggered the deploy process starts. For me, that event is when I merge a pull request into master.

What is Kernl

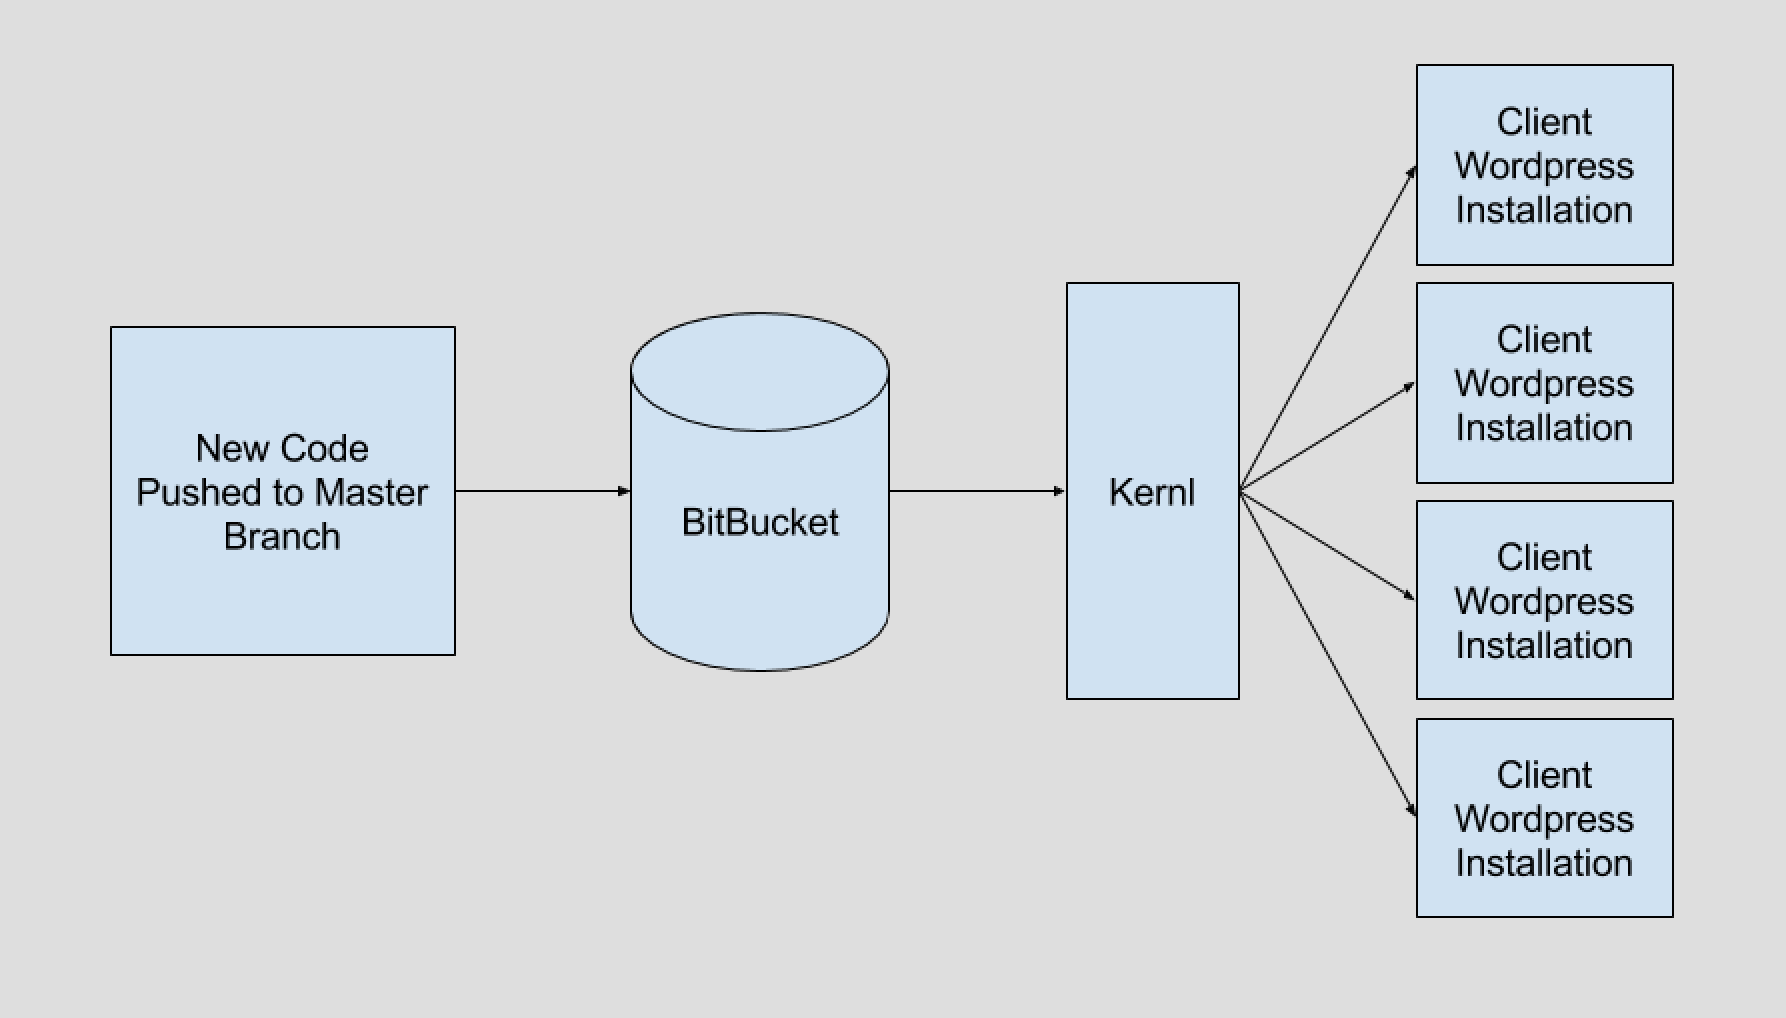
Kernl started out as a way to provide private plugin and theme updates for WordPress, which grew out of my frustration at having to update clients manually every time a small bug was patched. Once I had the updates working manually, the next step was automating everything. This is where “push to build” came in.

How Push To Build Works

Getting Started with Kernl

Getting push-to-build updates on your plugin or theme is pretty easy to set up with Kernl.

  1. Go to https://kernl.us and sign up. After you’ve logged in, click “Continuous Integration”.
  2. Now connect BitBucket.  This will authorize Kernl to access your BitBucket account so that it can enable push-to-build functionality.
  3. The next step is adding a WebHook to BitBucket.  This tells BitBucket to send a message to Kernl after every code push.  To do this, go to your repository settings, scroll down to “Integrations” and click “WebHooks”.  Set the new Webhook to point at https://kernl.us/api/v1/repositories/bitbucket/webhook.
  4. In order for Kernl to know when to build a new version of your plugin, it looks for a file named kernl.version in the root directory of your repository.  Go ahead and add this file now and commit it.  The kernl.version should contain a semantic version that looks like “1.0.1”.
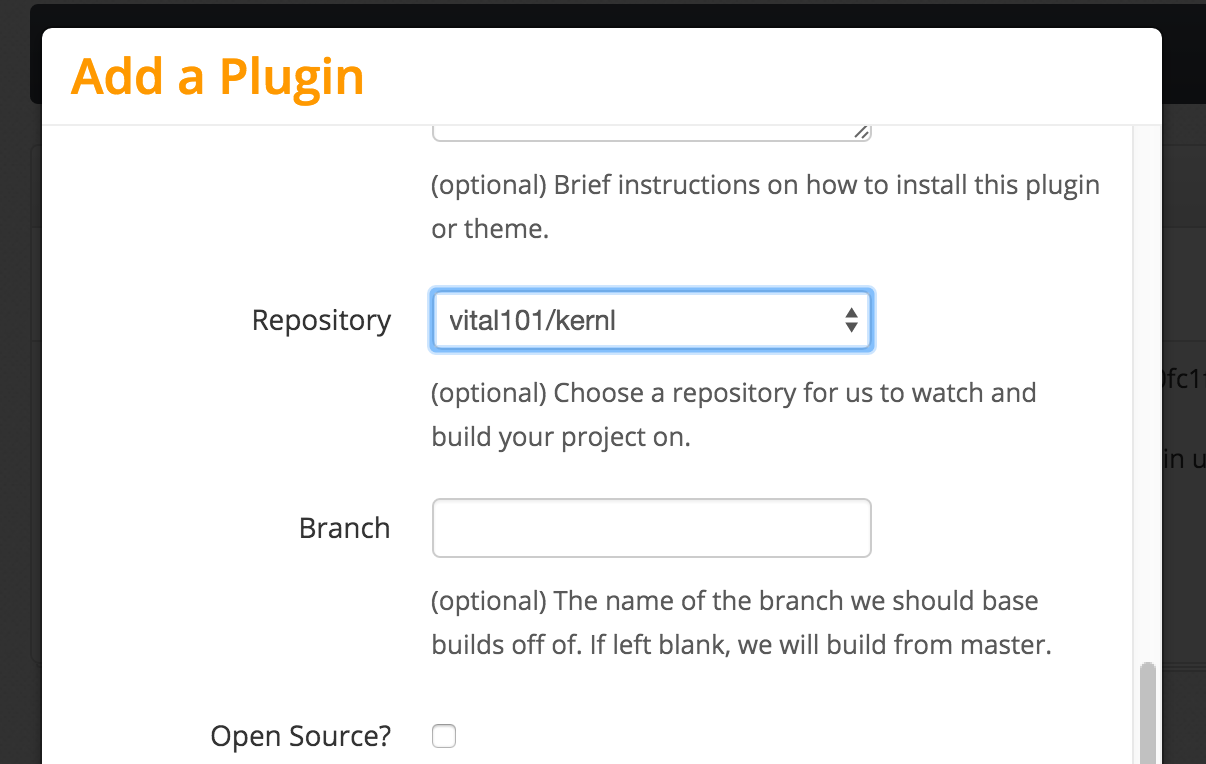
  5. Next, you need to add a plugin.  In Kernl, click “Plugins” on the left and then click “Add Plugin” on the upper-right.  Fill out the name, slug, and description fields, then scroll to the bottom.Kernl Select Repository and Branch You should now be able to select from a list of repositories from your BitBucket account.  You can also choose what branch Kernl should make its builds from.  The default is master, but it can be anything that you want.  Select a repository now and press “Save”.
  6. Next, you need to add the first version to Kernl manually.  Click the “versions” button for the plugin you just created, and then click “Add Version”.  The most important part of the process here is to make sure that the version number in Kernl, kernl.version, and your plugin match.  If you put 1.0.0 in the kernl.version file, make sure that it matches in your plugin’s main file, as well as in Kernl when you upload the first version.  If this still isn’t clear, check out the example plugin on BitBucket.  The kernl.version should contain one line, and on that line will be your version.  Once you have the versions figured out, zip up the plugin as if you were going to distribute it and upload it to Kernl.
  7. Thats it!  Distribute this copy of the plugin to your clients and they’ll receive private updates whenever you upload a new copy or push a new version to your BitBucket repository.

Pushing a New Version

With all the boilerplate setup complete, getting a new update out to your clients is super easy.  Follow the steps below and you’ll be good to go.

  1. Make code changes.  Whatever change you want to push out, go ahead and make it.
  2. Update your plugin’s version.  This is typically in the comment document block in your functions.php file.
  3. Update the kernl.version file.  This should match your functions.php version.
  4. Commit
  5. Push to the branch you specified in your plugin setup on Kernl.  If you didn’t specify a branch, that means you’ll need to push to master.
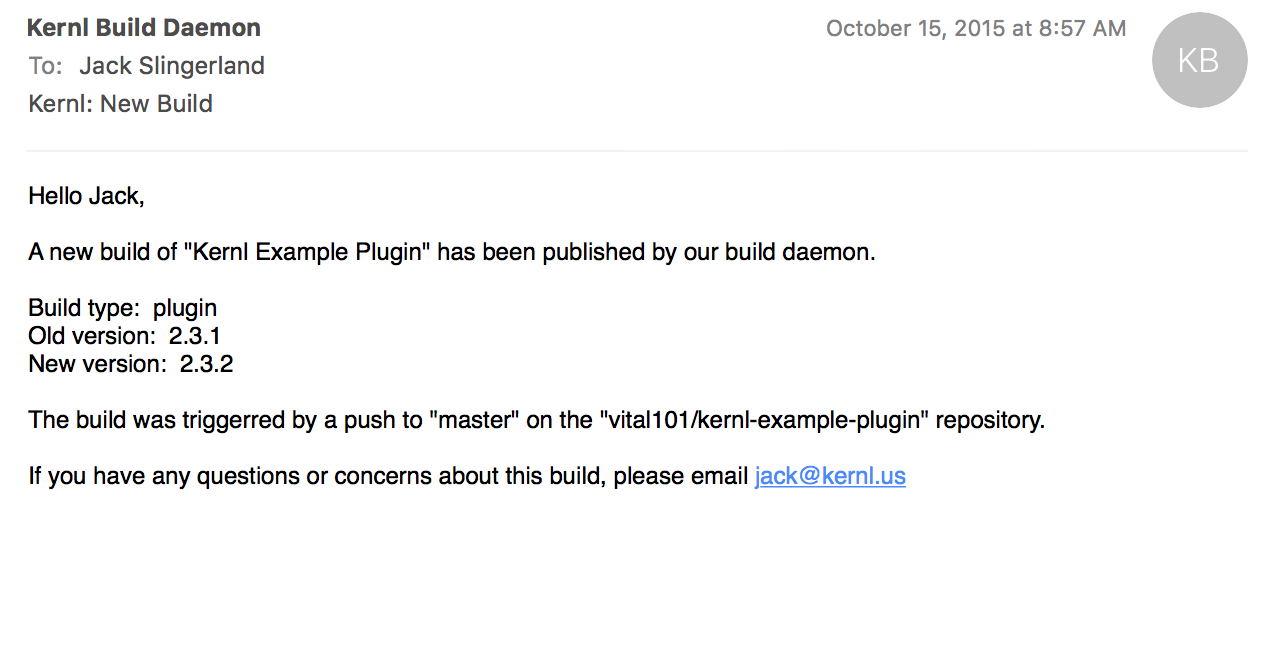
  6. Done.  If all went well, you’ll receive an email from Kernl that lets you know about the new version that was pushed.  You can also verify that the plugin was built by visiting Kernl and looking in the version list for your plugin.

Plugin build email

If you’ve ever wanted to modernize your WordPress development pipeline, I highly suggest you check out Kernl.  Automatic updates triggered by changes in your repository will save you tons of time and get bug fixes and updates out to your clients faster.

Categories
Wordpress Development

A Case for WordPress

I recently made the case for using the open-source WordPress CMS instead of a custom hand-rolled CMS to a manager. What follows is the email (with names and companies changed) that was sent. I thought that it might be useful to other people who are trying to convince their organization to take the leap to WordPress, Drupal, or any other open-source CMS. It’s also worth noting that I’m on very friendly terms with my manager, hence the informality and straight-forwardness. As for the Django references, we develop most of our data-driven sites in Python/Django.

Hey [Manager],

As you already know, I completely loathe the [Custom] CMS. My recent and ongoing experiences with the [Client] website have only served to reinforce these feelings. Unbridled hate rarely serves any useful purpose though, so I’ve decided to see what I can do to make the problem better. My way of doing that is by making a case for using WordPress on large, non-trivial, content driven websites. As of right now WordPress has been lasso’d into small-size websites at [Company], but I believe it is capable of far more then that. What follows is a breakdown of all the feedback, questions, and concerns that were raised while I was gathering information. I’ve provided solutions to almost all of the problems, and its worth noting that some of the problems with WordPress are not unique to WordPress. I also want to make it clear that I’m not trying to get rid of the [Custom] CMS, especially since we have a lot of clients with a lot of money invested in it. I’m simply making a case for using WordPress on large sites instead of the [Custom] CMS.

Content Creation / Management

For as long as I can remember, [Other Manager] always raised a red flag with WordPress because it was inferior in content creation to the CMS. In vanilla form this is arguably true, however WordPress has an amazing community of plugin developers surrounding it who have solved all of these problems.

  • Pods – I have a love-hate relationship with pods. I like that they provide nearly infinite flexibility to the content creator, but that comes with the price of nearly infinite complexity. While I disagree with giving the content-creator that much control over how content is displayed, I can see the usefulness of it. To solve that problem, there are many visual composition plugins available for WordPress. My favorite is Visual Composer (http://vc.wpbakery.com/). Extending Visual Composer (akin to adding “module functions”) is as simple as adding a hook in your WordPress widget.
  • Categories / Taxonomies for Media (assets) – WordPress has brilliant support for categories and custom taxonomies out of the box. Beyond that, it also has support for tags. One thing that doesn’t work out of the box is media categories. Luckily there is a large handful of community plugins that easily solve this problem for us.
  • Media – The media library in WordPress is extremely slick, ajax-y (asynchronous uploads, etc), and easily extendable. Multiple thumbnails and image sizes are generated out of the box. Adding new image sizes is easy too.
  • Videos – WordPress supports videos out of the box. Adding Youtube/Hulu/Vimeo videos is as easy as adding one of the numerous plugins. There are even plugins out there that interface with FFMPEG to get you a nice selection of thumbnails to choose from.
  • Form Builder – The new hotness of [Custom] CMS is Form Builder. WordPress has a large amount of awesome form builders available, and most of them are cheap and come with support. Gravity Forms(http://www.gravityforms.com) is my favorite. Although Ninja forms is looking like a valid alternative.
  • User Management – WordPress comes with excellent user management out of the box. It has 4 default roles (Administrator, Editor, Contributor, Subscriber), but no way to change what those roles are capable of. They generally have pretty sane defaults, but sometimes you want to tweak things. User Role Editor(http://wordpress.org/plugins/user-role-editor) provides an easy way to modify group and user permissions. If you need to add new roles, there are plugins for that as well.
  • Content Deployment – We’ve often struggled with how to deploy new content to sites. Generally you don’t want to create the content on live, because it will need to be hidden. There is a straight ballin’ plugin for WordPress called Ramp(http://crowdfavorite.com/wordpress/ramp/) that solves this problem. Seriously, check this out. It will blow your mind.

General Notes

I have a handful of notes that don’t fit well into Content Creation / Management or Development, so here we go.

  • Update Cycle – WordPress has a release cycle (http://en.wikipedia.org/wiki/WordPress#Releases). It has feature releases, bug releases, and HOLY HELL THATS A BIG RELEASE releases. WordPress updates are vetted by an insanely large community of professional developers who catch bugs/regressions and fix them before release.
  • CMS “Upgrades” – Somehow its become normal and accepted at [Company] that a CMS Upgrade costs north of $25,000, takes a month, and almost always ends up braking some part of the site that wasn’t broken before. WordPress upgrades take 10 seconds, don’t break changes, and have deprecation warnings just in case you’re using a method/hook that won’t be supported in a future release. We might make some money off of [Custom] CMS upgrades, but my experience has been that they end up costing more time/effort/good will then they are worth. Having a one-click upgrade option allows us to keep our sites secure, up to date, and gets us back to making things awesome.
  • Community – WordPress.org has 1,998 base themes that can be used and extended via theme inheritance. It also has over 26,000 plugins that extend WordPress’ functionality. This doesn’t account for the numerous premium plugins that are available throughout the internet. Help is always just a Google search away. If that doesn’t work, Stack Overflow most certainly will. Having the backing of a community while you are developing is invaluable. Did I mention the WordPress IRC channel?
  • Documentation – One of the most frustrating things about the [Custom] CMS isn’t the lack of code documentation, but the lack of code usage documentation. WordPress has a ludicrous amount of documentation on pretty much anything you can think of. It stays up to date with best practices and is updated for every release. If the WordPress.org documentation isn’t good enough, the source code is very well documented. If the source doesn’t suit your fancy, there is probably a blogger that wrote about your problem.
  • Hiring – Hiring is hard in this economic climate. Selling a PHP developer to come work for [Company] with [Custom] CMS is even harder. If the person is a WordPress expert, all of that domain knowledge stagnates and becomes useless here. It also makes the on-boarding process take 2-4 months. And even then, they still aren’t all that useful in the [Custom] CMS. Having WordPress as a core tool allows us to hire people who are already experts. The on-boarding becomes a few weeks, and everyone is happy. It also makes it a lot less fatal if we lose a developer, because it’s possible to hire another one that already has all the domain knowledge.
  • Focus – Using WordPress is similar to using Django in that it gets out of your way at lets you focus on what’s important: making awesome stuff. You don’t have to piddle around with random regressions, bugs, or odds and ends. Those are already worked out for you. You get to focus on making custom functionality the best you can. Not having to mess around with bugs and regressions allows you to focus on quality instead of just “getting it done”.
  • Security – WordPress can be a security nightmare. With an install footprint of over 60 million websites (as of 2012), everybody is trying to hack it. Luckily most plugin authors and the WordPress security team are always right on top of it. There is a plugin called WP Security Scan(http://wordpress.org/plugins/wp-security-scan/) that takes care of making sure all the directories have the proper permissions, and in general gives good advice to harden your WordPress installation. Taking 10 minutes a week to update all your WordPress sites is also the best way to prevent security issues.
  • Who? – WordPress.com has a nice list of notable WordPress users (http://en.wordpress.com/notable-users/). The list includes, CNN, NYTimes, Forbes, Reuters, Sony, Jay-Z, Rolling Stones, GM, and others.
  • Cost – We keep upgrading the CMS. It needs it, but it cost lots of money. WordPress and the open-source community keep things up-to-date for us, so the cost is nil.

Development

In the past, a lot of misinformation has been spread about WordPress and how developing with it is awful. A lot of that comes from lack of knowledge, so I thought I’d address a lot of the pain points that people have experienced.

  • Plugin Creation – [Other developer] brought up the point that WordPress plugins are created in a procedural fashion, and are therefore a huge PITA to work with. As it turns out, the correct way to make WordPress plugins is via OOP. This NetTuts tutorial covers most of the basics (http://net.tutsplus.com/tutorials/wordpress/create-wordpress-plugins-with-oop-techniques/).
  • Content Deployment – WordPress hard-codes URLs into the database content. This is obviously a bad idea for many reasons. To rectify, if you move content from one server to another, you just need to execute 3 sql queries as part of your deployment. Usage of Ramp (mentioned above) solves this issue for 99% of use cases.
  • Versioning – WordPress shouldn’t be versioned. Any plugin you install from WordPress.org should not be versioned. If you are making a custom theme, that should get it’s own repository (hey, look at Stash and all it’s repos we can create). If you are making a custom plugin, that should also get it’s own repo. This promotes re-usability and good coding practices. Deployment of theme/plugin updates is as easy as checking out the latest version or git-pulling.
  • Deployment – Initial deployment of a WordPress site is just like moving a staging site to the live server for the [Custom] CMS. After that, deploying code updates to custom plugins and themes is just a git pull/checkout of a tag. This could easily be streamlined with the use of Fabric or Capistrano.
  • Modules / Custom Post Types – The [Custom] CMS has a pretty nice way of creating basic custom content via modules and the scaffolding. WordPress has custom post types, and several different plugins for creating them on the fly. My current favorite is Advanced Custom Fields (http://www.advancedcustomfields.com/)
  • Theme Inheritance – As mentioned before, WordPress has LOTS of themes. Nearly any one of them can be used as a base theme, saving front-enders a ton of time getting base CSS and templates set up.
  • ORM – WordPress has a weak ORM. Hopefully you can use WordPress’ features enough that you can write minimal SQL. On the bright side, you’ll have some nicely optimized queries 😉 This is also why you should use the right tool for the job. If you have to interact with the database so much that you need an ORM, you should probably be using a framework.
  • Testing – WordPress core is fully unit and integration tested. The majority of premium plugins and popular plugins are tested as well. Plugins can easily be tested using PHPUnit, and their interfaces can be tested using Behat.
  • Developing as a Team – WIth a sane Git strategy (custom plugins and themes versioned only) developing as a team is a non-issue. In the past, having the whole project under version control caused serious issues when there was more then one developer.
  • Database Migrations – Just as with [Custom] CMS, if you have complex migration that destroys data you’ll need to handle the migration yourself. http://codex.wordpress.org/Creating_Tables_with_Plugins has more info. If the migration isn’t destructive, you can use the wp_delta method to handle it for you.
  • Environment Abstraction – WordPress does a great job of not caring about what version of PHP you’re on. So long as you are PHP >= 5.2.4 and MySQL >= 5.0.0, you’re all set

I know we’ve talked in the past about vetting a Django CMS, but I think that using WordPress is the best choice. We already have people who know it, the front-enders know how to develop for it, the community is massive, and learning it is easy. I look forward to talking with you about this.

Categories
PHP Programming Wordpress Development

Caching WordPress Data with the Transients API

If you’re a plugin or theme developer, there may come a time when you need to execute a long running operation. It doesn’t need to be anything complicated, but something as simple as fetching a Twitter feed can take a significant amount of time. When you come across these types of situations, it’s handy to be able to store the data on your own server and then fetch a new copy of it every X hours. This is called caching, and WordPress convieniently comes packages with an excellent caching API called Transients .
Wordpress Transients API

The Transients API is surprisingly simple to use. In fact, it’s very much like using set_option and get_option except with an expiration time. If you aren’t familiar with caching at all, here’s the general workflow:

  1. If the data exists in the cache and isn’t expired, get it.
  2. If the data doesn’t exist in the cache or is expired, perform the necessary actions to get the data.
  3. Store the data in the cache if it doesn’t already exist or is expired.
  4. Continue from here using data.

When attempting to use the Transients API for caching, there are three functions that you need to be aware of: set_transient, get_transient, and delete_transient.

  • set_transient($identifier, $data, $expiration_in_minutes): This function stores your data into the database. The identifier is a string that uniquely identifies your data. Your data can be any sort of complex object, so long as it is serializable. The expiration is how long your want your data to be valid (ex: 12 hours would be 60*60*12).
  • get_transient($identifier): This retrieves your data. If the data doesn’t exist or the expiration time has passed, false is returned. Otherwise, the same data you stored will be returned.
  • delete_transient($identifier): This will delete your data before it’s expiration time. This is handy if you are storing post-dependent data because you can hook it into the save action so that every time you save a post, your cached data is cleared.

Now that we’ve covered the basics, how about a quick example?

if (false === ( $my_data = get_transient('super_expensive_operation_data') ) ) {
     $my_data = do_stuff();
     set_transient('super_expensive_operation_data', $my_data, 60*60*12);
}
 
echo $my_data;
 
function do_stuff() {
     $x = 0;
     for($i = 0; $i != 999999999; $i++) {
          $x = $x * $i;
     }
     return $x;
}

The example is pretty straight forward. We first check to see if there is a cached copy of the data, if not, we fetch the data from the “do_stuff” function, and store it in the database. Simple, right?

One of the benefits of using the Transients API (aside from speeding your site up) is that plugins like WP Super Cache or WP Total Cache will auto-magically cache your data into memcached if you have it set up. For you, this means an even faster site! If you have any questions about caching techniques or the Transients API, leave a comment and I’d be happy to help.

Categories
PHP Programming Wordpress Development

WordPress Development as a Team

At my day job I’m really the only person that knows how to write WordPress plugins, so when I write one it’s usually sand-boxed on my machine where nobody can touch it. However, in a side endeavor I’m part of we have a team of 3 people developing on one plugin. As I’m the most experienced plugin developer amongst our team, I was tasked with coming up with a development style and plugin architecture that would work for us.

Development Style

Everyone will be running a local copy of WordPress and making their changes to the plugin locally. The plugin itself will be under version control using Git, and developers will push/pull changes from either a self-hosted Git server or Git Hub. Database schema will be tracked in a file called schema.sql. When someone makes a change to the schema, it goes into that file at the bottom with a comment about why the schema changed. We’ll being jQuery as our Javascript framework of choice, and we’ll be writing all of our Javascript in CoffeeScript (see my previous entries).

Plugin Architecture

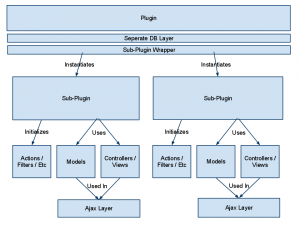
The more difficult aspect of developing this plugin as a team is the sheer size of the plugin. Realistically this could probably be split into about 6 different plugins by functionality, but we want to keep everything together in one tidy package. To illustrate the architecture, I made a quick drawing.

The first layer of the plugin is essentially a wrapper. It initializes the ORM that we are using to access the database (we are using a separate database for this plugin’s data), and includes the wrapper class. The wrapper class is where developers drop their sub-plugin include file and instantiate it’s main object. For instance, for each sub plugin there will probably be two classes instantiated in the wrapper. One being admin related functionality, and the other being for front-end display functionality. My thinking with this architecture was that we could all work on separate sub-plugins without crossing paths too frequently. This also allows us to separate the different functionality areas of the plugin in a logical manner. The other benefit to architecting the plugin like this is that it will be very easy to port to a different architecture in the future. I’m well aware that WordPress probably isn’t the best tool for the job, but it is the best tool for the team with the deadline that we have.

Thoughts

While thinking about WordPress Plugin Architecture, I cruised the source code of a lot of plugins and it seems that everyone goes about it in a different way. If you’ve ever developed a large-scale plugin with a team, how did you go about doing it? Did you run in to any problems that you didn’t foresee at the beginning of the process?

Categories
PHP Programming Wordpress Development

PHP Alternative Syntax

Did you know that PHP has an alternative syntax structure?  Up until about two years ago, I didn’t either.  It wasn’t until I started poking around in the WordPress core that I saw it.  Intrigued, I popped over to PHP.net and read an entry on it.  In a nutshell, the alternative syntax can go far in making your PHP code much easier to read.  The control structures if, while, for, foreach, and switch can all be expressed in the alternative syntax form.  In general, I prefer to use the alternative syntax when mixing PHP in with HTML, and the standard syntax when writing pure PHP.

If Example

// This....
if($myString == "foo"):
    echo "bar";
else:
    echo "no-foo-bar";
endif;
 
//...is equal to this.
if($myString == "food") {
    echo "bar";
} else {
    echo "no-foo-bar";
}

ForEach Example

$names = array("bob", "tom", "john");
 
//This....
foreach($names as $name):
    echo "Your name is: {$name}";
endforeach;
 
//...is equal to this.
foreach($names as $name) {
    echo "Your name is: {$name}";
}

Resources

If you’re looking for more resources on PHP’s alternative syntax, check out the documentation here, or the WordPress source code for examples.

Categories
Wordpress Development

WordPress Data Validation Functions

As a developer of WordPress plugins or themes, you need to be aware of and use data validation.  What is data validation you ask?  It’s when you make sure that the data you fetched (POST, GET, database call, external source) is the type of data that you expected.  For instance, let’s say you have a user enter a number between 1-10.  They enter the letter ‘A’.  The process of determining whether the input is an integer between 1-10 is data validation.

So what kind of data functionality does WordPress (and PHP in general) offer?  Lots!

  • intval($value) – This will cast any value as an integer.  Particularly useful for casting floating point numbers.
  • absint($value) – Returns the absolute value of a number.  For those of you with no math background, that means it will return a whole number given any floating point number.  (Ex.  absint(3.3) = 3)
  • wp_kses()This function will strip a string of any HTML tags that are not allowed.  It also makes sure that any HTML entities that are in the string are normal.
  • esc_html($string) – This will escape any HTML characters in a string.  This is handy for storing blogs of HTML in a database.
  • esc_js($string) – Escapes any javascript that it is given.  Mostly this means it escapes single and double quotes.
  • urlencode($string) – This function encodes any string you put in to it as a url-safe value.
  • $wpdb->prepare() – This function is used prepare SQL statements for database inserts.  I wrote an article about using the WPDB class with your plugin that you should check out.
  • validate_file(..) – This  is useful to validate that a file exists, and also to help prevent directory traversal attacks.
  • wp_redirect() – This is the safest was to do redirects.  Instead of using header(Location: ..), this will only allow redirects to white listed domains instead domains.
  • balanceTags($string) – If you’re allowing your users to comment on something with html tags, this function will try to make sure that the tags are balanced.
  • is_email($email) – Validates whether an email address is valid or not.

As you can see, WordPress (and PHP) include a nice array of data validation functions.  Make sure you use them as often as possible, because a large number of web based attacks could be prevented if people validated data.