Categories
Wordpress Development

WordPress User Roles

By default, WordPress 3 ships with 6 (5 in your aren’t using MU features) roles that can be assigned to individual users.  Unless you’re browsing the codex or have been using WordPress for ages, it’s sometimes hard to understand the differences between user roles.  Many bloggers run their site on their own, so roles really don’t matter all that much.  However, for those who run sites with multiple contributing users, roles help keep the order.

The 6 default roles are Super Admin, Administrator, Editor, Author, Contributor, and Subscriber.

  • Super Admin – The Super Admin is a role only available in WordPress 3 when the multi-user (multi-site) features are turned on.  This role allows the super admin to administrate the entire network of sites.
  • Administrator – This role allows the user to access all of the administration features of a site, including themes, plugins, and comment moderation.
  • Editor – An editor can manage all pages, posts, and comments.  They don’t have to own them either, they can be authored by other users.
  • Author – An author is a user that you trust to publish their own posts.
  • Contributor – This is a user who is allowed to write posts, but they have to be approved by an editor before they get published.  This is handy if you have a guest that you would like to write an article, but want to review the content first.
  • Subscriber – This user is only allowed to edit and maintain their profile on your site.

If these roles aren’t enough to suit your needs (perhaps you need finer-grain permissions), there are plugins that exist in the WordPress Plugin Repository that can help.

Categories
Wordpress Development

How to Enable WordPress 3 Custom Menus

Prior to WordPress 3, if you wanted custom menus you had to code them yourself.  This generally involved editing your theme’s header.php file, knowledge of HTML, CSS, PHP, and probably SQL too.  Unsuprisingly, easy custom menus was a highly requested feature for WordPress 3 and it was delivered.

Unfortunately, most themes don’t have support for custom menus yet.  Wordpress makes it easy to add them as widgets, but if you want real menus, they need to be enabled in your theme.

Step 1:  Enable Custom Menus

The first thing that you need to do in order to get custom menus working in WordPress 3 is enable them.  To do that, open up your theme’s functions.php file, and drop in the following code.

1
2
3
4
function register_custom_menu() {
     register_nav_menu('custom_menu', __('Custom Menu'));
}
add_action('init', 'register_custom_menu');

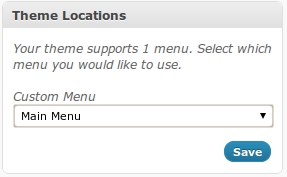
Once you have done that, go to Appearance -> Menus and you should see something like this.

Wordpress Custom Menu Theme Locations

Step 2:  Add the Menu to Your Theme

Assuming that you’ve created a custom menu and want to display it, you’ll need to add the display function to your theme.  In most cases, you’ll need to open up the header.php file, and the area that looks like a menu.  This changes for every theme, but it should be fairly obvious.  Once you find it, insert the following code.

1
<?php wp_nav_menu(array('menu' => 'custom_menu')); ?>

After that, you’re menu should display in your navigation bar.  Good luck!

Categories
Wordpress Development

How to Exclude WordPress Plugins From Updates

More often then we would like to admit, we are unwilling or unable to submit our WordPress plugins back to the repository for everyone to use.  But how do you exclude your plugin from WordPress updates?  As usual, the answer is with filters.  Check out the code below to see how.

1
2
3
4
5
6
7
8
9
10
11
function exclude_my_plugin( $r, $url ) {
      if ( 0 !== strpos( $url, 'http://api.wordpress.org/plugins/update-check' ) )
          return $r;
      $plugins = unserialize( $r['body']['plugins'] );
      unset( $plugins->plugins[ plugin_basename( __FILE__ ) ] );
      unset( $plugins->active[ array_search( plugin_basename( __FILE__ ), $plugins->active ) ] );
      $r['body']['plugins'] = serialize( $plugins );
      return $r;
}
 
add_filter( 'http_request_args', 'exclude_my_plugin', 5, 2);

Attribute:  This code is originally from a lead WordPress Developer, Mark Jaquith (thanks Mark!)

But how does this exclude your plugin from the update?  First, it takes the HTTP Request args and unserializes the [‘body’][‘plugins’] part of it.  From there, it’s as simple as unsetting your plugin from the array, then re-serializing the request args.  Also the first part checks to see if this is actually and update check.  If it’s not, you exit the function.

Categories
Wordpress Development

How to Enable Custom Backgrounds in WordPress 3

One of the smaller (yet still welcome) features that snuck it’s way into WordPress 3 was custom backgrounds.  In most cases, this allows you to change the background picture and color of your blog (Note:  This may not work if your theme has a background already).  This is great, because you don’t have to know CSS to make it work.  Really, all you need to do is add the following code to your theme’s functions.php file.

1
add_custom_background();

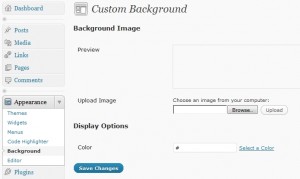
After that, under the Appearance menu you should have a “Background” option link.  When clicked, it will look like this.

Enable WordPress 3 Custom Backgrounds

From there, upload your custom background and bask in your own glory!

Categories
Other

Google Keyword Tool

It’s not easy knowing what to write about.  When you run a niche site like this, it’s even harder.  One of the tools I rely heavily on to tell whether I should invest the time writing a post or not is the Google Keyword Tool.  The Google Keyword Tool allows you enter key words, and then it tells you the monthly search volume on those words, the competition, and even monthly local searches.  But it doesn’t stop there, it gives you other keywords that may be relevant to you and displays statistics on those as well.   By far though, the most important feature is the competition rating.  It lets you see if you should even bother trying to go after that niche or not.

Google Keyword Tool

Categories
Wordpress Development

WordPress Lightbox

The default behavior in WordPress when an image is clicked is to open another page of your blog.  Sometimes though, you want a more elegant solution.  One of the more trendy ways to open an image of the past few years has been using something called a lightbox.  A lightbox dims the screen via a modal window, and then displays your image.  If you would like something of this nature to be your default image behavior, check out Lightbox 2 (http://wordpress.org/extend/plugins/lightbox-2/).  Don’t just take my word for it though, try out this WordPress lightbox by clicking the image below.

Wordpress Lightbox Example
Test Lightbox Image
Categories
Wordpress Development

How To Create and Code WordPress Widgets

Note:  The full source code for this plugin can be found here.

Every time you go to WordPress blog and see items in the sidebar, it’s likely that they are widgets.  There are thousands of them for download on WordPress.org, but what if you want to create your own?  How would you code it? That’s what I will answer in this quick How-To.

Step 1:  Create The Plugin

We’re going to start out by creating a simple plugin.  It’s only purpose is to initialize our widget.

1
2
3
4
5
6
7
8
9
10
11
12
13
14
15
16
<?php
/*
Plugin Name: Sweet Math Widget
Plugin URI: https://re-cycledair.com
Description: A math widget that takes the post id and multiplies it by 5.
Author: Jack Slingerland
Version: 0.1
Author URI: https://re-cycledair.com
*/
 
function sweetMathWidget() {
     global $post;
     echo "{$post->ID} x 5 = ";
     echo $post->ID*5;
}
?>

Step 2:  Add & Register the Widget

The nex step is the add the widget to WordPress and then register it.  Add this code to the plugin that you already have going.

1
2
3
4
function sweetMathWidgetInit() {
     register_sidebar_widget(__('Sweet Math Widget'), 'sweetMathWidget');
}
add_action("plugins_loaded", "sweetMathWidgetInit");

Step 3:  Add Theme Compatibility

You want everyone you use your plugin right?  Well if it isn’t compatible with any themes nobody is going to use it.  To add theme compatibility we need to modify the first function we wrote to look like this.

1
2
3
4
5
6
7
8
9
10
function sweetMathWidget($args) {
     global $post;
     extract($args);
     echo $before_widget;
     echo $before_title;
     echo "<h2> Sweet Math Widget </h2>";
     echo $after_title;
     echo "{$post->ID} x 5 = ";echo $post->ID*5;
     echo $after_widget;
}

Step 4:  Upload & Add The Widget

Now that you’re done, save the file as sweet_math_widget.php and then zip the file using WinZip (or a similar tool).  Upload the plugin to your WordPress install and then activate.  If everything goes well, you’ll have a new widget in you Appearance -> Widgets area.

How to Create / Code A WordPress Widget

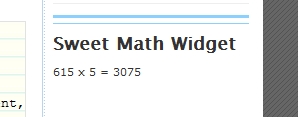
Drag “Sweet Math Widget into your sidebar and you’re done.  Go to a post on your blog and you should see something like this.

How to Create / Code a WordPress Widget Final Product

You can download the full source code for this widget here.

Categories
Wordpress Development

How To Enable Post Thumbnails In WordPress

Since version 2.9 of WordPress, it’s been possible to have post thumbnails.  Once these thumbnails have been set, they can be used throughout your site whenever your post is called.  Using post thumbnails is easy, and so is enabling them.  It’s only a few steps, so let’s get started.

Enable

The first step to using post thumbnails in WordPress is to enable them.  To do that, all you need to do is put the following in you themes functions.php file.

1
add_theme_support('post-thumbnails');

Once you’ve added this code, you should see a box underneath “Post Tags” in the Edit Post screen.

Post Thumbnail Box

Set the Post Thumbnail

Now that you have the featured image box in you WordPress Edit Post area, you need to click the “Set featured image” link.  Once you do that, you’ll be greeted with the usual WordPress image upload screen.  Select the image you would like to upload, and then let WordPress do it’s image crunching magic.  Now comes the most important part, you need need to click “Use as featured image”.

Use Post Thumbnail
Once you’ve done that, you’ll get a thumbnail version of the photo you just uploaded in the lower-right hand corner of you Edit Posts screen.

Post Thumbnail Set

Using Post Thumbnails in Your Theme

Obviously post thumbnails aren’t much use to you if nobody can see them.  To see them in your theme, you need to call the following function while inside The Loop.

1
<? the_post_thumbnail(); ?>

That’s it!  It’s now easier than ever you have each one of your posts have a thumbnail.  If you have any questions, please leave them in the comments.