Categories
Wordpress Development

WordPress Dashboard Widget Tutorial

Historically, I’ve never been a huge fan of the WordPress Dashboard.  Not because I don’t think it’s a good idea, but mostly because I don’t use it.  Before I turned this into a WordPress / PHP development blog, I posted infrequently and never saw the point of having a dashboard view.  Now that I have traffic, and hope to get more (*crosses fingers*), I’m spending a lot of time there.  Since I’m spending so much time on the dashboard, I thought I might make a bit more useful with a widget.

Note:  The full (working) version of this Dashboard Widget is available here.

Reddit RSS WordPress Dashboard Widget

Step 1:  Decide What You’re Going To Create

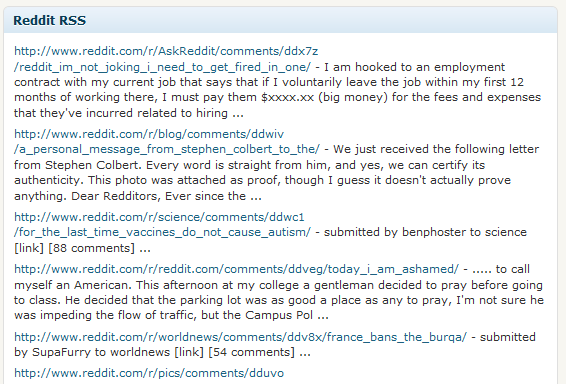
The first step in this tutorial is deciding what to create.  I’m personally a HUGE fan of Reddit, but often enough I’m unable to read it because I’m busy managing this blog.  So, why not bring Reddit to me?  This tutorial will show you every step of how to create a WordPress Dashboard Widget that displays Reddit’s RSS feed.

Step 2:  Write The Display Code

As most readers here know, WordPress is well on it’s way to being a full-fledged CMS.  As with any good CMS, extending any part should be easy.  It’s no different with the WordPress Dashboard.  Using the wp_add_dashboard_widget function, you can hook into the WordPress Dashboard and drop in your own widgets.  But first, we must write the widget itself.

1
2
3
4
5
6
7
8
9
10
11
12
13
14
15
16
17
18
19
20
21
22
23
24
25
26
27
28
29
30
31
32
33
34
35
36
37
38
39
40
41
42
function reddit_rss_dashboard_widget_function() {
     $rss = fetch_feed( "http://www.reddit.com/.rss" );
 
     if ( is_wp_error($rss) ) {
          if ( is_admin() || current_user_can('manage_options') ) {
               echo '<p>';
               printf(__('<strong>RSS Error</strong>: %s'), $rss->get_error_message());
               echo '</p>';
          }
     return;
}
 
if ( !$rss->get_item_quantity() ) {
     echo '<p>Apparently, there is nothing happening on Reddit!</p>';
     $rss->__destruct();
     unset($rss);
     return;
}
 
echo "<ul>\n";
 
if ( !isset($items) )
     $items = 10;
 
     foreach ( $rss->get_items(0, $items) as $item ) {
          $publisher = '';
          $site_link = '';
          $link = '';
          $content = '';
          $date = '';
          $link = esc_url( strip_tags( $item->get_link() ) );
 
          $content = $item->get_content();
          $content = wp_html_excerpt($content, 250) . ' ...';
 
         echo "<li><a href='$link'>$link</a> - $content</li>\n";
}
 
echo "</ul>\n";
$rss->__destruct();
unset($rss);
}

Most of the above code is pretty easy to follow.  But here’s  breakdown of what happens if you’re a bit confused.

  1. We use the fetch_feed function to get the RSS feed from the supplied URL.  In this case, it’s Reddit’s RSS feed.
  2. Check to see if there have been any errors (is_wp_error).
  3. Check to see if there was anything on the feed. ($rss->get_item_quantity).
  4. Loop through the fee printing out list items.

Step 3:  Add The Widget To The Dashboard

In this step, you need to call wp_add_dashboard_widget from a function.

1
2
3
function reddit_rss_add_dashboard_widget() {
     wp_add_dashboard_widget('reddit_rss_dashboard_widget', 'Reddit RSS', 'reddit_rss_dashboard_widget_function');
}

The first argument in this function is the unique id that you give your widget.  The second argument is the widget’s name.  And the 3rd argument is the display function (which we just wrote).

Step 4:  Initialize Your Widget

The fourth and final step to creating a WordPress Dashboard Widget is to use the add_action function to add it to the setup.

1
add_action('wp_dashboard_setup', 'reddit_rss_add_dashboard_widget');

Step 5:  Clean Up

Once you have everything written, save it all in a file called reddit_dashboard_widget.php.  From there, zip it up and upload it to your WordPress install as a plugin.  Once activated, you’ll have Reddit’s RSS feed as a Dashboard Widget.  It will show up towards the bottom, so you’ll need to re-order it to your liking.

Final Thoughts

As I brought together this dashboard widget as a proof of concept, I got to thinking about how it could be improved.  One way would be to use more Ajax to fetch the updated feed.  Or if the RSS feed doesn’t update frequently enough, we could scrape the page ever n minutes to get updated content.  Also, at the suggestion of a reader, I’m going to start including full (working) examples with each tutorial.  Enjoy!

Download the WordPress Reddit Dashboard Widget Here.

Categories
PHP Programming Wordpress Development

WordPress Shortcode API Tutorial

One neat feature of WordPress plugins is shortcode.  Shortcode enables a user to put something like “[myplugin]” in their posts or pages and have it display content from their plugin.  Making WordPress shortcode work for you isn’t terribly difficult, but without some help it can be confusing.  In this tutorial, I’ll show you how to use shortcode in your plugins.

Wordpress Shortcode API Tutorial

Shortcode Example

Let’s say you want to print out the current time anywhere in your post where you put “[time]”.  Easy enough!  Open up your theme’s functions.php and enter the following.

function time_func($atts) {
     $thetime = time();
     return date("g:i A",$thetime);
}
add_shortcode('time', 'time_func');

So now, “[time]” will be replaced with the current server time formatted like hour:minute AM/PM.  But what if you aren’t sure what format you want the time to come out in?  Well, you just need to add an attribute.  I’m going to be using PHP’s date() function formatting in this example.

function time_func($atts) {
     extract(shortcode_atts(array(
          'timeFormat' =&gt; 'g:i A'
          ), $atts));
     $thetime = time();
     return date($timeFormat, $thetime);
}
add_shortcode('time', 'time_func');

What the above code does is add the possibility of an attribute to your shortcode.  So you could use it like “[time timeFormat=’d.m.Y’]”, which return today’s date.  In the extract function, you can specify the default value (which I set as hour:minute AM/PM).  You can add as many attributes as you need to your shortcode.

For more information, please see the WordPress Shortcode API.

Categories
Wordpress Development

WordPress 3.1 Features

While the release of WordPress 3.1 is still a few months away, a lot of people have begun to wonder what new features might be added and what bugs may be fixed.  The WordPress developers have finally held a meeting and came up with a plan of what they would like to include in the 3.1 release.

Features

  • Internal Linking  – This is by far the most exciting feature to get in to WordPress 3.1.  What this will allow you to do is easily link to pages within your site.  Instead of having to go to the page, copy the URL, and then paste it into an external link, you’ll be able to click the “Internal Link” button and choose from your posts.
  • Bug Fixes – As always, there will be numerous bug fixes included in this release of WordPress.
  • Post Templates – In many a CMS, you are able to create a bunch of different templates by which you can display your content.  WordPress has started down this path a little bit with custom post types, but if you wanted to display a normal post multiple ways you were sort of out of luck.  In WordPress 3.1, designers and developers will be able to create multiple templates and users will be able to choose how their post is displayed.
  • Theme Admin UI – This upgraded will make the way you browse and administer your WordPress themes much easier.  The current system is a bit clunky, and they hope to do away with it completely and replace it with an improved version.
  • Ajax Admin – It’s no secret that WordPress doesn’t use Ajax much on the back end.  It looks like they developers have finally decided to change this with 3.1.  This update should hopefully smooth out the pagination when browsing your posts in the admin.  It should also provide advanced search and sorting functionality.
  • The Admin Bar – WordPress.com users have a neat feature called the “Admin Bar”.  What this does is connect the back and front end of the site through an easy to use bar that appears at the top of the screen for logged in users.  From the discussions, it looks like this may have to be enabled (similar to featured images), but it is still a welcome feature to most.

Release Schedule

  • October 15, 2010 – Feature freeze.
  • November 15, 2010 – Beta period starts.
  • December 15,2010 – Release.

Wordpress 3.1 Features

Categories
Wordpress Development

Securing Your WordPress Plugin: Nonces

So you’ve created an epic contact form plugin for your WordPress install.  It seems secure enough.  You’re validating input, checking input types, and doing everything else right.  After it’s been up for a few weeks, you take a look at your database and notice you’ve got a bunch of crap in there.  “How could this happen?!” you scream!

Well, it probably had something to do with a Cross Site Request Forgery (CSRF).  Cross site request forgeries happen when someone starts submitting information to your form’s processing controller from another domain.  This is easy enough to do, because you can set the action field of a form to anything you want.  If you aren’t careful how you process your form, CSRF attacks can be a huge problem.   So how can you secure your plugin against CSRF attacks?  By using a nonce (Number used once).

Nonces are unique identifiers that you can use to make sure your form is coming from the right place.  To use them, you follow three simple steps.

  1. Create the nonce identifier. (wp_create_nonce)
  2. Place the identifier in your form or query string.
  3. Verify that the nonce is correct. (wp_verify_nonce)

In practice, it looks something like this.

1
2
$nonce = wp_create_nonce("my-plugin-nonce");
echo "<a href='controller.php?nonce={$nonce}'>Click here!</a>";

And then in your controller/processor…

1
2
$nonce = $_GET['nonce'];
if(!$wp_verify_nonce($nonce, "my-plugin-nonce")) due("No CSRF for you!");

That’s really all there is to it.  In literally 4 lines of code, you can make your plugin that much more secure.  On a side note, if you are using ajax to submit a form or pull data, you can pass the nonce through as a form field (or as part of the query string), but you’ll need you use a different function to verify it (check_ajax_referer).

1
check_ajax_referer("my-plugin-nonce");

Additional Resources

Categories
Wordpress Development

Enhancing the WordPress Code Editor

In all WordPress versions, there has been a severe dichotomy between text editors.  In one corner we have TinyMCE, which is a full-featured editor that is used when constructing pages and posts.  On the other hand we have what amounts to a text area, where you make changes to code in theme files.  I’ve always wondered why there isn’t some sort of syntax highlighting, tab support, or rudimentary auto-completion available in the default code editor.  As a developer, I realize how hard these features are to implement using nothing more than CSS and Javascript, but I thought some attempt may have been made by the core developers by version 3.

That has yet to materialize, but the community has come to the rescue.  A plugin called Power Code Editor exists that does simple syntax highlighting and improves font that is used in the editor.  After applying the plugin, your code editor will look like this.

Enhance WordPress Code Editor

If you’re interested, you can download the plugin here.  Or, from within the WordPress plugin installation menu search for “power code editor“.

Categories
PHP Programming Wordpress Development

$_SERVER Variables Are Unsafe For WordPress Plugins

Sometimes a plugin developer might want to submit a form back to itself.  Or perhaps they want to link back to the current page, except with a variable in the query string.  Often enough, you’ll seem them do it this way.

1
<form method=POST action='<=$_SERVER['PHP_SELF']?>'>

or

1
2
3
4
5
6
7
<a href='<?=$_SERVER['REQUEST_URI']?>'>Click Here</a>{/code}
 
The problem with this code is that it's easily exploitable.  Remember, the behavior for REQUEST_URI and PHP_SELF are to take whatever the entrance URL was and return it to the caller.  So how can this effect your pages?  Since the user can append anything that they'd like to the initial entrance URL, it becomes the vector for attack.
 
So how can you submit forms and links back to themselves without these variables?  For forms, just leave the action blank or don't include it at all.
 
<pre lang="html4strict"><form method=POST>
<form method=POST action=''>

And for links, using the # sign will link back to your current page.

<a href='#'>Click here!</a>

If a plugin developer absolutely MUST use server variables, just make sure to escape them accordingly.   Use the WordPress function esc_url().

1
<a href='<?=esc_url($_SERVER['PHP_SELF']?>'>Click Me!</a>

In reality, it’s bad practice to use the PHP $_SERVER variables at all.  So try to avoid doing it at all costs.

Categories
Wordpress Development

WordPress User Roles

By default, WordPress 3 ships with 6 (5 in your aren’t using MU features) roles that can be assigned to individual users.  Unless you’re browsing the codex or have been using WordPress for ages, it’s sometimes hard to understand the differences between user roles.  Many bloggers run their site on their own, so roles really don’t matter all that much.  However, for those who run sites with multiple contributing users, roles help keep the order.

The 6 default roles are Super Admin, Administrator, Editor, Author, Contributor, and Subscriber.

  • Super Admin – The Super Admin is a role only available in WordPress 3 when the multi-user (multi-site) features are turned on.  This role allows the super admin to administrate the entire network of sites.
  • Administrator – This role allows the user to access all of the administration features of a site, including themes, plugins, and comment moderation.
  • Editor – An editor can manage all pages, posts, and comments.  They don’t have to own them either, they can be authored by other users.
  • Author – An author is a user that you trust to publish their own posts.
  • Contributor – This is a user who is allowed to write posts, but they have to be approved by an editor before they get published.  This is handy if you have a guest that you would like to write an article, but want to review the content first.
  • Subscriber – This user is only allowed to edit and maintain their profile on your site.

If these roles aren’t enough to suit your needs (perhaps you need finer-grain permissions), there are plugins that exist in the WordPress Plugin Repository that can help.

Categories
Wordpress Development

How to Enable WordPress 3 Custom Menus

Prior to WordPress 3, if you wanted custom menus you had to code them yourself.  This generally involved editing your theme’s header.php file, knowledge of HTML, CSS, PHP, and probably SQL too.  Unsuprisingly, easy custom menus was a highly requested feature for WordPress 3 and it was delivered.

Unfortunately, most themes don’t have support for custom menus yet.  Wordpress makes it easy to add them as widgets, but if you want real menus, they need to be enabled in your theme.

Step 1:  Enable Custom Menus

The first thing that you need to do in order to get custom menus working in WordPress 3 is enable them.  To do that, open up your theme’s functions.php file, and drop in the following code.

1
2
3
4
function register_custom_menu() {
     register_nav_menu('custom_menu', __('Custom Menu'));
}
add_action('init', 'register_custom_menu');

Once you have done that, go to Appearance -> Menus and you should see something like this.

Wordpress Custom Menu Theme Locations

Step 2:  Add the Menu to Your Theme

Assuming that you’ve created a custom menu and want to display it, you’ll need to add the display function to your theme.  In most cases, you’ll need to open up the header.php file, and the area that looks like a menu.  This changes for every theme, but it should be fairly obvious.  Once you find it, insert the following code.

1
<?php wp_nav_menu(array('menu' => 'custom_menu')); ?>

After that, you’re menu should display in your navigation bar.  Good luck!