Categories
PHP Programming Wordpress Development

Simple WordPress Plugin Tutorial

Sometimes WordPress just doesn’t do what you want it to do.  When that happens, you turn to plugins for help.  But sometimes, the WordPress plugin repositories don’t have what you need either.  In those cases, it’s time to pull up your sleeves and get to work.  In this tutorial, I’m going to go through the process of creating a simple WordPress plugin from scratch.  I created this plugin as a proof of concept awhile ago, and thought that it would make a great learning tool now.

Step 1:  What are you’re making anyways?

This plugin does one thing only, and it does it well.  It will place a “Submit to Hacker News” button on all of your posts.  While this tutorial is only for a simple plugin, it could easily be extended to include other news aggregation services and social networks.


Step 2:  Creating the plugin.

Now that we know what we’re going to create, we need to create the plugin.  To do that, simply create a file called wp-hacker-news.php and then add the following to it.

1
2
3
4
5
6
7
8
/*
* Plugin Name: WP Hacker News
* Version: 0.1
* Description: Adds a "Submit to Hacker News" button to your posts.
* Author: Jack Slingerland
* Author URI: https://re-cycledair.com/
* Plugin URI: https://re-cycledair.com/wp-hacker-news
*/

The lines above are all required for a WordPress plugin to function correctly.  Below is a quick run-through of what each of these means.

  • Plugin Name – This is the name of your plugin.  It is how it will appear in the WordPress back-end administration panels.
  • Version – The version number.  I always start a 0.1 to start, and then increment like 0.1.1 for small changes.
  • Description – This is the description of your plugin.  Feel free to be verbose here, as this is how people will know what your plugin does.
  • Author – This is you!  Put your name or the name of your team here.
  • Author URI – Your website.  In my case, I link it to https://re-cycledair.com.
  • Plugin URI – The web page for your plugin.  Here, I’m linking it to the original announcement I made for this plugin.

Step 3:  Creating a display function.

So you finally have a WordPress plugin.  That’s great and all, but it doesn’t do anything yet.  What you need now is to create a  function that displays the “Submit To Hacker News” link.  To do that, add this below the comment section:

1
2
3
4
5
6
7
8
9
10
11
12
13
14
15
16
17
18
19
//Function to show the HN Link.
function WPHackerNews_link() {
     global $post;
     $link = urlencode(get_permalink($post->ID));
     $title = urlencode($post->post_title);
     $formattedLink = "
     <div style="float: right; margin-left: 10px; margin-bottom: 4px;">
          <a href="http://news.ycombinator.com/submitlink?u=$link&t=$title">
               <img src="https://re-cycledair.com/wp-content/uploads/2010/03/hn.jpg" alt="" />
          </a>
          <span style="font-size: 9px;">
               <a href="http://news.ycombinator.com/submitlink?u=$link&t=$title">Submit to HN</a>
          </span>
          <a href="http://news.ycombinator.com/submitlink?u=$link&t=$title"></a>
     </div>
";
 
     return $formattedLink;
}

The code above explains itself pretty well.  But I’ll break it down a bit anyways.

  1. We set the global post variable.  It holds all of the information about the post we’re currently on.
  2. Store the current post’s permalink and title in variables.
  3. Using some in-line css and good old HTML, we get the Y Combinator logo to float on the right side of the post.
  4. Return the HTML for the button to the caller of the function.


Step 4:  Displaying your plugin.

Everything is going great, but now we need this to actually show up in posts.  To do that, we register a display function with WordPress.  With a bit of logic, we can make it only display on posts.

1
2
3
4
5
6
7
8
9
10
11
//Integrate with Wordpress.
function WPHackerNews_ContentFilter($content) {
     if(is_single()) {
          return WPHackerNews_link().$content;
     } else {
          return $content;
     }
}
 
//Add the filter
add_filter ('the_content', 'WPHackerNews_ContentFilter');

The above code isn’t self-explanatory at all, so here’s how it works.

  1. When we create the function, we make sure to pass it “$content”.  “$content” is a variable that holds the content of the post that the user is on.
  2. We then check to make sure that we are on a single post with the function “is_single()”.
  3. If so, we return our button by calling “WPHackerNews_link()” and appending “$content” to it.
  4. If not, just return the original un-altered content.
  5. The final step is to use the “add_filter” function to add this plugin into WordPress.  The first argument describes where our plugin should be used (“the_content”), and the second argument is what function it should use (“WPHackerNews_contentFilter”).

Step 5:  You’re Done!

That concludes this tutorial on creating a simple WordPress plugin.  All you need to do now is drop this file in your wp-content/plugins directory and then activate it in the admin.  As usual, if you run in to any errors or notice any problems, please let me know and I’ll help the best I can.

Categories
Wordpress Development

Displaying a WordPress Widget on Specific Pages

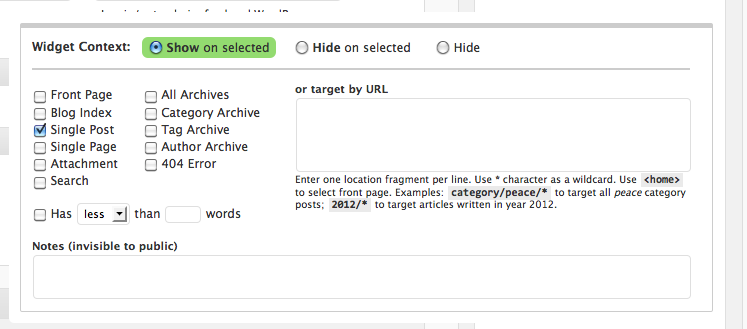
Sometimes when you a creating a WordPress site or blog, you only want a widget to show up on specific pages or page types.  This used to be needlessly difficult, where you would need to edit your theme manually for it to work.  However, there is a new(ish) plugin called Widget Context, which allows you to pick specific pages or page types on which you would like a widget to be shown.

Wordpress Widget on Specific Pages

This plugin is WordPress 3 compatibile, and can be downloaded at http://wordpress.org/extend/plugins/widget-context/.

Categories
PHP Programming Wordpress Development

WordPress 3 Custom Post Type Meta Box Tutorial

In my previous article, I talked about how to set up a rudimentary custom post type in WordPress 3.  This time, I’m going walk you through adding your own custom meta boxes to the admin interface.

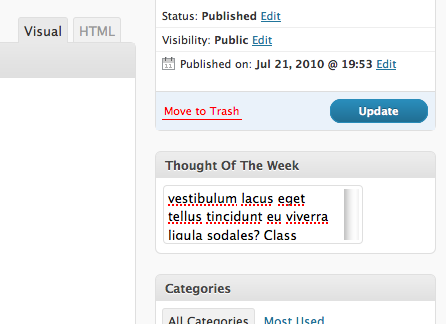
Wordpress 3 Custom Post Type Meta Box

Step 1:  Add Meta Box (add_meta_box)

Out of the entire tutorial, this is probably the easiest part.  We’re going to add a little side-column box for “Thought of the Week”.

1
add_meta_box("thought_of_the_week-meta", "Thought Of The Week", "thought_of_the_week", "newsletter", "side", "low");
  • Arguments
    • The first argument in add_meta_box is a unique identifiable string.  Try to user something descriptive.  In this case, I chose “thought_of_the_week-meta”.
    • The second argument is the title for the box that is going to show up.  Once again, be descriptive so the end user doesn’t have to guess at this.
    • The third argument is the function that displays your box information.
    • The fourth argument is the custom post type that you want this box to show up with.
    • The fifth argument is where you want the box.  I wanted it on the side, so I entered “side”.
    • The last argument is the priority of the box.  If you want it to appear lower on the post type, just enter “low”.  Else, you can add “high”.

Step 2: Display function & Get Post Meta (get_post_meta)

The next step is to create your display function.  Here’s mine.

1
2
3
4
5
function thought_of_the_week(){
     global $post;
     $meta = get_post_meta($post->ID, 'thought_of_the_week', true);
     echo '<textarea name="thought_of_the_week">'.$meta.'</textarea>';
}

First, you need to declare the “$post” global variable.  This will give you access to a bunch of information, most important of which is the post ID.  In the second line, I get any saved meta information with the name “thought_of_the_week” (more on this later).  In the last line, I simply echo out a text area with the content from “get_post_meta”.

Step 3:  Saving Your Meta Information (add_action)

This step is easy as well.  Here you will register a save action with your custom post type.  All that means is that when you click the “Publish” or “Save Draft” button, this function will be called.

1
add_action("save_post", "save_details");

The first argument is an action (more about actions here) which determines what action the second argument should be attached to.  The second argument is the function to get executed.  I called mine “save_details”.

Step 4:  Save the Details (update_post_meta)

The final step in creating a custom metabox in WordPress 3 is using the “update_post_meta”.

1
2
3
4
5
6
7
8
function save_details($post_id) {
     global $post;
 
     if(isset($_POST['post_type']) && ($_POST['post_type'] == "newsletter")) {
          $data = $_POST['thought_of_the_week'];
          update_post_meta($post_id, 'thought_of_the_week', $data);
     }
}

Here’s a quick breakdown of this function.

  1. Declare the global “$post” variable.
  2. Check to see if the post type “newsletter” (or whatever your custom post type is named.
  3. Get the data out of the POST.
  4. Call update_post_meta().

The first argument in update_post_meta is the post ID.  The second is the name of the meta box.  The third is the data you wish to save.

Step 5:  That’s it!

That’s all there is to it.  Once you’ve done that, you can fetch the data anytime that you like by calling

Categories
PHP Programming Wordpress Development

WordPress 3 Custom Post Type Tutorial

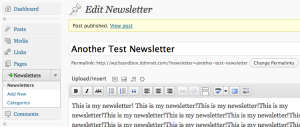
When WordPress 3.0 was released, all the hype was about something called “custom post types”.  Custom post types basically allow you to add your own content types to WordPress.  Lets say for instance that you want to create a newsletter.  A newsletter in your case, is a quick descriptions followed by the excerpts from several regular posts.  By default, WordPress doesn’t support this.  However, with custom post types we can add out own “Newsletter” post type and get to work.

Wordpress Newsletter Cusotm Post Type

Step 1:  Register the Custom Post Type

When creating a new custom post type, the first thing you need to do is register it with your WordPress install.  This can happen at the theme or plugin level.  In my trials with custom post types, I’ve always done it at the plugin level (mainly because I’m a developer, not a designer).

1
2
3
4
5
6
7
8
9
10
11
12
13
14
15
16
17
18
19
20
21
22
23
24
25
26
27
28
29
30
31
//Set up custom post type variables.
$labels = array(
   'name' => _x('Newsletters', 'post type general name'),
   'singular_name' => _x('Newsletter', 'post type singular name'),
   'add_new' => _x('Add New', 'Newsletter'),
   'add_new_item' => __('Add New Newsletter'),
   'edit_item' => __('Edit Newsletter'),
   'new_item' => __('New Newsletter'),
   'view_item' => __('View Newsletter'),
   'search_items' => __('Search Newsletters'),
   'not_found' =>  __('Nothing found'),
   'not_found_in_trash' => __('Nothing found in Trash'),
   'parent_item_colon' => ''
);
 
$args = array(
   'labels' => $labels,
   'public' => true,
   publicly_queryable' => true,
   'show_ui' => true,
   'query_var' => true,
   'menu_icon' => get_stylesheet_directory_uri() . '/images/newsletter.gif',
   'rewrite' => true,
   'capability_type' => 'post',
   'hierarchical' => false,
   'menu_position' => 20,
   'supports' => array('title','editor', 'excerpt')
);
 
//Register the newsletter post type.
register_post_type( 'newsletter' , $args );

Now, lets disect this a bit so you know what’s going on.

  • Labels
    • name – The name of your custom post type.  Usually this is the plural form of it.
    • singular_name – This is the singular form of your plural name.
    • add_new – Normally when you add a post, you click “Add new”.  It’s the same thing for this example.  However, you could make it say “Be more awesome! Add a newsletter!” (if you REALLY wanted to).
    • edit_item – Same as add_new.  You can change how the edit link is displayed.
    • new_item – When you first create your new newletter, this is what it will describe it as.  Once you have a title on it, it will display that instead.
    • For more information on these, I suggest the WordPress Codex.
  • Args
    • labels – General label information for your custom post type.
    • public – Should this be made available to all users?
    • publicly_queryable – Should the public be able to run queries against your post type?
    • show_ui – Do you need a user interface?
    • menu_icon – Path to the icon that is displayed in the admin.
    • rewrite – Should WordPress attempt to make the urls friendly?
    • supports – This bit is pretty important.  This is where you describe what is shown in the admin.  Currently I have “title”, “editor”, and “excerpt”.  You can also extend this with your own stuff later.
    • For more information on these, I suggest the WordPress Codex.
  • register_post_type – This hook is how you register your shiny new custom post type with WordPress 3.0.  First argument is a unique name that you give to your custom post type.  The second argument is the array that was defined above.

Step 2: Custom Categories (Taxonomy) [optional]

One of the nice things about custom post types in WordPress 3 is that you don’t have to use the same categories (taxonomy) as your other posts  and pages.  Registering a new taxonomy for your custom post type is very easy.

1
2
3
4
5
6
7
8
9
//Create taxonomy for categorizing newsletters
register_taxonomy(
   "Categories",
   array("newsletter"),
   array("hierarchical" => true,
      "label" => "Categories",
      "singular_label" => "Category",
      "rewrite" => true)
);

How this works is fairly straight forward.  The first argument is what you’d like your new post type categories to be called.  In this example, I opted for simplicity and went with “Categories”.  The second argument is the post types that you would like this taxonomy to show up on.  Since we only want it on our new post type, I’ve defined it as such.  The third argument is for options (lables, rewrite on/off, etc).

Step 3:  Your done!

Really, it’s that easy.  If you want to make it really useful, you need to add meta boxes to admin interface so that you can do sweet custom content.  But at it’s bare minimum, this is all you need.

If there is sufficient interest, I can go into deeper detail about making a plugin with a custom post type.  Also, if you need help, drop a comment and I’d be happy to give your problem a shot.

Categories
Wordpress Development

Aristo, a jQuery UI Theme

I recently posted a question to Hacker News about using Theme Roller for site design.  The general concensus was that it’s great, but sometimes looks a little childish.  So, a fellow HN user released http://taitems.tumblr.com/post/482577430/introducing-aristo-a-jquery-ui-theme.  It’s called Aristo, and it really cleans up the jQuery UI stuff.

Take a look if you get bored.  It’s worth it.

Categories
PHP Programming Wordpress Development

WP Hacker News Plugin

I’ve been on a WordPress kick lately, and decided that Hacker News needed a WordPress plugin.  This plugin simply places a nice little Y Combinator badge in the upper right-hand corner of your post, with a link that says “Submit to HN”.  If you’d like to check it out, it’s used on this post.

Also, it can be downloaded here.

If you have any questions or need support, please leave a comment.

Categories
Wordpress Development

WordPress as a CMS

It was about last year that I realised most of the projects that I do required a content management system (CMS). This both a relief and frightening prospect all at the same time. How do I use modern CMS’s? Are they easy to modify, hack, template, etc? Will this actually make my life easier?

With these questions in mind, I began my hunt for a CMS to use for a re-design of one of my larger projects (Wrestling Addix).  I had dabbled with Drupal before, but I found it to be a little complicated.  I also was having a hard time with the Drupal terminology (nodes?  You mean pages right?).  I also explored the Joomla route, but it seemed like a little more than what I needed.  Eventually, I came to rest on WordPress.  I had been keeping a WordPress blog for years (Re-Cycled Air was formerly a blog about my [mis]adventures during my undergrad) so it seemed like the natural choice.

Once I had settled on WordPress, it was time to figure out how to make it a usable CMS.  First off, I needed a static front page.  That was easily handled by going to the settings and having my blog posts go into a different page.  After that, creating a theme was next.  No problem, WordPress is easily themed, or you can choose from a large assortment at the WordPress site.  From there, I need a few extra plugins to make things work.  Here’s what I use regularly.

  • Advertising Manager – Used to rotate ads on some of my clients sites.  Allows for extreme customisation and weighted ads.
  • Akismet – Blocking spam comments has never been easier.
  • All-in-One SEO Pack – Using this Search Engine Optimisation package allows site contributors to fill out the meta information without ever having to touch a piece of code.
  • BM Custom Login – This plugin allows you to skin the WordPress Login/Registration/Password Recovery page.  It’s a nice touch that clients just love.
  • Configure SMTP – For clients without an SMTP server, this works great because it allows you to easily use a GMail account for SMTP.
  • Disable WordPress Core Update – Nothing is worse then having a client constantly bug you about updating WordPress.  Luckily, with this plugin you can disable the update notification.
  • Event Calendar – A lot of sites like to have calendars.  This plugin makes it easy to place either a larger full page calendar or a calenar widget on your site.  Managing events is easy as well.
  • Exec-PHP – This plugin allows you to execute PHP scripts in your pages, posts, or widgets.  It’s really handy if you don’t want to make a plugin for something.
  • Favicon Manager – Every site needs a favicon.  This plugin allows you to easily change your favicon so it shows up in browsers and RSS feeds.
  • Google Analytics for WordPress – This will add google analytics functionality to your WordPress site.  It accomplishes the same thing as putting analytics code directly in the header, except you don’t have to edit the template by hand.
  • Maintenance Mode – In the event that you need to do some serious site maintenance, this plugin allows you to easily throw up a maintenance splash page.  Admins are still allowed to view the site and the backend.
  • Member Access – You can easily restrict parts of your site to registered users only.  I used it to lock out authorised users from an upload area.
  • Page Links To – This allows you to make pages links go to external or internal sources.
  • PageMash – With this you can visually reorder your menu.  Much easier that the cumbersome ‘enter a number’ system that’s included by default.
  • Simple Press Forum – An easy to use integrated forum for WordPress.  Why use PHPbb or Vbulletin when you can have this with single sign on with the click of a button?

If you have any other suggestions for good CMS plugins, please leave them in the comments for all to see.

Categories
Wordpress Development

Plugin Development

While working on the new Wrestling Addix Beta site, I was recently charged with the task to create a new wordpress plugin for the “Featured Videos” section of the site.  When I realized that I needed to do this, I was a bit overwhelmed.  I thought that making WordPress plugins was for the real rockstar wordpress developers, but it turns out that almost anyone can do it.  I found a nice site that had a wordpress plugin template already worked out for you (complete with admin backend!), so that made it a lot easier to get things done.  If you’re interested, the site can be found here.