Categories
Django Python

Using the Django Per-Site Cache with the Nginx HTTP Memcached Module

For a long time I thought that the most interesting problems in my field were in scalability. Some people may be more interested in scaling, and others might be more into slick interfaces and fast animations. But for me, scalability has continued to be my passion. For awhile though, it was a unicorn. That unattainable thing that I wanted to work on but couldn’t find anywhere to do it at. That is, until I started work at Future US.

Future is a media company. Originally they started in old media focusing heavily on gaming and tech magazines. Eventually the internet became prominent in everyday life, so more of their old media properties made the transition to the web. The one that really matters to me though is PC Gamer. I’ve been a huge fan of PC Gamer since I was about 7 years old. I still have fond memories getting demo disks in the mail with my subscription.

When I was hired at Future it was to help facilitate the move of PC Gamer from its existing platform (WordPress) to Django. Future had experienced success moving other properties to Django, so it made sense to do it with PC Gamer. When it eventually came time to implement our caching layer, we thought about a lot of different ways that it could be done. Varnish came up as an option, but we decided against it since nobody on the team had experience configuring it (and people elsewhere in the organization had experienced issues with it). Eventually we settled on having Nginx serve pages directly from Memcache. For us, this method works great because PC Gamer doesn’t have a lot of interaction (its almost completely consumption from the user end). Anything that does require back-and-forth between the server is handled via javascript, which makes full page caching super easy to do.

The high level architecture for pc gamer.

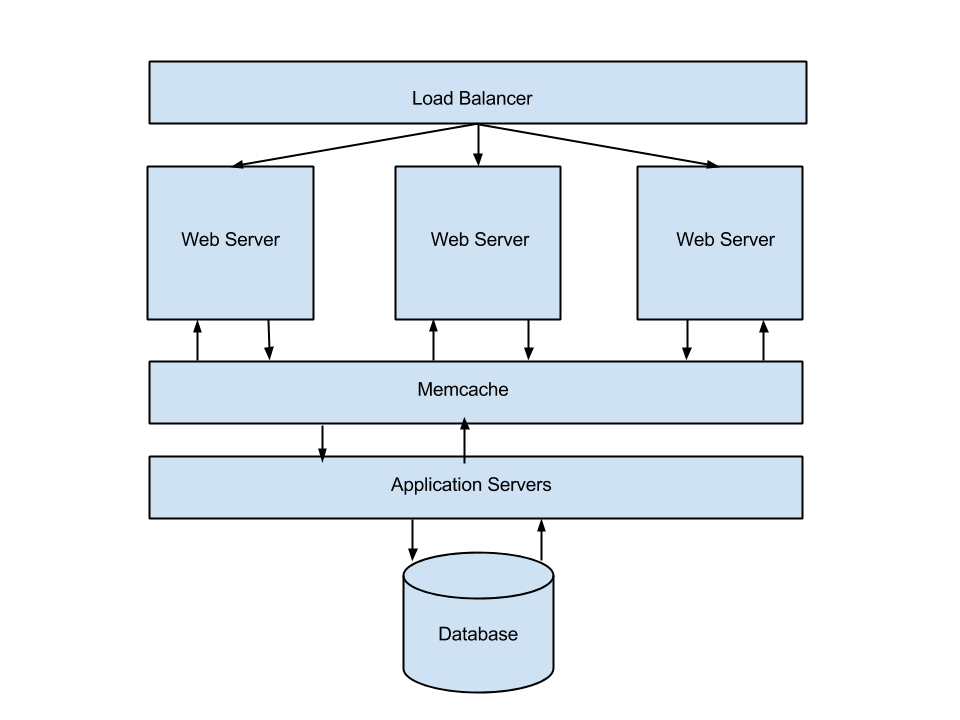
So how does it all work? The image above describes PC Gamer’s server architecture from a high level. Its pretty basic and works quite well for us. We end up having two types of requests: cache hits & cache misses. The flow for a cache hit is: request -> load balancer -> nginx -> memcache -> your browser. The flow for a cache miss is: request -> load balancer -> nginx -> application server (django) -> (store page in cache) -> your browser.

Since we’re basically running a static site, deciding what content to cache is easy: EVERYTHING!

Cache all the things!

Luckily for us Django already has a nice way of doing this: The per-site cache. But it is not without its issues. First of all, the cache keys it creates are insane. We needed something a little simpler for our setup so Nginx could build the cache key of the current request on the fly.

How It Works

The meat and potatoes of overriding Django’s per-site cache key comes in the `_generate_cache_key` function.

def _generate_cache_key(request, method, headerlist, key_prefix):
    if key_prefix is None:
        key_prefix = settings.CACHE_MIDDLEWARE_KEY_PREFIX
    cache_key = key_prefix + get_absolute_uri(request)
    return hashlib.md5(cache_key).hexdigest()

To make things easier for Nginx to understand we just take the url and md5 it. Simple!

On the Nginx side of things, the setup is equally simple.

        set            $combined_string "$host$request_uri";
        set_by_lua     $memcached_key "return ngx.md5(ngx.arg[1])" $combined_string;
 
        # 404 for cache miss
        # 502 for memcached down
        error_page     404 502 504 = @fallback;
 
        memcached_pass {{ cache.private_ip }}:11211;

All this setup does is take the MD5 of the host + request URI and then check to see if that cache key exists in memcache. If it does then we serve the content at that cache key, if it doesn’t we fall back to our Django application servers and they generate the page.

Thats it. Seriously. It’s simple, extremely fast, and works for us. Your mileage may vary, but if you have relatively simple caching requirements I highly suggest looking into this method before looking at something like Varnish. It could help you remove quite a bit of complexity from your setup.

Categories
PHP Programming Wordpress Development

Caching WordPress Data with the Transients API

If you’re a plugin or theme developer, there may come a time when you need to execute a long running operation. It doesn’t need to be anything complicated, but something as simple as fetching a Twitter feed can take a significant amount of time. When you come across these types of situations, it’s handy to be able to store the data on your own server and then fetch a new copy of it every X hours. This is called caching, and WordPress convieniently comes packages with an excellent caching API called Transients .
Wordpress Transients API

The Transients API is surprisingly simple to use. In fact, it’s very much like using set_option and get_option except with an expiration time. If you aren’t familiar with caching at all, here’s the general workflow:

  1. If the data exists in the cache and isn’t expired, get it.
  2. If the data doesn’t exist in the cache or is expired, perform the necessary actions to get the data.
  3. Store the data in the cache if it doesn’t already exist or is expired.
  4. Continue from here using data.

When attempting to use the Transients API for caching, there are three functions that you need to be aware of: set_transient, get_transient, and delete_transient.

  • set_transient($identifier, $data, $expiration_in_minutes): This function stores your data into the database. The identifier is a string that uniquely identifies your data. Your data can be any sort of complex object, so long as it is serializable. The expiration is how long your want your data to be valid (ex: 12 hours would be 60*60*12).
  • get_transient($identifier): This retrieves your data. If the data doesn’t exist or the expiration time has passed, false is returned. Otherwise, the same data you stored will be returned.
  • delete_transient($identifier): This will delete your data before it’s expiration time. This is handy if you are storing post-dependent data because you can hook it into the save action so that every time you save a post, your cached data is cleared.

Now that we’ve covered the basics, how about a quick example?

if (false === ( $my_data = get_transient('super_expensive_operation_data') ) ) {
     $my_data = do_stuff();
     set_transient('super_expensive_operation_data', $my_data, 60*60*12);
}
 
echo $my_data;
 
function do_stuff() {
     $x = 0;
     for($i = 0; $i != 999999999; $i++) {
          $x = $x * $i;
     }
     return $x;
}

The example is pretty straight forward. We first check to see if there is a cached copy of the data, if not, we fetch the data from the “do_stuff” function, and store it in the database. Simple, right?

One of the benefits of using the Transients API (aside from speeding your site up) is that plugins like WP Super Cache or WP Total Cache will auto-magically cache your data into memcached if you have it set up. For you, this means an even faster site! If you have any questions about caching techniques or the Transients API, leave a comment and I’d be happy to help.

Categories
Other PHP Programming

Creating a Flexible Caching Module

I work for a great company, I really do.  Sure we have our problems (like just coming out of the developer stone age), but overall I work with smart, friendly people who are passionate about what they do.  One of the things that always bugged me though was the lack of any sort of caching in our CMS.  Most times it’s not needed, but when an operation takes about 100 queries or so to finish, then it’s time to start caching.

Since I’m a bit of an efficiency freak, I thought I would take a crack at writing a flexible caching module that is easy for our developers to use.  So what do “easy” and “flexible” mean?  To be “easy”, the caching module must be usable by even a novice developer and have a limited number of options.  For instance, I ended up deciding that we really only need two public methods, and one public property.

  • $cache->exists – If “$cache” is a cache object, calling exists checks to see if the cached object already exists in the database.  It also checks to see if it’s expired or not.  If it’s expired or non-existent, it returns false.   It returns true if the cached object exists and is up to date.
  • $cache->put($val) – This is how you store something in cache.  It can be any type of serializable PHP object.  So basically, resource types are off limits but objects, arrays, variables, entire web pages, etc. can be used.
  • $cache->get() – This fetches the object stored  in the cache.  It handles the re-serialization of it as well, so it really makes things pretty idiot proof.

What about flexible?  Well, by that I mean we need to be able to transparently implement several different types of caching.  Since we’re just crawling out of the dark ages, I opted to implement a fallback caching mechanism.  Here’s how it works.

  • The programmer defines a variable in our settings area to be which caching option he/she wants to use.  Options are memcached, file, mysql.
  • If the setting isn’t defined, we try memcached by default.  This is by far the best caching system to use, so it makes sense to try it first.
  • If memcached fails, we go to a database caching schema.  While not nearly as good as using memcached, it’s possible it could save you tons of queries on your database.
  • If the user chooses file caching, we do that.  It’s a pretty bad idea to use in most cases, but may still have it’s uses.

So why did it come this?  It’s not that we host terribly high-volume sites, but that our CMS is super slow.  A full-on page will take about 4 seconds to load to your screen completely, and that’s running local on the network.  One of the main problems is that we use output bufferring extensively.  The ENTIRE FRIGGIN PAGE is buffered.  This has 3 side effects:

  1. Slight performance loss due to bufferring.
  2. Apparent page load time sucks because the browser has to wait for the entire page to be generated before getting output.
  3. Development is super easy because you don’t ever have to worry about output being sent before doing a call like “header()”.

We can’t remove output buffering unfortunately.  It’s at the very core of our CMS and development practices, so it just won’t work.  To get the load time to generate the page as low as possible, I decided that caching was needed.

So what sort of problems do we run in to with this caching module?  Glad you asked!  Many of the problems aren’t specific to this caching module, but to caching in general.  The quick list:

  • If the original query wasn’t complicated, it’s not worth storing the results.  The number of queries the caching module does in MySQL mode is 3.  If your initial query was less than that, or not a super-complex-mega-join, it’s not worth using.  This caveat goes away in memcached mode.
  • Smart naming and design.  You have to be very careful out what you cache, and when.  Remember, page content and queries probably change when a user is logged in or on a different device.  Just things to keep in mind.
  • Getting developers to use it.  Not everyone likes to learn, let alone change their habits.  The biggest barrier to this is getting people to use it.  Some people don’t care about efficiency either (sad, I know), but at least our system administrator thanks me.

The caching module seems to work pretty well too.  On one particularly SQL heavy page, I reduced page load time from 14 seconds (ridiculous) to just under 6 seconds (still bad, but getting better).

That’s it for now.  Any questions or comments are welcome.