Categories
PHP Programming Wordpress Development

Simple WordPress Plugin Tutorial

Sometimes WordPress just doesn’t do what you want it to do.  When that happens, you turn to plugins for help.  But sometimes, the WordPress plugin repositories don’t have what you need either.  In those cases, it’s time to pull up your sleeves and get to work.  In this tutorial, I’m going to go through the process of creating a simple WordPress plugin from scratch.  I created this plugin as a proof of concept awhile ago, and thought that it would make a great learning tool now.

Step 1:  What are you’re making anyways?

This plugin does one thing only, and it does it well.  It will place a “Submit to Hacker News” button on all of your posts.  While this tutorial is only for a simple plugin, it could easily be extended to include other news aggregation services and social networks.


Step 2:  Creating the plugin.

Now that we know what we’re going to create, we need to create the plugin.  To do that, simply create a file called wp-hacker-news.php and then add the following to it.

1
2
3
4
5
6
7
8
/*
* Plugin Name: WP Hacker News
* Version: 0.1
* Description: Adds a "Submit to Hacker News" button to your posts.
* Author: Jack Slingerland
* Author URI: https://re-cycledair.com/
* Plugin URI: https://re-cycledair.com/wp-hacker-news
*/

The lines above are all required for a WordPress plugin to function correctly.  Below is a quick run-through of what each of these means.

  • Plugin Name – This is the name of your plugin.  It is how it will appear in the WordPress back-end administration panels.
  • Version – The version number.  I always start a 0.1 to start, and then increment like 0.1.1 for small changes.
  • Description – This is the description of your plugin.  Feel free to be verbose here, as this is how people will know what your plugin does.
  • Author – This is you!  Put your name or the name of your team here.
  • Author URI – Your website.  In my case, I link it to https://re-cycledair.com.
  • Plugin URI – The web page for your plugin.  Here, I’m linking it to the original announcement I made for this plugin.

Step 3:  Creating a display function.

So you finally have a WordPress plugin.  That’s great and all, but it doesn’t do anything yet.  What you need now is to create a  function that displays the “Submit To Hacker News” link.  To do that, add this below the comment section:

1
2
3
4
5
6
7
8
9
10
11
12
13
14
15
16
17
18
19
//Function to show the HN Link.
function WPHackerNews_link() {
     global $post;
     $link = urlencode(get_permalink($post->ID));
     $title = urlencode($post->post_title);
     $formattedLink = "
     <div style="float: right; margin-left: 10px; margin-bottom: 4px;">
          <a href="http://news.ycombinator.com/submitlink?u=$link&t=$title">
               <img src="https://re-cycledair.com/wp-content/uploads/2010/03/hn.jpg" alt="" />
          </a>
          <span style="font-size: 9px;">
               <a href="http://news.ycombinator.com/submitlink?u=$link&t=$title">Submit to HN</a>
          </span>
          <a href="http://news.ycombinator.com/submitlink?u=$link&t=$title"></a>
     </div>
";
 
     return $formattedLink;
}

The code above explains itself pretty well.  But I’ll break it down a bit anyways.

  1. We set the global post variable.  It holds all of the information about the post we’re currently on.
  2. Store the current post’s permalink and title in variables.
  3. Using some in-line css and good old HTML, we get the Y Combinator logo to float on the right side of the post.
  4. Return the HTML for the button to the caller of the function.


Step 4:  Displaying your plugin.

Everything is going great, but now we need this to actually show up in posts.  To do that, we register a display function with WordPress.  With a bit of logic, we can make it only display on posts.

1
2
3
4
5
6
7
8
9
10
11
//Integrate with Wordpress.
function WPHackerNews_ContentFilter($content) {
     if(is_single()) {
          return WPHackerNews_link().$content;
     } else {
          return $content;
     }
}
 
//Add the filter
add_filter ('the_content', 'WPHackerNews_ContentFilter');

The above code isn’t self-explanatory at all, so here’s how it works.

  1. When we create the function, we make sure to pass it “$content”.  “$content” is a variable that holds the content of the post that the user is on.
  2. We then check to make sure that we are on a single post with the function “is_single()”.
  3. If so, we return our button by calling “WPHackerNews_link()” and appending “$content” to it.
  4. If not, just return the original un-altered content.
  5. The final step is to use the “add_filter” function to add this plugin into WordPress.  The first argument describes where our plugin should be used (“the_content”), and the second argument is what function it should use (“WPHackerNews_contentFilter”).

Step 5:  You’re Done!

That concludes this tutorial on creating a simple WordPress plugin.  All you need to do now is drop this file in your wp-content/plugins directory and then activate it in the admin.  As usual, if you run in to any errors or notice any problems, please let me know and I’ll help the best I can.

Categories
Wordpress Development

Displaying a WordPress Widget on Specific Pages

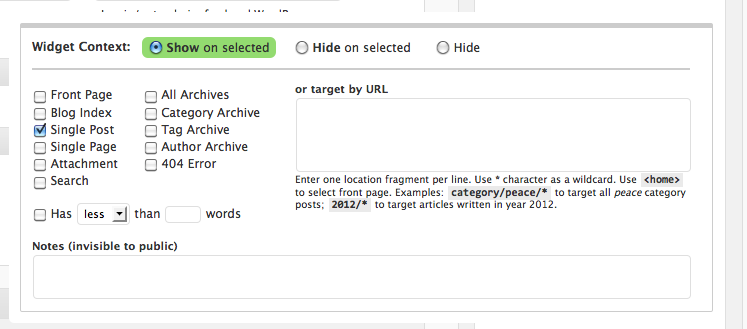
Sometimes when you a creating a WordPress site or blog, you only want a widget to show up on specific pages or page types.  This used to be needlessly difficult, where you would need to edit your theme manually for it to work.  However, there is a new(ish) plugin called Widget Context, which allows you to pick specific pages or page types on which you would like a widget to be shown.

Wordpress Widget on Specific Pages

This plugin is WordPress 3 compatibile, and can be downloaded at http://wordpress.org/extend/plugins/widget-context/.

Categories
PHP Programming Wordpress Development

WordPress 3 Custom Post Type Tutorial

When WordPress 3.0 was released, all the hype was about something called “custom post types”.  Custom post types basically allow you to add your own content types to WordPress.  Lets say for instance that you want to create a newsletter.  A newsletter in your case, is a quick descriptions followed by the excerpts from several regular posts.  By default, WordPress doesn’t support this.  However, with custom post types we can add out own “Newsletter” post type and get to work.

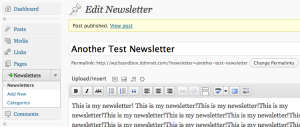
Wordpress Newsletter Cusotm Post Type

Step 1:  Register the Custom Post Type

When creating a new custom post type, the first thing you need to do is register it with your WordPress install.  This can happen at the theme or plugin level.  In my trials with custom post types, I’ve always done it at the plugin level (mainly because I’m a developer, not a designer).

1
2
3
4
5
6
7
8
9
10
11
12
13
14
15
16
17
18
19
20
21
22
23
24
25
26
27
28
29
30
31
//Set up custom post type variables.
$labels = array(
   'name' => _x('Newsletters', 'post type general name'),
   'singular_name' => _x('Newsletter', 'post type singular name'),
   'add_new' => _x('Add New', 'Newsletter'),
   'add_new_item' => __('Add New Newsletter'),
   'edit_item' => __('Edit Newsletter'),
   'new_item' => __('New Newsletter'),
   'view_item' => __('View Newsletter'),
   'search_items' => __('Search Newsletters'),
   'not_found' =>  __('Nothing found'),
   'not_found_in_trash' => __('Nothing found in Trash'),
   'parent_item_colon' => ''
);
 
$args = array(
   'labels' => $labels,
   'public' => true,
   publicly_queryable' => true,
   'show_ui' => true,
   'query_var' => true,
   'menu_icon' => get_stylesheet_directory_uri() . '/images/newsletter.gif',
   'rewrite' => true,
   'capability_type' => 'post',
   'hierarchical' => false,
   'menu_position' => 20,
   'supports' => array('title','editor', 'excerpt')
);
 
//Register the newsletter post type.
register_post_type( 'newsletter' , $args );

Now, lets disect this a bit so you know what’s going on.

  • Labels
    • name – The name of your custom post type.  Usually this is the plural form of it.
    • singular_name – This is the singular form of your plural name.
    • add_new – Normally when you add a post, you click “Add new”.  It’s the same thing for this example.  However, you could make it say “Be more awesome! Add a newsletter!” (if you REALLY wanted to).
    • edit_item – Same as add_new.  You can change how the edit link is displayed.
    • new_item – When you first create your new newletter, this is what it will describe it as.  Once you have a title on it, it will display that instead.
    • For more information on these, I suggest the WordPress Codex.
  • Args
    • labels – General label information for your custom post type.
    • public – Should this be made available to all users?
    • publicly_queryable – Should the public be able to run queries against your post type?
    • show_ui – Do you need a user interface?
    • menu_icon – Path to the icon that is displayed in the admin.
    • rewrite – Should WordPress attempt to make the urls friendly?
    • supports – This bit is pretty important.  This is where you describe what is shown in the admin.  Currently I have “title”, “editor”, and “excerpt”.  You can also extend this with your own stuff later.
    • For more information on these, I suggest the WordPress Codex.
  • register_post_type – This hook is how you register your shiny new custom post type with WordPress 3.0.  First argument is a unique name that you give to your custom post type.  The second argument is the array that was defined above.

Step 2: Custom Categories (Taxonomy) [optional]

One of the nice things about custom post types in WordPress 3 is that you don’t have to use the same categories (taxonomy) as your other posts  and pages.  Registering a new taxonomy for your custom post type is very easy.

1
2
3
4
5
6
7
8
9
//Create taxonomy for categorizing newsletters
register_taxonomy(
   "Categories",
   array("newsletter"),
   array("hierarchical" => true,
      "label" => "Categories",
      "singular_label" => "Category",
      "rewrite" => true)
);

How this works is fairly straight forward.  The first argument is what you’d like your new post type categories to be called.  In this example, I opted for simplicity and went with “Categories”.  The second argument is the post types that you would like this taxonomy to show up on.  Since we only want it on our new post type, I’ve defined it as such.  The third argument is for options (lables, rewrite on/off, etc).

Step 3:  Your done!

Really, it’s that easy.  If you want to make it really useful, you need to add meta boxes to admin interface so that you can do sweet custom content.  But at it’s bare minimum, this is all you need.

If there is sufficient interest, I can go into deeper detail about making a plugin with a custom post type.  Also, if you need help, drop a comment and I’d be happy to give your problem a shot.

Categories
Other Other Programming

Epiphany of Development

I’ve been doing web development for a long time.  I made my first (crappy) web page in 6th grade using the then awesome Geocities.  After that, I graduated to Front Page express.  Throughout my development career, I’ve had a series of epiphanies that have brought my skills to the next level.  Bold entries are where they happened.

  • 1998 – First web page – I knew that the internet existed, but it never dawned on me to actually create content.  I didn’t realize it at the time, but this simple act has been the anchor for the rest of my life.
  • 1999 – Discover Front Page (Express) – With my new found web skills, I started to use more advanced WYSIWYG editors.  Frontpage is hardly advanced, but it allowed me to separate my menus from my content using frames.  It opened up numerous paths for me to take.
  • 1999 (late) – Dreamweaver – Not super important, but discovering Macromedia Dreamweaver really changed how I did web pages.  I stopped using frames to make menus and started using layers.  Little did I know that layers were actually “<div>” tags that were positioned by CSS.
  • 2000 – Flash – Flash was still rather immature at this point, however it showed me what could truely be accomplished on the web.  No longer did menus have to be boring images and text links.  We could have tweening!  It was around this time that I build my first web page with heavy flash components.
  • 2001 – Discover PHP, HTMl, and CSS – This was a big year for me.  I discovered PHP, HTML, and CSS all at the same time.  I had no idea how any of these worked though.  At the time, PHP was well beyond my grasp.  CSS and HTML seemed do-able though.
  • 2003 – HTML + CSS  Zen – I was a junior in high school at this point, and had been appointed to wor on the school’s web site.  Actually, it was the entire district’s domain.  My brain had matured enough for me to make a web site BY HAND using nothing more than HTML and CSS.  I still didn’t understand programming, but using markup languages like HTML and CSS because second nature to me.
  • 2004 – Servers – Around this time I discovered that I could make servers on my own!  Not really code them persay, but rather run server software.  I’m pretty sure my first server was an FTP server so that I could share files with my friends.  It was tedious though, since I was still using 56k dial-up at the time.
  • 2005 (Early) – First Computer Science Course – The biggest eye opener ever.  I never realized how deep the rabbit hole went.  I was only learning assignmen, logic, loops and a few other things, but it made my thirst for knowledge inquentiable.  I started to learn C++ here.
  • 2005 (Late) – Assembly Language & C – Taking a course in SPARC assembly and a bit of C is an eye opener for every Computer Science student.  You’re pretty much at the bottom of the rabbit hole, and you spend the rest of your career climbing back out.  Coding in low level languages made me a much better programmer though, because it forced me to think.
  • 2006-2007 – School & Languages – These years were spent diving into new languages, learning new programming styles and domains, and generally having a good time.  I didn’t spend a lot of time doing web development, but I did teach myself how to make a web server in Python.  Not especially helpful, but still fun.
  • 2008 – PHP, MySQL, LAMP – I had already learned Linux in 2006-2007, however I never really dove into Linux as a server.  That was at least, until I found out (again) about PHP.  Turns out PHP needed Apache to run.  And all the fun PHP stuff also needed a database server  (MySQL).  I set up a PHP + Apache + MySQL server and went from there.  It was at this time that I started development on the first edition of Wrestling Addix.  I made my own CMS for it (bad idea) and in general the site worked fine, however it was a bear to maintain.  I decided that the next version would use a pre-built CMS so that my life would be easier.
  • 2009 – Ajax, WordPress, OOP, CMS – This year I’ve learned lots of stuff.  Most of it revolved around web development though.  I’ve learned to bend WordPress to my will (it runs this site).  I’ve learned how to use Ajax to make my web apps for responsive.  I’ve learned how to use Object Oriented Programming in my web sites, and how using a CMS WILL make your life easier.