Note: The full source code for this plugin can be found here.
Every time you go to WordPress blog and see items in the sidebar, it’s likely that they are widgets. There are thousands of them for download on WordPress.org, but what if you want to create your own? How would you code it? That’s what I will answer in this quick How-To.
Step 1: Create The Plugin
We’re going to start out by creating a simple plugin. It’s only purpose is to initialize our widget.
1 2 3 4 5 6 7 8 9 10 11 12 13 14 15 16 | <?php /* Plugin Name: Sweet Math Widget Plugin URI: https://re-cycledair.com Description: A math widget that takes the post id and multiplies it by 5. Author: Jack Slingerland Version: 0.1 Author URI: https://re-cycledair.com */ function sweetMathWidget() { global $post; echo "{$post->ID} x 5 = "; echo $post->ID*5; } ?> |
Step 2: Add & Register the Widget
The nex step is the add the widget to WordPress and then register it. Add this code to the plugin that you already have going.
1 2 3 4 | function sweetMathWidgetInit() { register_sidebar_widget(__('Sweet Math Widget'), 'sweetMathWidget'); } add_action("plugins_loaded", "sweetMathWidgetInit"); |
Step 3: Add Theme Compatibility
You want everyone you use your plugin right? Well if it isn’t compatible with any themes nobody is going to use it. To add theme compatibility we need to modify the first function we wrote to look like this.
1 2 3 4 5 6 7 8 9 10 | function sweetMathWidget($args) { global $post; extract($args); echo $before_widget; echo $before_title; echo "<h2> Sweet Math Widget </h2>"; echo $after_title; echo "{$post->ID} x 5 = ";echo $post->ID*5; echo $after_widget; } |
Step 4: Upload & Add The Widget
Now that you’re done, save the file as sweet_math_widget.php and then zip the file using WinZip (or a similar tool). Upload the plugin to your WordPress install and then activate. If everything goes well, you’ll have a new widget in you Appearance -> Widgets area.
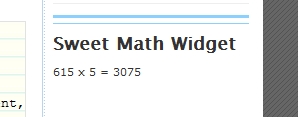
Drag “Sweet Math Widget into your sidebar and you’re done. Go to a post on your blog and you should see something like this.
You can download the full source code for this widget here.


