The Ruby on Rails community has long been a proponent of Behavior Driven Development(BDD) and has a great ecosystem around it supporting that testing methodology. From Cucumber to Capybara, RoR developers have it made when it comes to BDD. But what about Django? What about Python? Django and Python don’t have access to Cucumber or Capybara, but what we do have is a fantastic port of Cucumber called Lettuce.
What is Behavior Driven Development
Before we can get started talking about Lettuce and all the cool things you can do with it, we first need to talk about BDD.
Behavior-driven development combines the general techniques and principles of TDD with ideas from domain-driven design and object-oriented analysis and design to provide software developers and business analysts with shared tools and a shared process to collaborate on software development. (Wikipedia)
BDD arose out of the need for the business side of software and the engineering side of software to communicate more effectively. Prior to BDD, it was a lot more difficult to communicate the business requirements of a project to developers. Sure there were spec documents, but those still needed to be translated into a language the computer can understand. With BDD, tests and acceptance criteria are more accessible to everybody involved. Dan North suggested a few guidelines for BDD, and then the development community took it from there.
- Tests should be grouped into user stories. Essentially narratives about the expected functionality.
- Stories should have a title. The title should be clear and explicit.
- There should be a short narrative at the beginning of the story, that explains who the primary stakeholder of the story is, what effect the story should have, and what business value the stakeholder derives from this from this effect.
- Scenarios(tests) should follow the format of first describing the initial conditions for the scenario, then which event(s) triggers the start of the scenario, and finally what the expected outcome of the scenario should be.
- All of these steps should be written out in natural language, preferably using the Gherkin syntax.
An example feature using Gherkin.
Feature: Authentication
    In order to protect private information
    As a registered user
    I want to log in to the admin portal

    Scenario: I enter my password correctly
        Given the user "Jack" exists with password "password"
        And I am at "/login/"
        When I fill in "Login" with "Jack"
        And I fill in "Password" with "password"
        And I press "Login"
        Then I should be at "/portal/"
And I should see "Welcome to the admin portal" |
Feature: Authentication
In order to protect private information
As a registered user
I want to log in to the admin portal
Scenario: I enter my password correctly
Given the user "Jack" exists with password "password"
And I am at "/login/"
When I fill in "Login" with "Jack"
And I fill in "Password" with "password"
And I press "Login"
Then I should be at "/portal/"
And I should see "Welcome to the admin portal"
So now that we know the gist of BDD, why would you want to use it? There are probably more reasons than the 3 I’m going to list, but I found these to justify my use of BDD in most cases.
- It’s easy for business minded people to understand what you’re trying to test.
- It’s easier to translate complicated business requirements into tests.
- Some things are easier to explain in natural language.
Alright, now we’re done with the background information. Let’s get rolling on some testing.
Getting Started
To follow the rest of this article, you’re going to need the following:
- A little Python experience
- A little Django experience
- Extremely basic knowledge of regular expressions
- Knowledge of how to set up a virtual environment using virtualenv (I also use virtualenvwrapper to make my life a bit easier)
- Firefox – Yes, I know you don’t need Firefox to do this, but its probably the easiest to use with Selenium.
On the bright side, no previous testing experience required!
The best place to start with all this getting the virtual environment set up.
jacks$ mkvirtualenv learning_lettuce |
jacks$ mkvirtualenv learning_lettuce
After that, lets get Django installed.
(learning_lettuce)jack:repos jacks$ pip install django |
(learning_lettuce)jack:repos jacks$ pip install django
And now we’ll need to create a new Django project.
(learning_lettuce)jack:repos jacks$ django-admin.py startproject learning_lettuce
(learning_lettuce)jack:repos jacks$ cd learning_lettuce/
(learning_lettuce)jack:learning_lettuce jacks$ ls -la
total 8
drwxr-xr-x   4 jacks  staff  136 Jun 19 07:50 .
drwxrwxrwx  28 jacks  staff  952 Jun 19 07:50 ..
drwxr-xr-x   6 jacks  staff  204 Jun 19 07:50 learning_lettuce
-rw-r--r-- 1 jacks staff 259 Jun 19 07:50 manage.py |
(learning_lettuce)jack:repos jacks$ django-admin.py startproject learning_lettuce
(learning_lettuce)jack:repos jacks$ cd learning_lettuce/
(learning_lettuce)jack:learning_lettuce jacks$ ls -la
total 8
drwxr-xr-x 4 jacks staff 136 Jun 19 07:50 .
drwxrwxrwx 28 jacks staff 952 Jun 19 07:50 ..
drwxr-xr-x 6 jacks staff 204 Jun 19 07:50 learning_lettuce
-rw-r--r-- 1 jacks staff 259 Jun 19 07:50 manage.py
At this point, I also like to CHMOD manage.py so I can execute it without calling Python directly.
(learning_lettuce)jack:learning_lettuce jacks$ chmod +x manage.py
(learning_lettuce)jack:learning_lettuce jacks$ ./manage.py runserver
Validating models...

0 errors found
June 19, 2013 - 06:53:29
Django version 1.5.1, using settings 'learning_lettuce.settings'
Development server is running at http://127.0.0.1:8000/
Quit the server with CONTROL-C. |
(learning_lettuce)jack:learning_lettuce jacks$ chmod +x manage.py
(learning_lettuce)jack:learning_lettuce jacks$ ./manage.py runserver
Validating models...
0 errors found
June 19, 2013 - 06:53:29
Django version 1.5.1, using settings 'learning_lettuce.settings'
Development server is running at http://127.0.0.1:8000/
Quit the server with CONTROL-C.
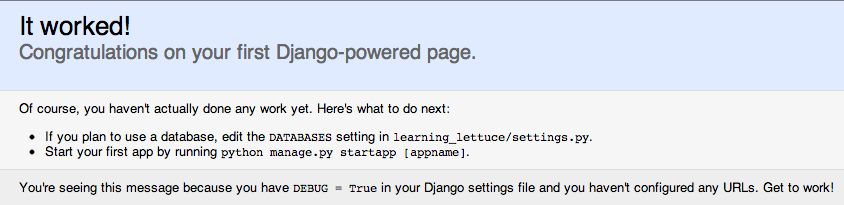
If you can run the server and see the image below, then we can proceed.

Now that we have Django set up, lets go ahead and create the app we’ll be testing in.
(learning_lettuce)jack:learning_lettuce jacks$ ./manage.py startapp blog |
(learning_lettuce)jack:learning_lettuce jacks$ ./manage.py startapp blog
And then go ahead and add the blog app to INSTALLED_APPS in your settings.py file.
INSTALLED_APPS = (
    'django.contrib.auth',
    'django.contrib.contenttypes',
    'django.contrib.sessions',
    'django.contrib.sites',
    'django.contrib.messages',
    'django.contrib.staticfiles',

    # Authored
    'blog',
) |
INSTALLED_APPS = (
'django.contrib.auth',
'django.contrib.contenttypes',
'django.contrib.sessions',
'django.contrib.sites',
'django.contrib.messages',
'django.contrib.staticfiles',
# Authored
'blog',
)
Also, lets configure our project to use SQLite3.
DATABASES = {
    'default': {
        'ENGINE': 'django.db.backends.sqlite3',
        'NAME': 'learning_lettuce.db',
    }
} |
DATABASES = {
'default': {
'ENGINE': 'django.db.backends.sqlite3',
'NAME': 'learning_lettuce.db',
}
}
Now that we have a Django project and one app set up, its time to take a break and talk about Lettuce.
Lettuce
No, not the vegetable you add to salads. I’m talking about the the BDD testing framework for Python (http://www.lettuce.it). Lettuce is basically a port of a BDD testing framework from the RoR community called Cucumber. The Lettuce website contains extensive documentation and is a great source for learning best practices with it. It’s worth noting however, that at the time of this writing the Lettuce website is undergoing some design changes. They’re incomplete and have made it pretty hard to extract information from the site. Hopefully by the time you need it for reference it’s back to being usable again.
Alright, back to work. Lets install Lettuce, Selenium, and Nose and then freeze a requirements file so we can replicate this environment if we ever need to.
(learning_lettuce)jack:learning_lettuce jacks$ pip install lettuce selenium django-nose
(learning_lettuce)jack:learning_lettuce jacks$ pip freeze > requirements.txt
(learning_lettuce)jack:learning_lettuce jacks$ cat requirements.txt
Django==1.5.1
django-nose==1.1
fuzzywuzzy==0.2
ipdb==0.7
ipython==0.13.2
lettuce==0.2.18
nose==1.3.0
selenium==2.33.0
sure==1.2.2
wsgiref==0.1.2 |
(learning_lettuce)jack:learning_lettuce jacks$ pip install lettuce selenium django-nose
(learning_lettuce)jack:learning_lettuce jacks$ pip freeze > requirements.txt
(learning_lettuce)jack:learning_lettuce jacks$ cat requirements.txt
Django==1.5.1
django-nose==1.1
fuzzywuzzy==0.2
ipdb==0.7
ipython==0.13.2
lettuce==0.2.18
nose==1.3.0
selenium==2.33.0
sure==1.2.2
wsgiref==0.1.2
You’ll also need to add Lettuce to INSTALLED_APPS in your settings.py file.
INSTALLED_APPS = (
    'django.contrib.auth',
    'django.contrib.contenttypes',
    'django.contrib.sessions',
    'django.contrib.sites',
    'django.contrib.messages',
    'django.contrib.staticfiles',

    # 3rd party
    'lettuce.django',

    # Authored
    'blog',
) |
INSTALLED_APPS = (
'django.contrib.auth',
'django.contrib.contenttypes',
'django.contrib.sessions',
'django.contrib.sites',
'django.contrib.messages',
'django.contrib.staticfiles',
# 3rd party
'lettuce.django',
# Authored
'blog',
)
So now that you have Lettuce installed, lets see that it actually works.
(learning_lettuce)jack:learning_lettuce jacks$ ./manage.py harvest
Django's builtin server is running at 0.0.0.0:8000
Oops!
could not find features at ./blog/features |
(learning_lettuce)jack:learning_lettuce jacks$ ./manage.py harvest
Django's builtin server is running at 0.0.0.0:8000
Oops!
could not find features at ./blog/features
Great, Lettuce worked! It didn’t find any tests to run, but thats ok. At least we’ve verified that we installed everything correctly.
Your First Test
Before you can test anything, you should probably have some content to test on. So let’s quickly wire up a simple view in the blog app.
# blog/views.py
from django.http import HttpResponse

def quick_test(request):
return HttpResponse("Hello testing world!"); |
# blog/views.py
from django.http import HttpResponse
def quick_test(request):
return HttpResponse("Hello testing world!");
# learning_lettuce/urls.py
from django.conf.urls import patterns, include, url

from blog.views import quick_test

urlpatterns = patterns('',
    url(r'^quick-test/$', quick_test),
) |
# learning_lettuce/urls.py
from django.conf.urls import patterns, include, url
from blog.views import quick_test
urlpatterns = patterns('',
url(r'^quick-test/$', quick_test),
)
Great! Now when you go to http://127.0.0.1:8000/quick-test/ you should see “Hello testing world!”.
The next step is to create a folder inside of the blog app called “features”. And inside of that create a file called “test.feature”. It’s worth noting that Lettuce doesn’t actually care what your file is named, so long as the extension is “.feature”. In “test.feature”, add the following:
Feature: Test
	As someone new to testing
	So I can learn behavior driven development
	I want to write some scenarios

	Scenario: I can view the test page
		Given I am at "/quick-test/"
Then I should see "Hello testing world!" |
Feature: Test
As someone new to testing
So I can learn behavior driven development
I want to write some scenarios
Scenario: I can view the test page
Given I am at "/quick-test/"
Then I should see "Hello testing world!"
Look at all that plain english! Even without me telling you anything, you can probably figure out what we’re trying to test. But let me break it down for you.
- Line 1: This loosely describes what all of the scenarios below are testing. Think of it as a way to logically group tests together.
- Lines 2-4: This is the narrative. It explains why you’re testing in the first place.
- Line 6: The title of your scenario. This describes what you are specifically testing in this instance.
- Lines 7-8: These are called “steps”. Steps are how you test your scenario. Each step maps to a method in your code.
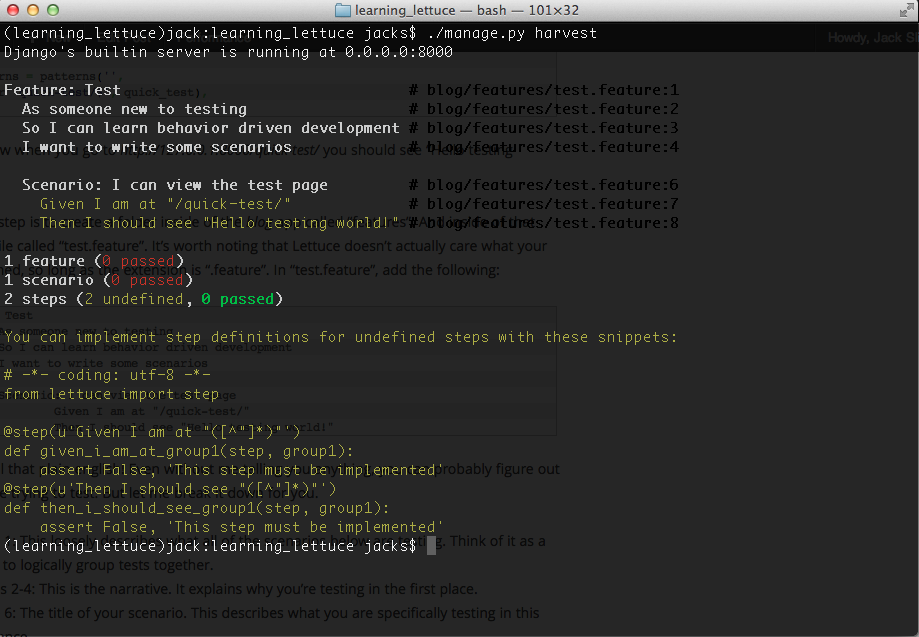
Alright, so now that you have your first test written, run it using “./manage.py harvest”. You should see the following:
Look at all that beautiful output! But what does it all mean?! It’s telling you that Lettuce attempted to run one scenario, and that the two steps within that scenario aren’t implemented yet (remember, each step maps to a method in your code). And because Lettuce is great, it gives you some code to help you implement those two steps.
The Terrain File
Lettuce keeps all of it’s settings and configuration is a file called terrain.py in the root of your Django project. It’s here that we’re going to configure the test database, Firefox, and Selenium. Go ahead and create a terrain.py file in the root of your Django project, and drop the following in it.
from django.core.management import call_command
from django.test.simple import DjangoTestSuiteRunner

from lettuce import before, after, world
from logging import getLogger
from selenium import webdriver

try:
	from south.management.commands import patch_for_test_db_setup
except:
	pass

logger = getLogger(__name__)
logger.info("Loading the terrain file...")

@before.runserver
def setup_database(actual_server):
	'''
	This will setup your database, sync it, and run migrations if you are using South.
	It does this before the Test Django server is set up.
	'''
	logger.info("Setting up a test database...")

	# Uncomment if you are using South
	# patch_for_test_db_setup()

	world.test_runner = DjangoTestSuiteRunner(interactive=False)
	DjangoTestSuiteRunner.setup_test_environment(world.test_runner)
	world.created_db = DjangoTestSuiteRunner.setup_databases(world.test_runner)

	call_command('syncdb', interactive=False, verbosity=0)

	# Uncomment if you are using South
	# call_command('migrate', interactive=False, verbosity=0)

@after.runserver
def teardown_database(actual_server):
	'''
	This will destroy your test database after all of your tests have executed.
	'''
	logger.info("Destroying the test database ...")

	DjangoTestSuiteRunner.teardown_databases(world.test_runner, world.created_db)

@before.all
def setup_browser():
	world.browser = webdriver.Firefox()

@after.all
def teardown_browser(total):
world.browser.quit() |
from django.core.management import call_command
from django.test.simple import DjangoTestSuiteRunner
from lettuce import before, after, world
from logging import getLogger
from selenium import webdriver
try:
from south.management.commands import patch_for_test_db_setup
except:
pass
logger = getLogger(__name__)
logger.info("Loading the terrain file...")
@before.runserver
def setup_database(actual_server):
'''
This will setup your database, sync it, and run migrations if you are using South.
It does this before the Test Django server is set up.
'''
logger.info("Setting up a test database...")
# Uncomment if you are using South
# patch_for_test_db_setup()
world.test_runner = DjangoTestSuiteRunner(interactive=False)
DjangoTestSuiteRunner.setup_test_environment(world.test_runner)
world.created_db = DjangoTestSuiteRunner.setup_databases(world.test_runner)
call_command('syncdb', interactive=False, verbosity=0)
# Uncomment if you are using South
# call_command('migrate', interactive=False, verbosity=0)
@after.runserver
def teardown_database(actual_server):
'''
This will destroy your test database after all of your tests have executed.
'''
logger.info("Destroying the test database ...")
DjangoTestSuiteRunner.teardown_databases(world.test_runner, world.created_db)
@before.all
def setup_browser():
world.browser = webdriver.Firefox()
@after.all
def teardown_browser(total):
world.browser.quit()
In your settings.py file, you’re going to need some additions too.
# Nose
TEST_RUNNER = 'django_nose.NoseTestSuiteRunner'

# Lettuce
LETTUCE_SERVER_PORT = 9000 |
# Nose
TEST_RUNNER = 'django_nose.NoseTestSuiteRunner'
# Lettuce
LETTUCE_SERVER_PORT = 9000
We use the Nose test runner because it’s faster than Django’s default test runner, and we change the server port for running tests so it doesn’t collide with our development server. At this point if you run `./manage.py harvest` again, you’ll still get notices for unimplemented steps, but you’ll also see Firefox open and close real quick. That means we’ve done our job correctly.
Your First Step Definition
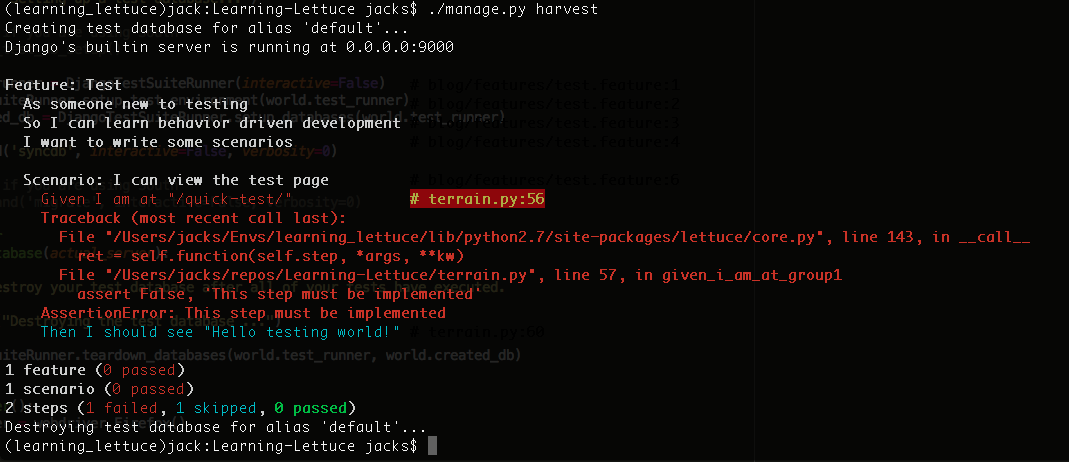
Alright, lets make something happen. If you look at the output from the harvest command, you’ll see that it gave you some code to help you implement the new steps that you wrote. Go ahead and copy that code into the bottom of the terrain.py file (and make sure to import ‘step’ at the top). Now, re-run ./manage.py harvest. You should get the following output.
So why did our steps fail? If you look that the code that was generated for you, there is a line that essentially says “False is equal to some string”. This is obviously not true, so our step fails. So why don’t we make the test pass? We’re going to change a few things:
- Change the decorator – We want this step to match even if we use other Gherkin keywords like “when”, “and”, and “then”.
- Change the function name and args – “group1” isn’t very descriptive
- Write the code – We need this to do something, and right now it doesn’t!
@step(u'I am at "([^"]*)"')
def i_am_at_url(step, url):
world.browser.get(url) |
@step(u'I am at "([^"]*)"')
def i_am_at_url(step, url):
world.browser.get(url)
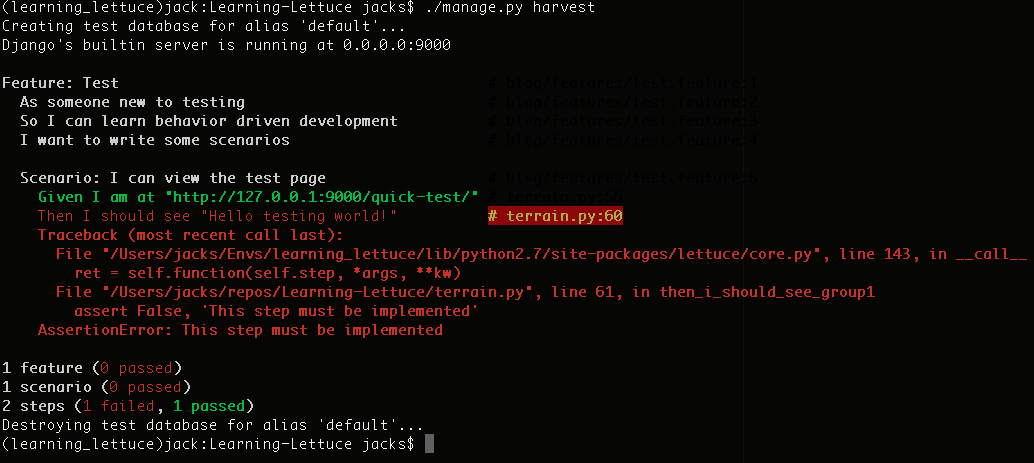
Now if you run ./manage.py harvest command again your tests will still fail, but this time for a different reason. The reason is the url that we’re passing into the step definition isn’t well formed. We were hoping to be able to pass relative urls in, but we can’t. So go ahead and modify the step in your scenario to look like this.
Given I am at "http://127.0.0.1:9000/quick-test/" |
Given I am at "http://127.0.0.1:9000/quick-test/"
Run ./manage.py harvest again. You’ll see one passing test and one failing test!
To make the next step pass, we need to make our web page a bit more formal. Go ahead and create a folder called “templates” inside of the “blog” app. Inside that folder, add a file called “base.html” and populate it with:
<html>
	<head>
		<title>Learning Lettuce!</title>
	</head>
	<body id='content'>
		{% block content %}{% endblock %}
	</body>
</html> |
<html>
<head>
<title>Learning Lettuce!</title>
</head>
<body id='content'>
{% block content %}{% endblock %}
</body>
</html>
Now create a file called “blog.html” inside the same folder. Give it the following content:
{% extends "base.html" %}

{% block content %}
Hello testing world!
{% endblock %} |
{% extends "base.html" %}
{% block content %}
Hello testing world!
{% endblock %}
You’ll also need to update the view:
from django.shortcuts import render_to_response

def quick_test(request):
return render_to_response("blog.html", {}) |
from django.shortcuts import render_to_response
def quick_test(request):
return render_to_response("blog.html", {})
And you’ll need to update your settings file.
## Add this at the top of settings.py
import os.path
root = os.path.dirname(__file__).replace('\\','/')

## Make your TEMPLATE_DIRS variable look like this
TEMPLATE_DIRS = (
    root + "/../blog/templates/",
) |
## Add this at the top of settings.py
import os.path
root = os.path.dirname(__file__).replace('\\','/')
## Make your TEMPLATE_DIRS variable look like this
TEMPLATE_DIRS = (
root + "/../blog/templates/",
)
Now that our template is more formalized, lets update the step definition in “terrain.py”.
@step(u'I should see "([^"]*)"')
def i_should_see_content(step, content):
	if content not in world.browser.find_element_by_id("content").text:
raise Exception("Content not found.") |
@step(u'I should see "([^"]*)"')
def i_should_see_content(step, content):
if content not in world.browser.find_element_by_id("content").text:
raise Exception("Content not found.")
This code explains itself pretty easily. We check to see if the content that is passed in via the step exists inside the body of the page. This has a few drawbacks:
- What if we don’t want to check the body? What if we want to check a different element?
- What if the content isn’t visible? (CSS hidden)
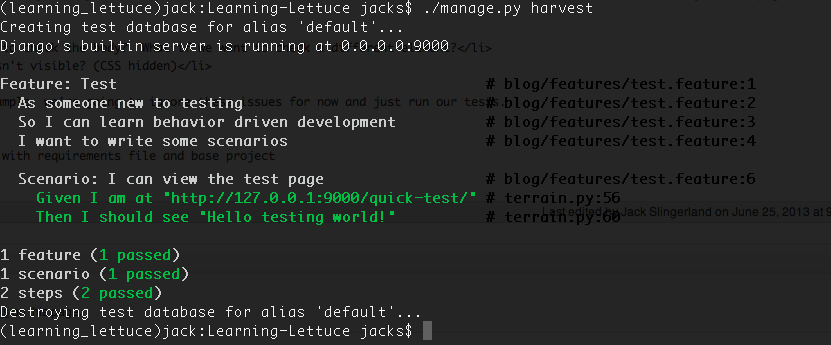
Since this is a simple example, we’re going to ignore these issues for now and just run our tests.
Passing tests!
Next Steps
Now that you have passing steps, you’re well on your way to writing serious integration tests for your code. But there is still a lot more to learn. The next article in this series will cover using Lettuce Webdriver to handle common step definitions, tables, scenario outlines, and much much more.
All code related to this post can be found at https://github.com/vital101/Learning-Lettuce