For a long time I thought that the most interesting problems in my field were in scalability. Some people may be more interested in scaling, and others might be more into slick interfaces and fast animations. But for me, scalability has continued to be my passion. For awhile though, it was a unicorn. That unattainable thing that I wanted to work on but couldn’t find anywhere to do it at. That is, until I started work at Future US.
Future is a media company. Originally they started in old media focusing heavily on gaming and tech magazines. Eventually the internet became prominent in everyday life, so more of their old media properties made the transition to the web. The one that really matters to me though is PC Gamer. I’ve been a huge fan of PC Gamer since I was about 7 years old. I still have fond memories getting demo disks in the mail with my subscription.
When I was hired at Future it was to help facilitate the move of PC Gamer from its existing platform (WordPress) to Django. Future had experienced success moving other properties to Django, so it made sense to do it with PC Gamer. When it eventually came time to implement our caching layer, we thought about a lot of different ways that it could be done. Varnish came up as an option, but we decided against it since nobody on the team had experience configuring it (and people elsewhere in the organization had experienced issues with it). Eventually we settled on having Nginx serve pages directly from Memcache. For us, this method works great because PC Gamer doesn’t have a lot of interaction (its almost completely consumption from the user end). Anything that does require back-and-forth between the server is handled via javascript, which makes full page caching super easy to do.

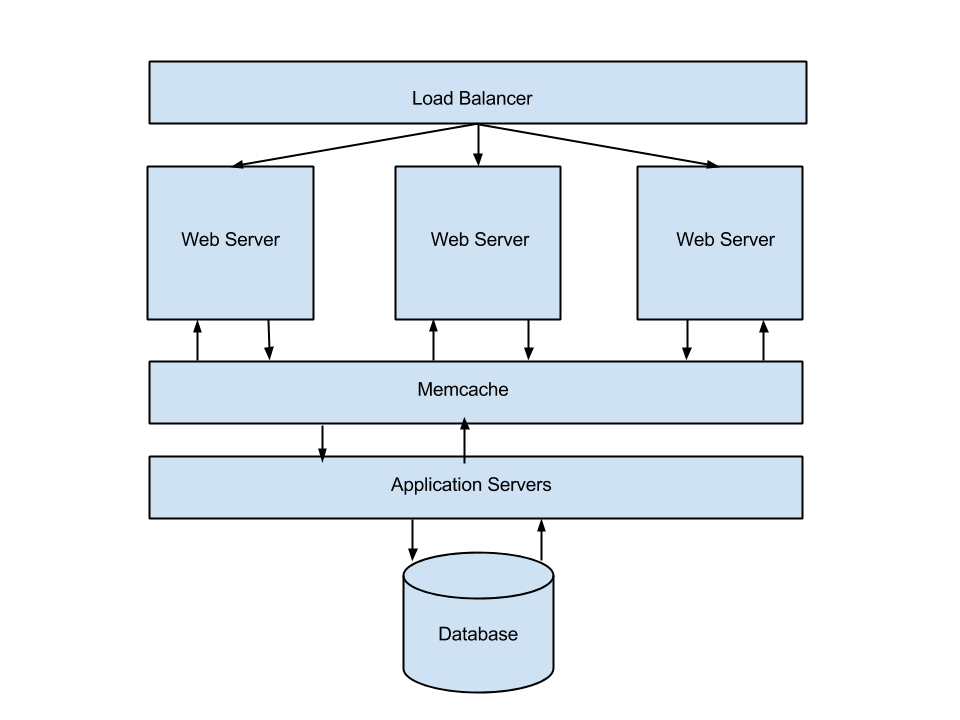
So how does it all work? The image above describes PC Gamer’s server architecture from a high level. Its pretty basic and works quite well for us. We end up having two types of requests: cache hits & cache misses. The flow for a cache hit is: request -> load balancer -> nginx -> memcache -> your browser. The flow for a cache miss is: request -> load balancer -> nginx -> application server (django) -> (store page in cache) -> your browser.
Since we’re basically running a static site, deciding what content to cache is easy: EVERYTHING!

Luckily for us Django already has a nice way of doing this: The per-site cache. But it is not without its issues. First of all, the cache keys it creates are insane. We needed something a little simpler for our setup so Nginx could build the cache key of the current request on the fly.
How It Works
The meat and potatoes of overriding Django’s per-site cache key comes in the `_generate_cache_key` function.
def _generate_cache_key(request, method, headerlist, key_prefix): if key_prefix is None: key_prefix = settings.CACHE_MIDDLEWARE_KEY_PREFIX cache_key = key_prefix + get_absolute_uri(request) return hashlib.md5(cache_key).hexdigest() |
To make things easier for Nginx to understand we just take the url and md5 it. Simple!
On the Nginx side of things, the setup is equally simple.
set $combined_string "$host$request_uri"; set_by_lua $memcached_key "return ngx.md5(ngx.arg[1])" $combined_string; # 404 for cache miss # 502 for memcached down error_page 404 502 504 = @fallback; memcached_pass {{ cache.private_ip }}:11211; |
All this setup does is take the MD5 of the host + request URI and then check to see if that cache key exists in memcache. If it does then we serve the content at that cache key, if it doesn’t we fall back to our Django application servers and they generate the page.
Thats it. Seriously. It’s simple, extremely fast, and works for us. Your mileage may vary, but if you have relatively simple caching requirements I highly suggest looking into this method before looking at something like Varnish. It could help you remove quite a bit of complexity from your setup.