In the Beginning
In late 2014 I decided that I needed a side project. There were some technologies that I wanted to learn, and in my experience building an actual project was the best way to do that. As I sat on my couch trying to figure out what to build, I remembered an idea I had back when I was still a junior dev doing WordPress development. The idea was that people building commercial plugins and themes should be able to use the automated update system that WordPress provides. There were a few self-managed solutions out there for this, but I thought building a SaaS product would be a good way to learn some new tech.
Getting Started
My programming history in 2014 looked something like: LAMP (PHP, MySQL, Apache) -> Ruby on Rails -> Django. In 2014 Node.js was becoming extremely popular and MongoDB had started to become mature. Both of these technologies interested me, so I decided to use them on this new project. As to not get too overwhelmed with learning things, I decided to use Angular for fronted since I was already familiar with it.
A few months after getting started, I finally deployed https://kernl.us for the world to see. To give you an idea of the expectations I had for this project, I deployed it to a $5/month Digital Ocean droplet. That means everything (Mongo, Nginx, Node) was on a single $5 machine. For the next month or two, this sufficed since my traffic was very low.
The First Wave
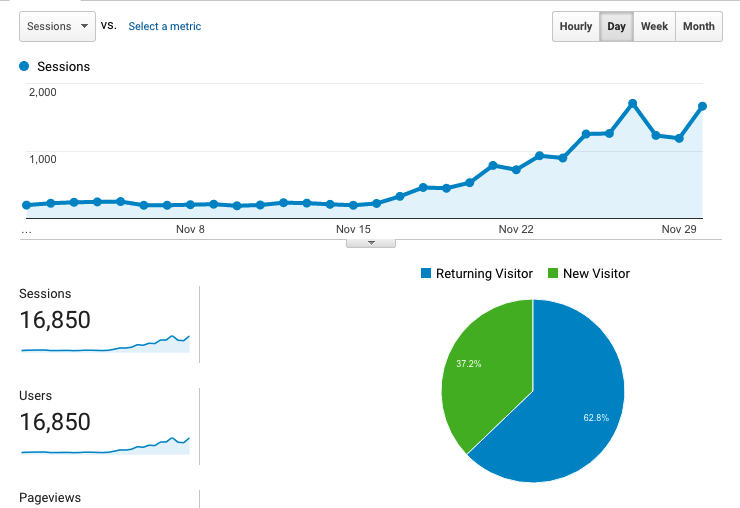
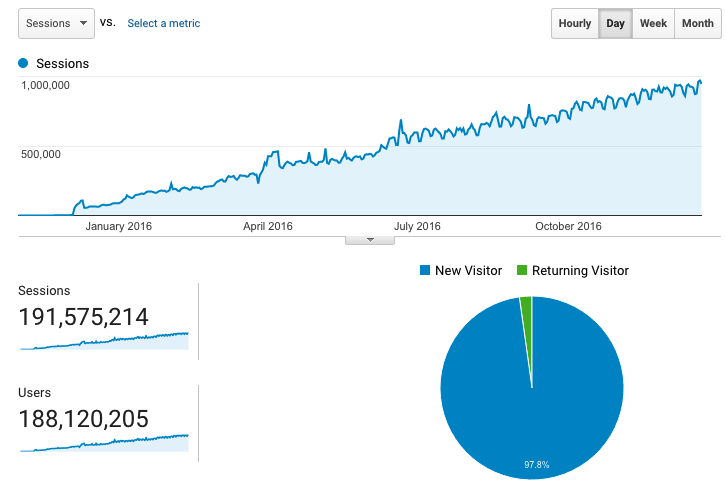
In December of 2014 things started to get interesting with Kernl. I had moved Kernl out of a closed alpha and into beta, which led to a rise in sign ups. Traffic steadily started to climb, but not so high that it couldn’t be handled by a single $5 droplet.
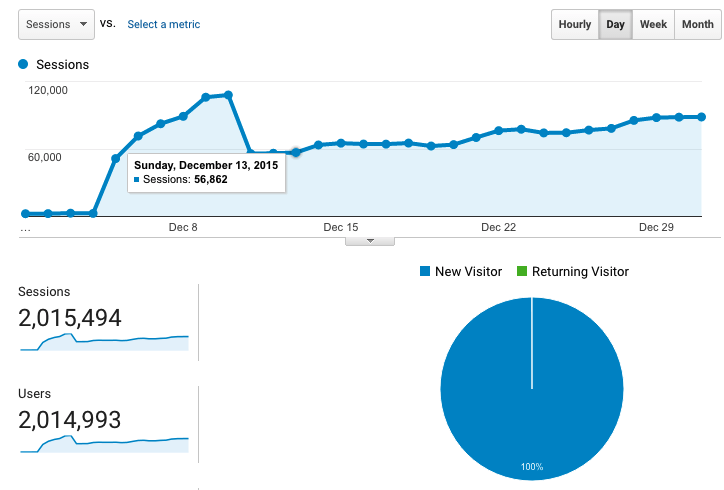
Around December 5th I had a customer with a large install base start to use Kernl. As you can see the graph scale completely changes. Kernl went from ~2500 requests per day, to over 2000 requests per hour. That seems like a lot (or it did at the time), but it was still well within what a single $5 droplet could handle. After all, thats less that 1 request per second.
Scaling Up
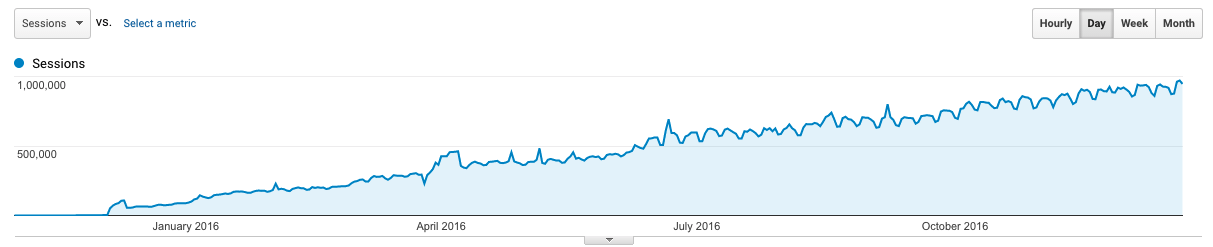
Through the first 3 months of 2015 Kernl experienced steady growth. I started charging for it in February, which helped fuel further growth as it made customers feel more comfortable trusting it with something as important as updates. Starting in March, I noticed that resource consumption on my $5 droplet was getting a bit out of hand. Wanting to keep costs low (both in my development time and actual money) I opted to scale Kernl vertically to a $20 per month droplet. It had 2GB of RAM and 2 cores, which seemed like plenty. I knew that this wasn’t a permanent solution, but it was the lowest friction one at the time.

During the ‘Scaling Up’ period that Kernl went through, I also ran into issues with Apache. I started out by using Apache as a reverse proxy because I was familiar with it, but it started to fall over on me when I would occasionally receive requests rates of about 20/s. Instead of tweaking Apache, I switched to using Nginx and have yet to run in to any issues with it. I’m sure Apache can handle far more that 20 requests/s, but I simply don’t know enough about tweaking it’s settings to make that happen.
SCaling Out & Increasing Availability
For the rest of 2015 Kernl saw continued steady growth. As Kernl grew and customers started to rely on it for more than just updates (Bitbucket / Github push-to-build), I knew that it was time to make things far more reliable and resilient than they currently were. Over the course of 6 months, I made the following changes:
- Moved file storage to AWS S3 – One thing that occasionally brought Kernl down or resulted in dropped connections was when a large customer would push an update out. Lots of connections would stay open while the files were being download, which made it hard for other requests to get through without timing out. Moving uploaded files to S3 was a no-brainer, as it makes scaling file downloads stupid-simple.
- Moved Mongo to Compose.io – One thing I learned about Mongo was that managing a cluster is a huge pain in the ass. I tried to run my own Mongo cluster for a month, but it was just too much work to do correctly. In the end, paying Compose.io $18/month was the best choice. They’re also awesome at what they do and I highly recommend them.
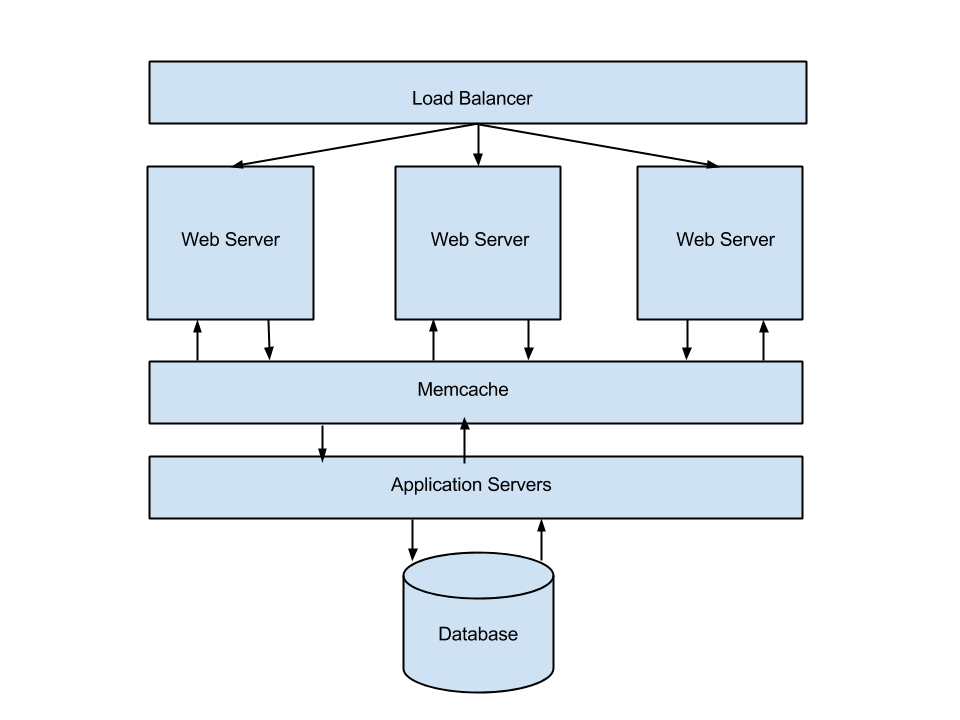
- Moved Nginx to it’s own server – In the very beginning, Nginx lived on the same box as the Node application. For better scaling (and separation of concerns) I moved Nginx to it’s own $5 droplet. Eventually I would end up with 2 Nginx servers when I implemented a floating ip address.
- Added more Node servers – With Nginx living on it’s own server, Mongo living on Compose.io, and files being served off of S3, I was able to finally scale out the Node side of things. Kernl currently has 3 Node app servers, which handle requests rates of up to 170/second.
Final Thoughts
Over the past year I’ve wondered if taking the time to build things right the first time through would have been worth it. I’ve come to the conclusion that optimizing for simplicity is probably what kept me interested in Kernl long enough to make it profitable. I deal with enough complication in my day job, so having to deal with it in a “fun” side project feels like a great way to kill passion.