In my previous article, I talked about how to set up a rudimentary custom post type in WordPress 3. This time, I’m going walk you through adding your own custom meta boxes to the admin interface.
Step 1: Add Meta Box (add_meta_box)
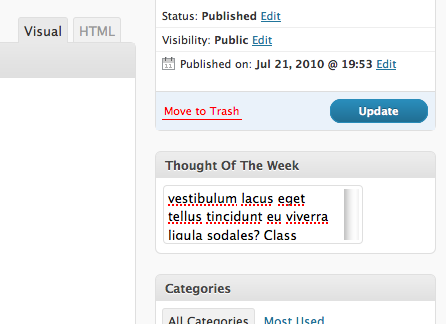
Out of the entire tutorial, this is probably the easiest part. We’re going to add a little side-column box for “Thought of the Week”.
1 | add_meta_box("thought_of_the_week-meta", "Thought Of The Week", "thought_of_the_week", "newsletter", "side", "low"); |
- Arguments
- The first argument in add_meta_box is a unique identifiable string. Try to user something descriptive. In this case, I chose “thought_of_the_week-meta”.
- The second argument is the title for the box that is going to show up. Once again, be descriptive so the end user doesn’t have to guess at this.
- The third argument is the function that displays your box information.
- The fourth argument is the custom post type that you want this box to show up with.
- The fifth argument is where you want the box. I wanted it on the side, so I entered “side”.
- The last argument is the priority of the box. If you want it to appear lower on the post type, just enter “low”. Else, you can add “high”.
Step 2: Display function & Get Post Meta (get_post_meta)
The next step is to create your display function. Here’s mine.
1 2 3 4 5 | function thought_of_the_week(){ global $post; $meta = get_post_meta($post->ID, 'thought_of_the_week', true); echo '<textarea name="thought_of_the_week">'.$meta.'</textarea>'; } |
First, you need to declare the “$post” global variable. This will give you access to a bunch of information, most important of which is the post ID. In the second line, I get any saved meta information with the name “thought_of_the_week” (more on this later). In the last line, I simply echo out a text area with the content from “get_post_meta”.
Step 3: Saving Your Meta Information (add_action)
This step is easy as well. Here you will register a save action with your custom post type. All that means is that when you click the “Publish” or “Save Draft” button, this function will be called.
1 | add_action("save_post", "save_details"); |
The first argument is an action (more about actions here) which determines what action the second argument should be attached to. The second argument is the function to get executed. I called mine “save_details”.
Step 4: Save the Details (update_post_meta)
The final step in creating a custom metabox in WordPress 3 is using the “update_post_meta”.
1 2 3 4 5 6 7 8 | function save_details($post_id) { global $post; if(isset($_POST['post_type']) && ($_POST['post_type'] == "newsletter")) { $data = $_POST['thought_of_the_week']; update_post_meta($post_id, 'thought_of_the_week', $data); } } |
Here’s a quick breakdown of this function.
- Declare the global “$post” variable.
- Check to see if the post type “newsletter” (or whatever your custom post type is named.
- Get the data out of the POST.
- Call update_post_meta().
The first argument in update_post_meta is the post ID. The second is the name of the meta box. The third is the data you wish to save.
Step 5: That’s it!
That’s all there is to it. Once you’ve done that, you can fetch the data anytime that you like by calling