Categories
PHP Programming

PHP Validate Email

Every so often (ok, a lot more than that), you need to validate an email address. The obvious solution is to use regular expressions, however PHP provides a better method using the filter_var() function.

To validate an email address using PHP, simply do the following:

1
2
3
4
5
6
$email = "jack@re-cycledair.wploadtest.xyz";
if(filter_var($email, FILTER_VALIDATE_EMAIL) == TRUE) {
     echo "Valid Email.";
} else {
     echo "Email is not valid.";
}

Note: This only works for PHP >= 5.2

Categories
PHP Programming Wordpress Development

WordPress 3 Custom Post Type Meta Box Tutorial

In my previous article, I talked about how to set up a rudimentary custom post type in WordPress 3.  This time, I’m going walk you through adding your own custom meta boxes to the admin interface.

Wordpress 3 Custom Post Type Meta Box

Step 1:  Add Meta Box (add_meta_box)

Out of the entire tutorial, this is probably the easiest part.  We’re going to add a little side-column box for “Thought of the Week”.

1
add_meta_box("thought_of_the_week-meta", "Thought Of The Week", "thought_of_the_week", "newsletter", "side", "low");
  • Arguments
    • The first argument in add_meta_box is a unique identifiable string.  Try to user something descriptive.  In this case, I chose “thought_of_the_week-meta”.
    • The second argument is the title for the box that is going to show up.  Once again, be descriptive so the end user doesn’t have to guess at this.
    • The third argument is the function that displays your box information.
    • The fourth argument is the custom post type that you want this box to show up with.
    • The fifth argument is where you want the box.  I wanted it on the side, so I entered “side”.
    • The last argument is the priority of the box.  If you want it to appear lower on the post type, just enter “low”.  Else, you can add “high”.

Step 2: Display function & Get Post Meta (get_post_meta)

The next step is to create your display function.  Here’s mine.

1
2
3
4
5
function thought_of_the_week(){
     global $post;
     $meta = get_post_meta($post->ID, 'thought_of_the_week', true);
     echo '<textarea name="thought_of_the_week">'.$meta.'</textarea>';
}

First, you need to declare the “$post” global variable.  This will give you access to a bunch of information, most important of which is the post ID.  In the second line, I get any saved meta information with the name “thought_of_the_week” (more on this later).  In the last line, I simply echo out a text area with the content from “get_post_meta”.

Step 3:  Saving Your Meta Information (add_action)

This step is easy as well.  Here you will register a save action with your custom post type.  All that means is that when you click the “Publish” or “Save Draft” button, this function will be called.

1
add_action("save_post", "save_details");

The first argument is an action (more about actions here) which determines what action the second argument should be attached to.  The second argument is the function to get executed.  I called mine “save_details”.

Step 4:  Save the Details (update_post_meta)

The final step in creating a custom metabox in WordPress 3 is using the “update_post_meta”.

1
2
3
4
5
6
7
8
function save_details($post_id) {
     global $post;
 
     if(isset($_POST['post_type']) && ($_POST['post_type'] == "newsletter")) {
          $data = $_POST['thought_of_the_week'];
          update_post_meta($post_id, 'thought_of_the_week', $data);
     }
}

Here’s a quick breakdown of this function.

  1. Declare the global “$post” variable.
  2. Check to see if the post type “newsletter” (or whatever your custom post type is named.
  3. Get the data out of the POST.
  4. Call update_post_meta().

The first argument in update_post_meta is the post ID.  The second is the name of the meta box.  The third is the data you wish to save.

Step 5:  That’s it!

That’s all there is to it.  Once you’ve done that, you can fetch the data anytime that you like by calling

Categories
PHP Programming Wordpress Development

WordPress 3 Custom Post Type Tutorial

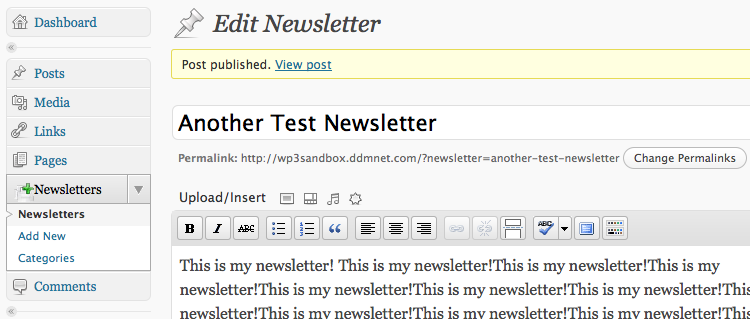
When WordPress 3.0 was released, all the hype was about something called “custom post types”.  Custom post types basically allow you to add your own content types to WordPress.  Lets say for instance that you want to create a newsletter.  A newsletter in your case, is a quick descriptions followed by the excerpts from several regular posts.  By default, WordPress doesn’t support this.  However, with custom post types we can add out own “Newsletter” post type and get to work.

Wordpress Newsletter Cusotm Post Type

Step 1:  Register the Custom Post Type

When creating a new custom post type, the first thing you need to do is register it with your WordPress install.  This can happen at the theme or plugin level.  In my trials with custom post types, I’ve always done it at the plugin level (mainly because I’m a developer, not a designer).

1
2
3
4
5
6
7
8
9
10
11
12
13
14
15
16
17
18
19
20
21
22
23
24
25
26
27
28
29
30
31
//Set up custom post type variables.
$labels = array(
   'name' => _x('Newsletters', 'post type general name'),
   'singular_name' => _x('Newsletter', 'post type singular name'),
   'add_new' => _x('Add New', 'Newsletter'),
   'add_new_item' => __('Add New Newsletter'),
   'edit_item' => __('Edit Newsletter'),
   'new_item' => __('New Newsletter'),
   'view_item' => __('View Newsletter'),
   'search_items' => __('Search Newsletters'),
   'not_found' =>  __('Nothing found'),
   'not_found_in_trash' => __('Nothing found in Trash'),
   'parent_item_colon' => ''
);
 
$args = array(
   'labels' => $labels,
   'public' => true,
   publicly_queryable' => true,
   'show_ui' => true,
   'query_var' => true,
   'menu_icon' => get_stylesheet_directory_uri() . '/images/newsletter.gif',
   'rewrite' => true,
   'capability_type' => 'post',
   'hierarchical' => false,
   'menu_position' => 20,
   'supports' => array('title','editor', 'excerpt')
);
 
//Register the newsletter post type.
register_post_type( 'newsletter' , $args );

Now, lets disect this a bit so you know what’s going on.

  • Labels
    • name – The name of your custom post type.  Usually this is the plural form of it.
    • singular_name – This is the singular form of your plural name.
    • add_new – Normally when you add a post, you click “Add new”.  It’s the same thing for this example.  However, you could make it say “Be more awesome! Add a newsletter!” (if you REALLY wanted to).
    • edit_item – Same as add_new.  You can change how the edit link is displayed.
    • new_item – When you first create your new newletter, this is what it will describe it as.  Once you have a title on it, it will display that instead.
    • For more information on these, I suggest the WordPress Codex.
  • Args
    • labels – General label information for your custom post type.
    • public – Should this be made available to all users?
    • publicly_queryable – Should the public be able to run queries against your post type?
    • show_ui – Do you need a user interface?
    • menu_icon – Path to the icon that is displayed in the admin.
    • rewrite – Should WordPress attempt to make the urls friendly?
    • supports – This bit is pretty important.  This is where you describe what is shown in the admin.  Currently I have “title”, “editor”, and “excerpt”.  You can also extend this with your own stuff later.
    • For more information on these, I suggest the WordPress Codex.
  • register_post_type – This hook is how you register your shiny new custom post type with WordPress 3.0.  First argument is a unique name that you give to your custom post type.  The second argument is the array that was defined above.

Step 2: Custom Categories (Taxonomy) [optional]

One of the nice things about custom post types in WordPress 3 is that you don’t have to use the same categories (taxonomy) as your other posts  and pages.  Registering a new taxonomy for your custom post type is very easy.

1
2
3
4
5
6
7
8
9
//Create taxonomy for categorizing newsletters
register_taxonomy(
   "Categories",
   array("newsletter"),
   array("hierarchical" => true,
      "label" => "Categories",
      "singular_label" => "Category",
      "rewrite" => true)
);

How this works is fairly straight forward.  The first argument is what you’d like your new post type categories to be called.  In this example, I opted for simplicity and went with “Categories”.  The second argument is the post types that you would like this taxonomy to show up on.  Since we only want it on our new post type, I’ve defined it as such.  The third argument is for options (lables, rewrite on/off, etc).

Step 3:  Your done!

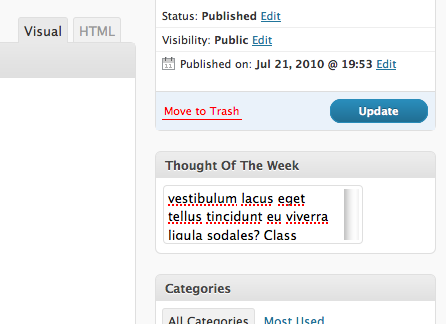
Really, it’s that easy.  If you want to make it really useful, you need to add meta boxes to admin interface so that you can do sweet custom content.  But at it’s bare minimum, this is all you need.

If there is sufficient interest, I can go into deeper detail about making a plugin with a custom post type.  Also, if you need help, drop a comment and I’d be happy to give your problem a shot.

Categories
Other

Wedding & Honeymoon

Just wanted to put a quick post out saying that there won’t be any updates for the next few weeks. My fiancé and I will be getting married on 7/31 and will be leaving for our honeymoon on 8/3.

Wish me luck! When I return, I hope to run a post on making custom post types play nice in WordPress 3.0.

Categories
PHP Programming

PHP Function Of The Day: ob_end_clean()

Sometimes you get in to a situation where you are working in an environment that drops everything into an output buffer before it spits it out the browser. In most languages this is called “output buffering”. The problem with having EVERYTHING buffered is being able to do special stuff like dynamic XML documents.

My solution to this little pickle was to just drop everything from the current output buffer and then kill the process after I’m done with it. To do this, just execute “ob_end_clean()” right before the functions/objects/code you need to execute. What “ob_end_clean()” does is drops all information that is currently stored in the output buffer, and then stops the buffering anything after it.

One “gotch ya” moment I had using this function was that it doesn’t end ALL cases of output buffering. If for some strange reason there is nested buffering going on, you’ll need to call the function as many times as it takes to get to the top of the call stack.

http://us2.php.net/manual/en/function.ob-end-clean.php

Categories
Other

The Idea That Wasn’t Meant To Be

Two summers ago I had a brilliant idea. College kids hate spending money. Books for classes cost money. Wouldn’t it be great if you knew whether or not you needed the book for class? That way, you could save money!

“Should I Get The Book?” was born out of this thought process. I worked hard on getting the coding part out of the way. It took about 4 weeks to get functional, working every day after work for 3 hours. After the coding was out of the way, I tried to make the site as nice as I could. I was a bit lazy with this though, and essentially “borrowed” a WordPress template and let ‘er rip.

I added schools, added subjects, added classes, and even seeded some reviews. Nobody came. I submitted my site for review to Hacker News, and they basically told me the idea was great, but the site wasn’t usable. In my infinite wisdom, I trudged ahead. I thought, if I advertise enough, people will surely come and leave reviews.

I ended up trying a few different advertising campaigns (Adwords, Facebook), and all brought some traffic, but nobody returned. It turns out that the site was fairly hard to use (which I’d been told by HN) and that without some kind of incentive nobody was going to leave reviews. There was also the part about nobody wanting to leave reviews because there weren’t any reviews there already (chicken & and egg problem?).

After unsuccessfully marketing my product for a few months and trying to get people to seed reviews, I gave up on the original and started on my redesign. The redesign was going to be grand! A huge ajaxy call to action form field in the middle of the screen just begging to be used, a karma system for people who seed reviews, special status for moderators, and incentives to invite your friends. The overall design also allowed people to discern the site’s purpose without reading a single word. Unfortunately, life has a way of putting a damper on even the best laid plans.

I quit grad school in January just as I was starting to make progress on the re-design. When I secured a real job, I found it became much harder to balance work, the fiance, side projects, and free time. I made the choice to sit on Should I Get the Book until the winter when I would have a bit more free time to work on it. Bad choice.

My fiance informed me today that Rate My Professor now has functionality that mimics Should I Get The Book. They implemented it better, already have a user base, and have the money and time to make it happen.

Does this make me sad? Sure it does. But I also feel like a weight has been lifted off my shoulders. For so long I thought Should I Get The Book would be my salvation from the life of a salary man, but as it turns out, it was only holding me back from other ideas that are probably better anyways.

Maybe I didn’t try hard enough. Maybe I didn’t put enough money into it. Or maybe I didn’t sacrifice enough. It could be any of these things, but I tend to think that this idea just wasn’t meant to be.