Categories
Other

HealthCare.gov: It almost worked

Ever since HealthCare.gov launched all I’ve been hearing about is how horrible the experience is. It never affected me directly, so I chalked it to a few vocal detractors trying to sway public opinion. I even went so far as to go to HealthCare.gov and use the logged-out experience to compare some plans. It looked pretty good actually, and I tweeted as such.

HealthCar.gov Tweet

That was all about to change though. I recently made the move to work at a small startup that doesn’t yet have an employer-sponsored health plan. They do however offer a stipend of sorts to help you pay for insurance costs on HealthCare.gov. And with that, my journey began.

Initial Sign Up

After discussing the healthcare situation with my wife, I ran the numbers and decided that it would be best for her to use her employer-sponsored healthcare and for me to use the exchange separately. At this point everything went as well as it could. Even though the UX on HealthCare.gov is pretty bad, I was able to figure out how to fill out an application, select health coverage, select dental coverage, and get things rolling. This all happened before December 23rd, which means I’d be getting coverage by January 1st! All was well… until I had to make a change.

The Change

As it turns out, I math’d wrong. When I was calculating the cost of healthcare for my wife at her job, I was off by something like $200 per month, which pushed her healthcare costs well into the “unreasonable for what I’m going to receive” range. With that in mind, I thought I could make a quick change on HealthCare.gov to get her on the same plan that I was. Boy was I wrong.

The process I had to take to get both my wife and myself health and dental insurance was ridiculous, and still hasn’t worked correctly. To add my wife to my plan, I had to delete the entire thing. Not only that, but I needed to delete my entire application and start over from scratch. Once I did that, I kept constantly running into javascript errors in their application which would force me to re-authenticate.

After finally getting through the application process, I get to the last step where I need to confirm. I press the button and… nothing. Not a goddamn thing. Being a software engineer, I do a little investigating and find out that the server is returning 500 errors to the client (in non-developer speak, this means that the server couldn’t process my request because of some error on their side). The error that is returned says that I should try to log-out, then resume the application. I do this, but when I try to resume my application I get:

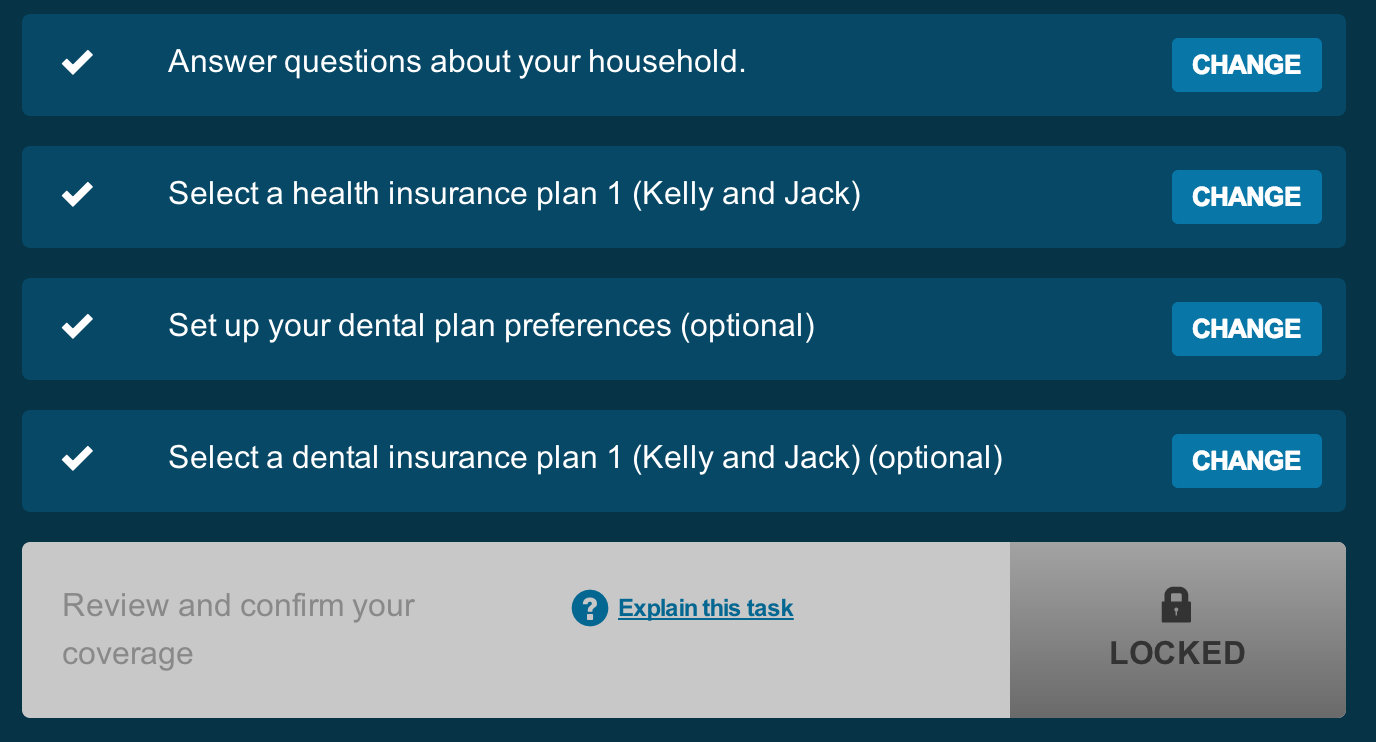
Thats right, my application is locked. It doesn’t give any reason, which is especially confusing considering that I was asked to re-authenticate. But there is a little link that can “explain this task”, so I click it, and it naturally didn’t work.

At this point, I was beginning to realize that I would need to contact their support to get things resolved.

Support and Next Steps

The first time I tried to use support, I clicked the helpful little “Live Chat” button. I then proceeded to wait for 25 minutes with no response. This was over the holidays, so I gave it another try after Christmas. This time I was connected to somebody, but no matter what question I asked I was given a canned response to contact the call center. My question is: Why have the “Live Chat” at all if you’re just going to tell me to contact the call center? It’s ridiculous and a waste of my time.

After my initial experience with HealthCare.gov, I’m not really excited to contact the call center. I honestly don’t have a ton of time to do it, and given the number of people that will be signing up for healthcare I’m sure the wait will be long. My likely next steps will be to cancel what remains of my application and start over. If it doesn’t work this time, then I’m going to cancel that application and contact my insurance provider of choice directly. In my case thats Blue Cross Blue Shield of Michigan, which happens to have a walk-in office about a block from where I work.

I create things all the time on the web. Its my chosen profession, so I know how hard it can be to make a good website when you need to integrate with a lot of different 3rd parties. However this sort of experience isn’t going to cut it. If I’m federally mandated to have health insurance, then the experience should be as painless as possible.

Because the system is broke I won’t have health coverage until February 1st now; a month long gap in coverage for my family. This just isn’t acceptable.

Categories
Django Python

Extending Django’s Model.save() Method

I’m currently working on a project where I have a model named ‘Instructor’ with a few fields:

  • first_name – CharField
  • last_name – CharField
  • departments – Many-toMany

I found out at some point that I’d really like a field called “full_name”, which is “first_name” and “last_name” concatenated together. I didn’t want to have to fill the field in though, I wanted it to happen automatically. To accomplish this, I extended Django’s Model.save() method after I added the ‘full_name’ column to my model.

class Instructor(models.Model):
    first_name = models.CharField(max_length=150)
    last_name = models.CharField(max_length=150)
    departments = models.ManyToManyField(Department)
    full_name = models.CharField(max_length=180, blank=True)
 
    def save( self, *args, **kw ):
        self.full_name = '{0} {1}'.format( self.first_name, self.last_name )
        super( Instructor, self ).save( *args, **kw )

And that’s it! Now every time I create a new instructor with ‘first_name’ and ‘last_name’, it automatically populates the ‘full_name’ field for me.

Categories
PHP Programming

Tracking Email Open Time with PHP

You can download my code for this article here.
Some time ago I had great aspirations of launching a web company that does email tracking and analytics. One of the things that I really wanted to figure out but wasn’t well documented on the web was how to track how long a user had a particular email open. When a company like MailChimp wants to track emails that they are sending out, they put a small image in the email called a “beacon”. When the user opens the email, the beacon image is requested from the server. The server sends the image, but not before it gathers information about the computer requesting it. The works great for checking if an email was opened, or what platform the person is on, but it doesn’t work at all for determining how long the email was open for.

One option that came to mind for checking the open time of an email was long polling.  Long polling (in this case) would use Javascript to contact the server every X seconds after the email was loaded.  Using those requests, it’d be trivial to find out how long it was open for.  Unfortunately, most (if not all) email clients don’t allow the execution of Javascript within emails, so that idea was completely sank.  The only option I had left was to use the beacon image to somehow determine open time.

The only option I could think of for using the image beacon without any Javascript was to redirect the image back to itself.  After much trial and error, I came up with the following.

//Open the file, and send to user.
$fileName = "../img/beacon.gif";
$fp = fopen($fileName, "r");
header("Content-type: image/gif");
while(!feof($fp)) {
    //Do a redirect for the timing.?
    sleep(2);
    if(isset($_GET['clientID'])) {
    	$redirect = $_SERVER['REQUEST_URI'];
    } else {
    	$redirect = $_SERVER['REQUEST_URI'] . "?clientID=" . $clientID;
    }
    header("Location: $redirect");
}

So what’s happening in this code?  First of all, we’re opening a small GIF file that we’re going to pretend to send to the user.  The second step is to send a header for an image file to the user so that their mail client expects one to be delivered.  This step is important because if the header isn’t sent, the browser/mail client will close the connection.  After that, you make the request sleep for a few seconds (as few or as many as you want depending on how granular you want your timing data to be) and then redirect back to the same page.  The “if” statement within the while loop is there so you can identify incoming requests and log the data accordingly.

So there you have it.  If you’ve ever wondered how people track the open time of an email, it’s probably a method very similar to this.  The only caveat to this method is that it relies on the user loading images in an email.  However, if you have a large enough sample you can just take the average open time from the users that did open it and be fairly confident with that.

Note: There has been some discussion over on Stack Overflow about this article. You may find it helpful.


If you liked this article, then you may like:

  • PHP Dark Arts: Multi-Processing (Part 1)
  • PHP Dark Arts: Multi-Processing (Part 2)
  • PHP Dark Arts: Shared Memory Segments (IPC)
  • PHP Dark Arts: Semaphores
  • PHP Dark Arts: GUI Programming with GTK
  • PHP Dark Arts: Sockets
  • PHP Dark Arts: Daemonizing a Process
  • Categories
    Other Programming

    CoffeeScript with WebSQL and jQuery

    Lately I’ve developed a distaste for Javascript.  I like what Javascript has done for the web, but I hate the syntax.  I hate that there are little “Gotch Ya!”‘s all over the language.  I don’t have to worry about that too much anymore though since I’ve started using CoffeeScript.  If you interested in learning more about it, check out the official web site, and then my “Getting Started” guide.

    Now that I’ve had a chance to dive in to CoffeeScript a bit more, I’ve started to integrate what I’m doing with other features and libraries to see what I can create.  For work I’ve been using a lot of WebSQL and jQuery, so that was the first place I took my new found CoffeeScript powers to.

    Using jQuery with CoffeeScript is really, really, easy.  For instance, let’s say we want to Ajax a page into an array:

    $.get("mypage.html", (data) ->
        myArray.push data
    )

    The syntax changes just a hair, but overall it looks a lot cleaner.

    As mentioned previously, the other thing I’ve been doing a lot at work recently was working with WebSQL.  It’s been dropped by the W3C, but Webkit has implemented it already so it’s here to stay.  Anyways, CoffeeScript makes WebSQL a little more palatable.

    #Start a transaction
    db.transaction( (tx) ->
        query = "SELECT * FROM table"
        tx.executeSql(query, [], (tx, results) ->
            rLength = results.rows.length
            for(i=0; i < rLength; i++)
                alert results.rows.item(i).someColName
        )
    )

    With WebSQL and CoffeeScript, the syntax doesn’t change a ton, but I like the look of it better without the braces.

    Another feature that I wanted to share with out about CoffeeScript is it’s equivalent to PHP’s key, value loop construct.  In PHP, it would look like:

    foreach($key => $value as $myArray) {
        //do stuff
    }

    In CoffeeScript, the equivalent is:

    for own key, value of myArray
        #Do stuff.

    The benefit of the CoffeeScript version is that it can loop over object properties as well, not just arrays.  If you have any other cool features or examples of CoffeeScript usage, drop a link (or example) into the comments.

    Categories
    Other

    My History of Failure

    “I’ve failed over and over and over again in my life, and that is why I succeed.”

    This is my third attempt.  I’ve tried twice before and failed, but this time could be different.  It could end up in failure just like the others, but I don’t think it will.  I’m smarter this time around.  I’ve learned from my mistakes, am better at what I do, and I have more to lose.

    Encode4Free

    The first time around was in 2007.  I had just learned PHP and thought I had what it took to make a video encoding startup.  This was before the term “cloud” was popular, and my idea was that users would upload videos to my service, encode them into whatever format they liked, and then re-download them.  For revenue, I thought that a free service could be done by adding advertising to the beginning of the encoded video.  Or, a user could pay small fee to get moved to the front of the queue and have no advertisements.

    The idea seemed good, but I wasn’t dedicated to it.  I got a design going and had the back-end encoding stuff working, but I just couldn’t act on it.  Some other things went wrong too.

    • No motivation – I was still in college, didn’t need the money, and enjoyed my life just where it was.  There wasn’t really a huge motivation for me to do this.
    • No passion – I honestly didn’t care about video encoding.  Sure it’s cool, but only cool from a technical standpoint.  It wasn’t something I could really get behind.
    • Knowledge – I really had no idea how deep the programming rabbit hole went at this point.  Not knowing what good design was really put a cramp in how fast I could develop too.  In short, I was inexperienced and it showed.
    • Flawed business model – In retrospect, this should have been a freemium model.  10 minute video for free, anything over is charged.  That way people don’t get annoying advertisements added to their videos.

    Should I Get The Book?

    In 2008 and early 2009 I worked on “Should I Get The Book?”(SIGTB).  As a grad student reflecting on my undergraduate years, I realized that I spent a ridiculous amount of money on books that I never needed.  After talking to friends and classmates, it seemed this was a universal problem, and my startup idea was born.  This time, I did things right (sort of).  I took a few hours every week over the the summer and started hacking away at it.  By the end of the summer, I had a functioning product.  I did a launch, and the waited.  But nobody came.

    So what happened?  Was it competition?  Was it a poor idea?  Well, it was a lot of things.

    • Design – This is huge.  My site design sucked.  I basically ripped off a WordPress template that somebody made because it looked cool.  It had nothing to do with my idea, and it showed.  People coming to the page would say “So what is this about?”.
    • UI – The interface and experience was awful.  None of it made sense, and the changes that people did suggest I back-burnered until I “had more time”.
    • Seed Data – The idea that users leave reviews about whether they needed the book or not was great, except that nobody would do it.  Without having some reviews already in there, I found that people weren’t motivated to leave a review because they thought the site wasn’t being used.  I needed to have data seeded, but I couldn’t think of a good way to do this without paying any money (I had none at the time).
    • Focus – I tried to focus on too many schools at once with the first launch.  I should have started with one to see if the concept would stick.
    • Advertising – On a college campus, flyers and word of mouth is key.  I had zero flyers and nobody talking about me.
    • Karma – Users like getting a reward for doing something.  It doesn’t have to be money, karma works just as well.  Users get to scratch their competitive urge by posting reviews, getting karma, and checking to see if they have more then their friends. I should have done this, but didn’t.
    • Evergreen data – One of the big problems with this data is that the instructor can change books, change styles, or even stop teaching.  The data can become useless quickly.

    Once I realized most of these things I vowed to start a re-design with all of these issues addressed.  I was about 25% of the way through the mock-up when I was informed that RateMyProfessor.com had a similar feature.  It was easy to use, and they already had a huge user base.  My idea was basically sunk.

    While SIGTB flopped, it was important step for me.  I had pushed a project through to completion, learned a lot about marketing, and learned that I really need a co-founder to talk me out of bad ideas.  Most importantly though, I proved to myself that I could accomplish something.  I might have given up too quickly, but I think that the idea wouldn’t have worked well anyways.

    CampaignAlytics (Working Name)

    I started this idea out in late October of this year.  The idea is that email campaign analytics can be done better.  Currently analytics is rolled in as a feature for big mailers (Mail Chimp, etc), but it doesn’t provide the in-depth analytics that a lot of marketing folks are looking for.  We’re looking to change that.  I’ve been working for an hour a day since November 1st, and have a lot to show for it.  I pitched the idea to a local pitch night, and the reception was great.  We have a lot of great features, and do it all in a non-obtrusive way that is compatible with mailing services, or can be rolled into your custom solution using our API.

    I’m taking a different path with this startup, based on the things I’ve learned on the last two.

    • Pay for a design – The first thing I did for this web app was pay for a design.  I got a great deal, and now have a design that I can be proud of and shows off the product like nothing I could have ever come up with.
    • Co-Founder – Having someone to talk you out of bad ideas, and give you a sense of perspective is amazing.  Having someone to discuss ideas with and share the burden is pretty great too.
    • Funding – I’ve come to the conclusion that without a little bit of funding, this startup will take forever to complete.  We’re applying to the seed incubator Momentum and hopefully we’ll get funded.
    • Iterate – I’ve already gone through two different layouts and menu structures for the account/analytics page.  The second version is far better than the first because I asked for feedback from a few trusted people and implemented the changes right away.

    The thing I hope you can take away from this is that you are going to fail many times before you succeed.  Being persistent (and maybe a bit stubborn) will take you 70% of the way there, and the rest is on how good your idea is.

    Categories
    PHP Programming

    PHP Bitwise Operations

    A bitwise operation is an operation that works on the individual bits of a number.  Yes, that means the binary(base 2) representation of a number.  These bitwise operations work by exploiting properties of binary numbers to their advantage.  For instance, if the binary representation of a number ends with a 1, it’s odd.

    Base 2 Refresher

    For those of us who don’t manipulate bits every day (including myself), I thought that a quick refresher on binary representation would be a good idea.  First, let’s create a table.

    4 3 2 1 0
    0 0 0 0 1

    Each column in the table represents a power of 2.  The first column (from the right) represents 20, the second 21, and so on.  Notice that I have a 1 in the row below the 0 column.  That stands for 20, and 20 is equal to 1.  Therefore, the number represented above (00001) is equal to 1.  On to the next table.

    4 3 2 1 0
    0 0 1 1 1
    Now the base-2 number in the bottom row is 00111.  This is equal to 22 + 21 + 20, or 4 + 2 + 1, which is equal to 7.  As you can see, using binary representation is pretty easy.  On to our final example.
    4 3 2 1 0
    1 1 0 0 1
    This example a bit (har, har) trickier.  The base-2 number in the bottom row is 11001, which is  24 + 23 +20(16 + 8 + 1) = 25.  Notice if there are zeros in the columns, we just ignore them completely.
    And that’s it!  Base-2 representation of numbers is easy, and critical for every programmer to understand.  Now on to some tricks.

    Trick 1 : Odd / Even

    One of the most useful bitwise tricks for web developers is for determining if a number is even or odd.

    for($i = 0; $i < 10; $i++) {
         if($i & 1) {
              echo "This is odd.";
         } else {
              echo "This is even.";
         }
    }
    So how does help your web development?  Alternating rows.  If you deal with data in a tabular format, you nearly always need to alternate row color on a table.  Using the bitwise “AND” operator is a good way to accomplish this.

    Trick 2 : Multiplication and Division

    Using the left-shift (<<) and right-shift (>>) operators, we can easily divide and multiple by powers of two.  These operators aren’t limited to powers of two, but it makes things easier to understand.
    //Example 1
    $x = 2;
    echo $x &lt;&lt; 1; //4
    echo $x &lt;&lt; 2; //8
     
    //Example 2
    $x = 16;
    echo $x &gt;&gt; 1; //8
    echo $x &gt;&gt; 2; //4

    In example 1, we left shift the number 2 one place.  By left shifting 1 place, it’s the same as multiplying that number by 2.  By left shifting 2 places, it’s the same multiplying the number by 2 twice.

    Example 2 is doing bitwise division.  Right shifting by 1 place is the same as dividing the number by 2.  Right shifting by 2 places, is the same is the same as dividing the number by 2 twice.

    Others

    There are most definitely a ton of other uses for bitwise operators, however these are the ones I use the most.  If you happen to have a favorite, please let everyone know about it in the comments.

    For a more in depth introduction to bitwise operations please check out http://en.wikipedia.org/wiki/Bitwise_operation and http://www.litfuel.net/tutorials/bitwise.htm

    Categories
    PHP Programming

    PHP Dark Arts: Daemonizing a Process

    Note:  Full source code for the example can be downloaded here.

    One of the many things you don’t often do with PHP (actually, I’m not sure you do this much with any language) is daemonize a process.  A daemon is program that runs in the background (read more here).  On Unix systems, processes are usually created by forking the init process and then manipulating the process to your liking.  To create a daemon though, you need to get the init process to adopt your process.  To do that, as soon as you fork the parent process, you kill the parent.  Since you child process is parent-less, the init process generally adopts it.  Once that happens, your process has been daemonized.

    What You Need To Know

    In order to follow the example, you’ll probably want to read up on multiprocessing in PHP and using POSIX in PHP.  Aside from that, keep an open mind.  There are probably better ways to do this (Nanoserv), but I think that doing it manually is a great way to learn more about systems programming and PHP.

    Step 1:  Fork It

    The first thing that you need to do when daemonizing a process in PHP is fork the process.  After that, we promptly kill the parent process so that the child process can be adopted.

    //Set the ticks
    declare(ticks = 1);
     
    //Fork the current process
    $processID = pcntl_fork();
     
    //Check to make sure the forked ok.
    if ( $processID == -1 ) {
    	echo "\n Error:  The process failed to fork. \n";
    } else if ( $processID ) {
    	//This is the parent process.
    	exit;
    } else {
    	//We're now in the child process.
    }

    Step 2:  Detach It

    Now that we have successfully forked the process and killed the parent, we need to detach the process from the terminal window.  We do this so that when the terminal window closes, our process doesn’t close with it. Once that’s done, we get our processes’ id.

    //Now, we detach from the terminal window, so that we stay alive when
    //it is closed.
    if ( posix_setsid() == -1 ) {
    	echo "\n Error: Unable to detach from the terminal window. \n";
    }
     
    //Get out process id now that we've detached from the window.
    $posixProcessID = posix_getpid();

    Step 3:  /var/run

    Now that we have our processes’ id, we need to let the system know about it.  To do this, we create a file in /var/run.  This file can be named anything you want, just make sure that it’s unique and it ends with the .pid extension.  In that file, we place the pid of our process and that’s it.

    //Create a new file with the process id in it.
    $filePointer = fopen( "/var/run/phpprocess.pid" , "w" );
    fwrite( $filePointer , $posixProcessID );
    fclose( $filePointer );

    Step 4:  Do Something

    Now that all the hard stuff is done, you can get to work.  What do you want your process to do?  For this example, I have mine adding 1 + 1 every 10 seconds.  Nothing too difficult, but you can make your process do whatever you like.  For instance, you could set up a server of some sort.  Note that this the code is sitting in an infinite while loop.  This is done so that the process doesn’t exit naturally.

    //Now, do something forever.
    while (true) {
    	$x = 1 + 1;
    	sleep(10);
    }

    Step 5:  Run It

    To run this process as a daemon, all you need to do is save you file and run php <myfile>.php.  You may need to execute it as a super user depending on how you permissions are set up.  Once it’s run, you can check out the results of your hard work by running ps aux | less.  Scroll to the bottom and your process should be there.  In the screen shot below, mine is 3rd from the bottom.

    Daemonizing a ProcessNote:  Full source code for the example can be downloaded here.

    Did you like this article?  Check out the rest of the Dark Arts.

    Categories
    PHP Programming

    Document Your Code

    When you started learning to program, documenting your code was the last thing on your mind. You’re were here to learn, and learn is what you did. As your programs started to grow in complexity, your college professors preached to you “You must document your code! What if you have to come back to it in 6 months? Will you remember how everything works?”. So, you dutifully documented your code. But then something strange happened: you got a job. In the real world there are deadlines, and that extra minute you should have taken to document the code is gone. But the thing is, you MUST document your code. If not for you, do it for me. Because guess what, I’m the one that has to go in and fix it, and knowing what’s going on would make my life a lot easier.

    A Story

    When I started my current job, one of the other programmers was assigned to get me up to speed with our CMS. My first question was “Is there any documentation I can go over?”, to which he responded “Nah, just dive in and you’ll be fine.”. So I dove in and it only got worse from there. As I looked through the code, nothing was documented. Nothing! I spent the next 3 months sifting through code trying to figure out how it all works. I eventually did figure it all out, but it was 3 months where I was working at maybe 50%-60% of my maximum efficiency. Having any sort of documentation would have made this process much easier. Not only that, but because of the lack of documentation we constantly create duplicate functionality. After all, how are you supposed to know what functionality exists if there no documentation on it?

    Now that I’ve been at my current job awhile, I’ve decided to change things. I’ve started taking 15 to 30 minutes a day to document our CMS using the PHPDoc format. It may or may not catch on with the rest of the programmers, but I know that every function and class that I write has full documentation, and it feels good when the documentation gets generated with PHPDoc. I believe the quote is “You need to be the change you believe in”.

    How to Document Your Code

    It’s easy. Really easy actually.

    /**
    * Function short description
    *
    * This is a long description of the function.  Discuss what this function does in
    * any detail that is necessary.
    *
    * @global void $globalVariable
    * @param int $aParameter This is the description of the parameter.
    * @param mixed $bParameter This is the description of another parameter.
    * @return bool This is a description of the return variable.
    * @todo Does something need to be done?  Put it here.
    */
    function my_function($aParameter, $bParameter) {
         global $globalVariable;
     
         //If you are doing something extra complicated, make a comment inside the
         //function.  Otherwise, you code should speak for itself.
         for($i=0; $i &lt; 20; $i++) {
              echo $i;
         }
     
         return true;
    }

    That’s it. That’s all you need to get started documenting PHP code. There’s a lot more you could be doing, but it’s not all that important. So long as you document the parameters, the return type, and write a description about what the function does, you have the important bits.

    So next time you think to yourself “I’ll document it later.”, just take the time to do it now. Because guess what? You aren’t going to go back. Something else is going to come up, and then the rest of us will suffer.