Categories
PHP Programming

PHP Dark Arts: References

Remember the first time you dabbled in C?  Oh, the glorious typing, functions, and structs!  Now do you remember the first time you ran in to a pointer?  ‘*’, ‘&’, ‘->’ all made your hurt, but eventually you figured it out.  It’s fortunate (depending how you look at it) that we don’t have need to dabble with pointers or references while web programming these days.  However, PHP does allow us to passing things around by reference.  It’s not used often, but when used correctly can be very beneficial to the quality of your code.

What are PHP references?

The first thing you need to know about PHP references is that they are not C references.  You can’t do pointer arithmetic on them because they aren’t actually addresses.  In PHP references are actually symbol table aliases.  This means that you can have 2 variable names sharing the same variable content.

What can you do with references?

There are 3 things that you can do with PHP references.

  • Assign by reference.
  • Pass by reference.
  • Return by reference.
$x =& $y;
$x = 3;
echo "X: $x, Y: $y";

The above code sets $x and $y’s references to the same content area. Therefore, when $x is assigned 3, $y has access to the same data.

function add_item(&$item) {
   	$item++;
}
 
$totalItems = 0;
for($i = 0; $i <; 5; $i++) {
	add_item($totalItems);
}
echo "Total items: $totalItems";

This code allows you to modify a variable’s value without ever returning anything. In this example I made a simple counter, but you can set the value of $item to anything and it should work out just fine.

class Test {
	public $count = 0;
 
	public function &getCount() {
		return $this->count;
	}
}
 
$t = new Test();
$value = &$t->getCount();
$t->count = 25;
echo $value;

This code returns a reference to the public $count variable of the Test class. Generally this isn’t best practice, as it lowers the readability of the code.

Unsetting References

In the event that you want to free a variable from it’s reference to another, you can simply use the unset function.

$x =& $y;
unset($x);
Categories
PHP Programming

PHP Dark Arts: Daemonizing a Process

Note:  Full source code for the example can be downloaded here.

One of the many things you don’t often do with PHP (actually, I’m not sure you do this much with any language) is daemonize a process.  A daemon is program that runs in the background (read more here).  On Unix systems, processes are usually created by forking the init process and then manipulating the process to your liking.  To create a daemon though, you need to get the init process to adopt your process.  To do that, as soon as you fork the parent process, you kill the parent.  Since you child process is parent-less, the init process generally adopts it.  Once that happens, your process has been daemonized.

What You Need To Know

In order to follow the example, you’ll probably want to read up on multiprocessing in PHP and using POSIX in PHP.  Aside from that, keep an open mind.  There are probably better ways to do this (Nanoserv), but I think that doing it manually is a great way to learn more about systems programming and PHP.

Step 1:  Fork It

The first thing that you need to do when daemonizing a process in PHP is fork the process.  After that, we promptly kill the parent process so that the child process can be adopted.

//Set the ticks
declare(ticks = 1);
 
//Fork the current process
$processID = pcntl_fork();
 
//Check to make sure the forked ok.
if ( $processID == -1 ) {
	echo "\n Error:  The process failed to fork. \n";
} else if ( $processID ) {
	//This is the parent process.
	exit;
} else {
	//We're now in the child process.
}

Step 2:  Detach It

Now that we have successfully forked the process and killed the parent, we need to detach the process from the terminal window.  We do this so that when the terminal window closes, our process doesn’t close with it. Once that’s done, we get our processes’ id.

//Now, we detach from the terminal window, so that we stay alive when
//it is closed.
if ( posix_setsid() == -1 ) {
	echo "\n Error: Unable to detach from the terminal window. \n";
}
 
//Get out process id now that we've detached from the window.
$posixProcessID = posix_getpid();

Step 3:  /var/run

Now that we have our processes’ id, we need to let the system know about it.  To do this, we create a file in /var/run.  This file can be named anything you want, just make sure that it’s unique and it ends with the .pid extension.  In that file, we place the pid of our process and that’s it.

//Create a new file with the process id in it.
$filePointer = fopen( "/var/run/phpprocess.pid" , "w" );
fwrite( $filePointer , $posixProcessID );
fclose( $filePointer );

Step 4:  Do Something

Now that all the hard stuff is done, you can get to work.  What do you want your process to do?  For this example, I have mine adding 1 + 1 every 10 seconds.  Nothing too difficult, but you can make your process do whatever you like.  For instance, you could set up a server of some sort.  Note that this the code is sitting in an infinite while loop.  This is done so that the process doesn’t exit naturally.

//Now, do something forever.
while (true) {
	$x = 1 + 1;
	sleep(10);
}

Step 5:  Run It

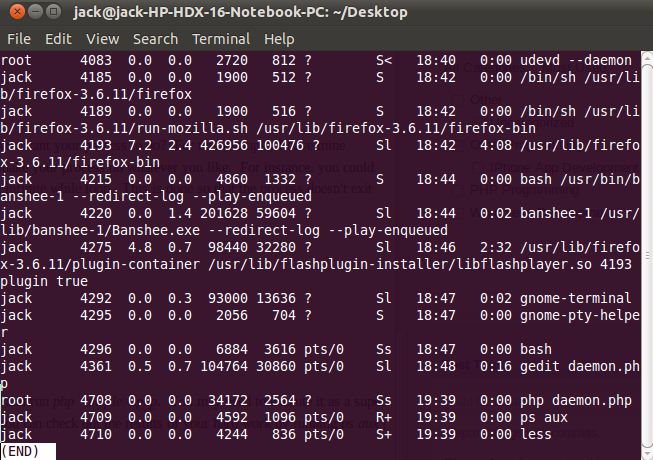
To run this process as a daemon, all you need to do is save you file and run php <myfile>.php.  You may need to execute it as a super user depending on how you permissions are set up.  Once it’s run, you can check out the results of your hard work by running ps aux | less.  Scroll to the bottom and your process should be there.  In the screen shot below, mine is 3rd from the bottom.

Daemonizing a ProcessNote:  Full source code for the example can be downloaded here.

Did you like this article?  Check out the rest of the Dark Arts.

Categories
PHP Programming

PHP Dark Arts: Sockets

Note:  Complete example code for this article is available here.

As an Internet user, you take part in many client-server relationships on a day to day basis.  Most of these relationships are abstracted away, but what if you wanted to make your own client?  Or your own server?  Well, if that’s the case then you’ll probably need to know some network programming.  What you’re really going to need is sockets.

A socket is a receptacle that provides a means of communication between two processes (or in this case, two computers).  Basically it allows you to accept or send information on any port you please (so long as they aren’t reserved or already in use).  So how are we going to use sockets?  Keep reading to find out.

The Server

There are a ton of different examples I could do for this, but I’m choosing to keep it simple.  The server is going to do the following:

  1. Create a socket on a specified port using socket_create_listen.
  2. Wait for incoming connections using socket_accept.
  3. Read data from the socket using socket_read.
  4. Echo the data, and then close the socket using socket_close.

Basically this amounts to creating a server, fetching data from a client, and dieing.  The code itself is very simple, so take a look.

//Set up some variables
$maxBytes = 5000;
$port = 33333;
 
//Create the socket on the specified port.
$socket = socket_create_listen($port);
 
//Wait for incoming connections.
$connection = socket_accept($socket);
print "Connection accepted\n";
 
//When a connection has been accepted, read up to $maxBytes
//then print the received message.
$bytes = socket_read($connection, $maxBytes);
echo "Message From Client: $bytes \n";
 
//Close the socket
socket_close($socket);

Notice that I set the port that I want the socket to bind on very high.  This generally a good idea, because lower ports are regularly used by other applications.  I also have the maximum number of bytes to read set fairly high.  I did this to simplify the example.

The Client

The client for this example is just as simple as the server.  It’s going to do the following.

  1. Bind to a socket using socket_create.
  2. Using the socket that was just created, connect to the server’s socket using socket_connect.
  3. Send a message to the server using socket_send.
  4. Close the connection using socket_close.
//Create a socket and connect it to the server.
$socket = socket_create(AF_INET, SOCK_STREAM, SOL_TCP);
socket_connect($socket, 'localhost', 33333);
 
//Create a message, and send it to the server on $socket.
$message = "This is a message from the client.\n";
socket_send($socket, $message, strlen($message), MSG_EOF);
//Close the socket.
socket_close($socket);

Running The Client & Server

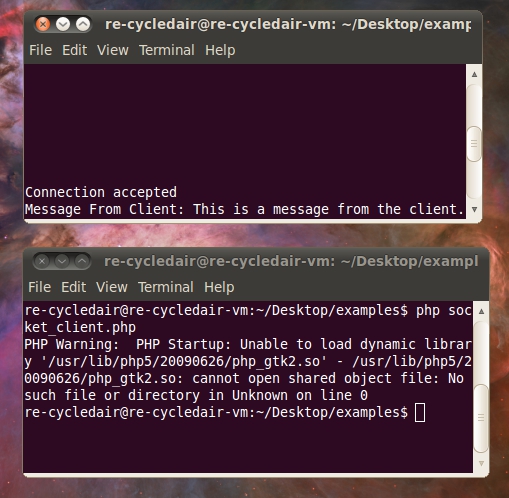
Running the code is easy.  Save your server code to socket_server.php and save your client code to socket_client.php.  After that, open two terminal windows.  In one window run php socket_server.php and in the other run php socket_client.php.  Your output should look like the following image.

PHP Sockets

Please ignore the library error, that’s actually unrelated to this example.  Look at the line above it.

Note:  Complete example code for this article is available here.

Did You Like This Article?

You’ll probably like these other articles from the Dark Arts series as well.

Categories
PHP Programming

PHP Dark Arts: GUI Programming with GTK

Note:  The examples mentioned in this article have source code available here.

PHP is not meant for desktop graphics programming.  It just isn’t.  PHP is web development language, or as you’ve seen in the PHP Dark Arts series, it can be used for some non-web related purposes.  But using PHP for GUI development just isn’t something people do, so naturally I had to give it a shot.  After much Google-fu I cam across the PHP-GTK project.

PHP GTK Logo
According to the PHP-GTK project site:

PHP-GTK is an extension for the PHP programming language that implements language bindings for GTK+. It provides an object-oriented interface to GTK+ classes and functions and greatly simplifies writing client-side cross-platform GUI applications

What Can You Do With It?

The first question that I had when I started looking at PHP-GTK was “What can I do with this?”.  Simple GUIs are very possible with PHP-GTK.  For example, you could easily build a questionnaire, a calculator, some sort of text editor, maybe a music library manager.  In short, you can build simple desktop applications.

Where To Get PHP-GTK

Getting PHP-GTK is easy.  Making it work for you is another matter.  I had originally hoped to get it running on my Ubuntu 9.10 virtual machine that I do all of my Re-CycledAir development work on, but that just wasn’t working for me.  I kept running into dependency issues and it just wouldn’t compile right.  After much pain and suffering I decided to just use the pre-compiled Windows binary which worked like a charm.  If you plan to follow any of these tutorials, I highly recommend that you use the Windows binary.

Once you have the Windows binary installed, just execute your GUI PHP programs using <path/to/phpgtk/>php.exe your_file.php.

Hello World

When I learn something new, be it a language or a library, I always like to start off with a simple “Hello World” program.  What follows is a simple “Hello World” program that creates a small window and displays some text.

set_title('Hello Re-CycledAir');
 
//Tell GTK to quit the main loop when we close the window.  This
//is what allows the program to exit fully.
$window-&gt;connect_simple('destroy', array('gtk', 'main_quit'));
 
//Create a simple label that displays "Hello Re-CycledAir!" and then
//add it to the window.
$labelHello = new GtkLabel("Hello Re-CycledAir!");
$window-&gt;add($labelHello);
 
//Make this window visible.
$window-&gt;show_all();
 
//Start the main loop.
Gtk::main();
?&gt;

If everything goes correctly, you should get something that looks like this.

Hello World PHP-GTK
Hello World 2

In this example, we place a button on this window instead of a label, which then triggers a modal pop-up window with a message.

//Check to see if PHP-GTK has been loaded correctly.
if (!class_exists('gtk')) {
     die("PHP-GTK has not been loaded in your php.ini file.");
}
 
//Create a new window and set it's title to "Hello Re-CycledAir".
$window = new GtkWindow();
$window-&gt;set_title('Hello Re-CycledAir');
 
//Tell GTK to quit the main loop when we close the window.  This
//is what allows the program to exit fully.
$window-&gt;connect_simple('destroy', array('gtk', 'main_quit'));
 
//Add an OK button, connect it to the ok function, and
//then add it to the window.
$buttonOK = new GtkButton("_OK");
$buttonOK-&gt;connect_simple('clicked', 'ok', $window);
$window-&gt;add($buttonOK);
 
//Make this window visible.
$window-&gt;show_all();
 
//Start the main loop.
Gtk::main();
 
function ok(GtkWindow $window) {
     $message = "Hello again!";
 
     //Create message dialog.
     $dialog = new GtkMessageDialog($window, Gtk::DIALOG_MODAL,
     Gtk::MESSAGE_ERROR, Gtk::BUTTONS_OK, $message);
     $dialog-&gt;set_markup(
     "You have received this message: \r\n"
      . "<span>" . $message . "</span>"
     );
 
     //Run the dialog
     $dialog-&gt;run();
     $dialog-&gt;destroy();
 
     //Destroy the original window.
     $window-&gt;destroy();
}
?&gt;

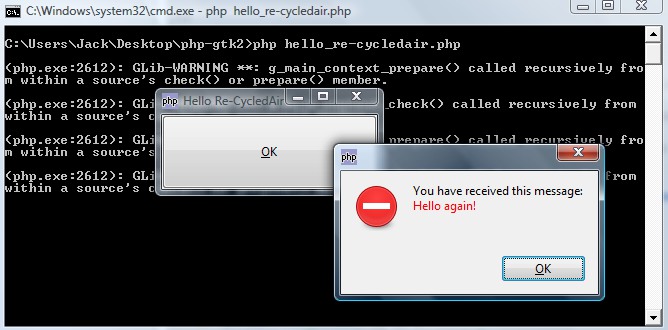
If all goes well with this example, you should get output that looks like this:

PHP-GTK ModalConlcusions

I am by no means a good GUI programmer.  In fact, the only GUI programming I have done outside of these examples is building a few simple interfaces using Swing in Java.  Your mileage may vary, but I found PHP-GTK to be a bit clumsy in how it handles things.  Perhaps with some more development time it could become a better library, but generally there are much better languages and libraries out there for GUI development.

Note:  The examples mentioned in this article have source code available here.

Did you like this article?  You’ll probably like these too.

Categories
PHP Programming

PHP Dark Arts: Semaphores

Note:  The full example code can be downloaded here.

Dijkstra contributed many important things to computer science, and among them was the semaphore.  A semaphore is a protected variable or abstract data type that is used for controlling access to some resource.  Semaphores can be used to control access to almost anything.  For example, lets say that I have multiple instances of a program running and this program counts how many rows are in table ‘X’ every 15 seconds.  We don’t want the program instances clobbering the database all at once, so we use a semaphore to control the access (I realize this is a silly idea, but it’s to illustrate a point).  Before a program instance can access the database, it must first acquire the semaphore.  Once acquired, it may run it’s query, and then release the semaphore so another program instance can use it.  In this way, access to the database is strictly controlled.

Semaphores have drawbacks of course.  The most obvious is that it’s easy to enter a state of deadlock.  Let’s say in the previous example, one program instance never releases the semaphore.  What happens then?  Everything comes to a screeching halt.  That’s why it’s important to be extremely careful when using a semaphore.  If you acquire it, be sure to release it.

PHP’s Semaphore Implementation

Using semaphores in PHP is actually very straight forward.  There are only 4 semaphore functions:

  • sem_acquire() – Attempt to acquire control of a semaphore.
  • sem_get() – Creates (or gets if already present) a semaphore.
  • sem_release() – Releases the a semaphore if it is already acquired.
  • sem_remove() – Removes (deletes) a semaphore.

So how do they all work together?  First, you call sem_get() to fetch the identifier for the semaphore.  After that, one of your processes will call sem_acquire() to try and acquire the semaphore.  If it’s currently unavailable, sem_acquire() will block until the semaphore is released by another process.  Once the semaphore is acquired, you may access the resource that you are controlling with it.  After you are done with the resource, call sem_release() so that another process can acquire the semaphore.  When all is said and done, and you’ve made sure that none of your processes require the semaphore anymore, you can call sem_remove() to remove the semaphore completely.

Getting and Removing

The first step in using a semaphore is calling sem_get().

1
2
3
4
5
6
$key = 123321;
$maxAcquire = 1;
$permissions =0666;
$autoRelease = 1;
 
$semaphore = sem_get($key, $maxAcquire, $permissions, $autoRelease);

The parameters for this function are pretty straight forward, but here is a break down just in case.

  • $key – A unique integer so that the semaphore is easily identifiable.
  • $maxAcquire – How many process can acquire the semaphore at once?
  • $permissionsUnix style permissions on the semaphore.
  • $autoRelease – Do you want the semaphore to release automatically if the request shuts down?

Each process needs to call sem_get() using the same parameters, otherwise it will get a different semaphore.  And if you want to remove your semaphore?  Just make sure you have a valid semaphore resource and then call sem_remove().

1
2
3
4
5
if(sem_remove($semaphore)) {
     echo "Semaphore removed. \n";
} else {
     echo "Failed to remove semaphore. \n";
}

Acquiring and Releasing

Once you’ve created (or retrieved) a semaphore, you can then start using it by calling sem_acquire().  Both sem_acquire() and sem_release() only take one parameter: a semaphore resource.

1
2
3
4
$semaphore = sem_get($key, $maxAcquire, $permissions, $autoRelease);
sem_acquire($semaphore);  //blocking
echo "hello world!";
sem_release($semaphore);

Now that you understand how to use PHP’s implementation of semaphores, we should try them out fully.

Controlling Access to Standard Input (STDIN) Using Semaphores

When learning about semaphores, a classic example is to control access to standard input.  There honestly isn’t much to the example, so I’ll just give you a quick breakdown of what happens and then let the code do the talking.

  1. Set the semaphore properties.
  2. Get the semaphore.
  3. Start a loop, and try to acquire the semaphore.
  4. Once acquired, access standard input.
  5. Once input is received store it, then release the semaphore
1
2
3
4
5
6
7
8
9
10
11
12
13
14
15
16
17
18
19
20
21
22
23
24
25
26
27
28
//Semaphore properties
$key = 123456;
$max = 1;
$permissions = 0666;
$autoRelease = 1;
 
//Open a new or get an existing semaphore
$semaphore = sem_get($key, $max, $permissions, $autoRelease);
if(!$semaphore) {
     echo "Failed on sem_get().\n";
     exit;
}
 
//Try to aquire the semaphore.
for($i = 0; $i < 2; $i++) {
     echo "\nAttempting to acquire semaphore...\n";
     sem_acquire($semaphore);
 
     echo "Aquired.\n";
     echo "Enter some text: ";
     $handler = fopen("php://stdin", "r");
     $text = fgets($handler);
 
     fclose($handler);
     sem_release($semaphore);
 
     echo "Got: $text \n";
}

Running the Example


First, you should download the example here.  After that open up two terminal windows and run the following in each:

{code} php semaphore.php {/code}

Did you like this article?  You’ll probably like these other PHP Dark Arts articles too.

Categories
PHP Programming

PHP Dark Arts: Shared Memory Segments (IPC)

Note: The full source code for the examples can be downloaded here.

In my previous articles on using PHP for multi-process programming, we kept it very simple.  By simple, I mean we didn’t have any inter-process communication (IPC).  IPC is a set of techniques for the exchange of data amongst separate processes and/or threads.  There are many different ways to set up IPC, such as files, signals, sockets, pipes, semaphores, shared memory, and message passing.  This time around, we’re going to cover PHP’s implementation of shared memory segments.

So what does it mean to share a memory segment?  It means that the program will create a section of memory that can be accessed by other processes on the system.  Normally this isn’t the case, since most processes have mutually exclusive address spaces.  The benefit of using a shared memory segment is that communication between processes is extremely fast.  The main downside is that processes must be running on the same machine (and same processor in some cases), where as other types of IPC can be used over a network.

Creating a Shared Memory Segment

In order to share memory between processes, you first need to create the shared memory segment.  This is accomplished with PHP’s shm_attach() function.  The shm_attach() function takes 3 parameters.

  • $key (int) – This is an integer value that identifies your shared memory segment.  If you used 123456 for this value in one process, you would need to use the same key in another process to access the shared memory segment.
  • $memsize (int) –  This is the amount of memory (in bytes) you would like to share.  Deciding how large this should be is sort of a pain.  The easiest way it to simply pick an arbitrary amount and make sure anything you try to share isn’t larger then that.  The best way would be to know the maximum size of data you will need to share and set it to that value.
  • $perm (int) – The permissions for the shared memory segment.  These permissions follow typical Unix style permissions.  The default is 0666 which means that everyone can read from and write to this memory segment.

On success, shm_attach() returns an identifier of the shared memory segment.

1
2
3
4
5
6
7
//Define shared memory segment properties.
$key = "987654";
$permissions = 0666;
$size = 1024;
 
//Create or open the shared memory segment.
$segment = shm_attach($key, $size, $permissions);

Using Your Shared Memory Segment

Now that you have created a shared memory segment, you’ll obviously want to try it out.  Using it is pretty straight forward with the shm_put_var() and shm_get_var() functions.  They work as you might expect them to.  shm_put_var() has 3 parameters:

  • The shared memory segment key.
  • An integer used basically as an index on the data (making it easier to retrieve).
  • Some variable.  This can be anything so long as it’s smaller than the size you’ve defined the memory segment to be.

The shm_get_var() function is very similar.  It only takes 2 parameters, one of which is the key for the shared memory segment, and the other is the integer value (index) associated with the stored data.  Now that you know what the functions do, let’s put it all together in a little program.

1
2
3
4
5
6
7
8
9
10
11
12
13
14
15
16
17
18
19
20
21
22
23
24
25
26
27
28
29
30
31
<?php
//Check the command line arguments
if(sizeof($argv) < 2) {
     echo  "Usage: php shared_memory.php <send|get|delete> <integer identifier> <value>\n";
     exit;
}
 
//Define shared memory segment properties.
$key = "987654";
$permissions = 0666;
$size = 1024;
 
//Create or open the shared memory segment.
$segment = shm_attach($key, $size, $permissions);
 
//Handle operations for the segment.
switch($argv[1]) {
     case "send":
          shm_put_var($segment, $argv[2], $argv[3]);
          echo "Message sent to shared memory segment.\n";
          break;
     case "get":
          $data = shm_get_var($segment, $argv[2]);
          echo "Received data: {$data}\n";
          break;
     case "delete":
          shm_remove($segment);
          echo "Shared memory segment released.\n";
          break;
}
?>

A quick glance at the code reveals that I’m making this program a little interactive for easier use.  All it does is check to make sure your command line arguments are correct, creates / opens the shared memory segment, and then performs the given operation on the segment.  An example:

<->php shared_memory.php
Usage: php shared_memory.php send|get|delete integer identifier value;
<->php shared_memory.php send 1 "Hello.  This is the shared memory segment."
Message sent to shared memory segment.
<->php shared_memory.php get 1
Received data: Hello.  This is the shared memory segment.
<->php shared_memory.php delete
Shared memory segment content deleted.

You’ll also notice that at the end I delete the contents of the shared memory segment.  It’s important to understand the difference between detaching and deleting(removing) here.  When you detach the shared memory segment, it’s possible for your data to still exist in memory until it’s overwritten by something else.  This poses a big security threat, so you should always delete(remove) the data first.  So how do we release the memory?  By using the shm_detach() function.

<->
//Define shared memory segment properties.
$key = “987654”;
$permissions = 0666;
$size = 1024;

//Create or open the shared memory segment.
$segment = shm_attach($key, $size, $permissions);

//Detach the memory segment.
shm_detach($segment);

Download

Now that your done, check out the full source code for the examples here.  In the near future I hope to have a virtual machine available for download, so users who don’t want to mess with configuration can just start it up and go.