Categories
PHP Programming Wordpress Development

WordPress Development as a Team

At my day job I’m really the only person that knows how to write WordPress plugins, so when I write one it’s usually sand-boxed on my machine where nobody can touch it. However, in a side endeavor I’m part of we have a team of 3 people developing on one plugin. As I’m the most experienced plugin developer amongst our team, I was tasked with coming up with a development style and plugin architecture that would work for us.

Development Style

Everyone will be running a local copy of WordPress and making their changes to the plugin locally. The plugin itself will be under version control using Git, and developers will push/pull changes from either a self-hosted Git server or Git Hub. Database schema will be tracked in a file called schema.sql. When someone makes a change to the schema, it goes into that file at the bottom with a comment about why the schema changed. We’ll being jQuery as our Javascript framework of choice, and we’ll be writing all of our Javascript in CoffeeScript (see my previous entries).

Plugin Architecture

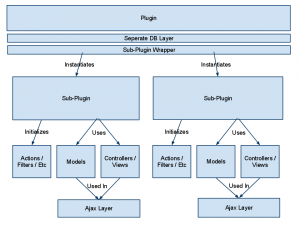
The more difficult aspect of developing this plugin as a team is the sheer size of the plugin. Realistically this could probably be split into about 6 different plugins by functionality, but we want to keep everything together in one tidy package. To illustrate the architecture, I made a quick drawing.

The first layer of the plugin is essentially a wrapper. It initializes the ORM that we are using to access the database (we are using a separate database for this plugin’s data), and includes the wrapper class. The wrapper class is where developers drop their sub-plugin include file and instantiate it’s main object. For instance, for each sub plugin there will probably be two classes instantiated in the wrapper. One being admin related functionality, and the other being for front-end display functionality. My thinking with this architecture was that we could all work on separate sub-plugins without crossing paths too frequently. This also allows us to separate the different functionality areas of the plugin in a logical manner. The other benefit to architecting the plugin like this is that it will be very easy to port to a different architecture in the future. I’m well aware that WordPress probably isn’t the best tool for the job, but it is the best tool for the team with the deadline that we have.

Thoughts

While thinking about WordPress Plugin Architecture, I cruised the source code of a lot of plugins and it seems that everyone goes about it in a different way. If you’ve ever developed a large-scale plugin with a team, how did you go about doing it? Did you run in to any problems that you didn’t foresee at the beginning of the process?

Categories
PHP Programming

Installing Memcache on MAMP

For the better part of 2 hours I tried and failed to get the Memcache extension installed on MAMP.  I tried following several guides, but everything fell flat on it’s face about 75% of the way through.  I eventually figured it out, and I wanted to share it so that other people don’t have to go through the pain and suffering that I did.  It turns out to be surprisingly easy, but YMMV.

Step 1: Install XCode

Step 2: Make the MAMP PHP binary files executable

sudo chmod +xrw /Applications/MAMP/bin/php5.3/bin/p*

Step 3: Get the Memcache extension source

cd ~
wget http://pecl.php.net/get/memcache-2.2.5.tgz
tar -zxvf memcache-2.2.5.tgz
cd memcache-2.2.5

Step 4: PHPize the Memcache extension files

/Applications/MAMP/bin/php5.3/bin/phpize

Step 5: Compile the Memcache extension

./configure
make

Step 6: Add the extension to the PHP.ini file

Add the following to the end of your PHP 5.3 ini file via the MAMP file menu.

extension=memcache.so

Step 7: Copy the memcache extension to the PHP extension folder

cp modules/memcache.so /Applications/MAMP/bin/php5.3/lib/php/extensions/no-debug-non-zts-[yourtimestamp]/

The “[yourtimestamp]” varies per installation, but you should just be able to tab complete that part.

Categories
PHP Programming Wordpress Development

PHP Alternative Syntax

Did you know that PHP has an alternative syntax structure?  Up until about two years ago, I didn’t either.  It wasn’t until I started poking around in the WordPress core that I saw it.  Intrigued, I popped over to PHP.net and read an entry on it.  In a nutshell, the alternative syntax can go far in making your PHP code much easier to read.  The control structures if, while, for, foreach, and switch can all be expressed in the alternative syntax form.  In general, I prefer to use the alternative syntax when mixing PHP in with HTML, and the standard syntax when writing pure PHP.

If Example

// This....
if($myString == "foo"):
    echo "bar";
else:
    echo "no-foo-bar";
endif;
 
//...is equal to this.
if($myString == "food") {
    echo "bar";
} else {
    echo "no-foo-bar";
}

ForEach Example

$names = array("bob", "tom", "john");
 
//This....
foreach($names as $name):
    echo "Your name is: {$name}";
endforeach;
 
//...is equal to this.
foreach($names as $name) {
    echo "Your name is: {$name}";
}

Resources

If you’re looking for more resources on PHP’s alternative syntax, check out the documentation here, or the WordPress source code for examples.

Categories
Other PHP Programming

Creating a Flexible Caching Module

I work for a great company, I really do.  Sure we have our problems (like just coming out of the developer stone age), but overall I work with smart, friendly people who are passionate about what they do.  One of the things that always bugged me though was the lack of any sort of caching in our CMS.  Most times it’s not needed, but when an operation takes about 100 queries or so to finish, then it’s time to start caching.

Since I’m a bit of an efficiency freak, I thought I would take a crack at writing a flexible caching module that is easy for our developers to use.  So what do “easy” and “flexible” mean?  To be “easy”, the caching module must be usable by even a novice developer and have a limited number of options.  For instance, I ended up deciding that we really only need two public methods, and one public property.

  • $cache->exists – If “$cache” is a cache object, calling exists checks to see if the cached object already exists in the database.  It also checks to see if it’s expired or not.  If it’s expired or non-existent, it returns false.   It returns true if the cached object exists and is up to date.
  • $cache->put($val) – This is how you store something in cache.  It can be any type of serializable PHP object.  So basically, resource types are off limits but objects, arrays, variables, entire web pages, etc. can be used.
  • $cache->get() – This fetches the object stored  in the cache.  It handles the re-serialization of it as well, so it really makes things pretty idiot proof.

What about flexible?  Well, by that I mean we need to be able to transparently implement several different types of caching.  Since we’re just crawling out of the dark ages, I opted to implement a fallback caching mechanism.  Here’s how it works.

  • The programmer defines a variable in our settings area to be which caching option he/she wants to use.  Options are memcached, file, mysql.
  • If the setting isn’t defined, we try memcached by default.  This is by far the best caching system to use, so it makes sense to try it first.
  • If memcached fails, we go to a database caching schema.  While not nearly as good as using memcached, it’s possible it could save you tons of queries on your database.
  • If the user chooses file caching, we do that.  It’s a pretty bad idea to use in most cases, but may still have it’s uses.

So why did it come this?  It’s not that we host terribly high-volume sites, but that our CMS is super slow.  A full-on page will take about 4 seconds to load to your screen completely, and that’s running local on the network.  One of the main problems is that we use output bufferring extensively.  The ENTIRE FRIGGIN PAGE is buffered.  This has 3 side effects:

  1. Slight performance loss due to bufferring.
  2. Apparent page load time sucks because the browser has to wait for the entire page to be generated before getting output.
  3. Development is super easy because you don’t ever have to worry about output being sent before doing a call like “header()”.

We can’t remove output buffering unfortunately.  It’s at the very core of our CMS and development practices, so it just won’t work.  To get the load time to generate the page as low as possible, I decided that caching was needed.

So what sort of problems do we run in to with this caching module?  Glad you asked!  Many of the problems aren’t specific to this caching module, but to caching in general.  The quick list:

  • If the original query wasn’t complicated, it’s not worth storing the results.  The number of queries the caching module does in MySQL mode is 3.  If your initial query was less than that, or not a super-complex-mega-join, it’s not worth using.  This caveat goes away in memcached mode.
  • Smart naming and design.  You have to be very careful out what you cache, and when.  Remember, page content and queries probably change when a user is logged in or on a different device.  Just things to keep in mind.
  • Getting developers to use it.  Not everyone likes to learn, let alone change their habits.  The biggest barrier to this is getting people to use it.  Some people don’t care about efficiency either (sad, I know), but at least our system administrator thanks me.

The caching module seems to work pretty well too.  On one particularly SQL heavy page, I reduced page load time from 14 seconds (ridiculous) to just under 6 seconds (still bad, but getting better).

That’s it for now.  Any questions or comments are welcome.

Categories
PHP Programming

PHP Dark Arts: Daemonizing a Process

Note:  Full source code for the example can be downloaded here.

One of the many things you don’t often do with PHP (actually, I’m not sure you do this much with any language) is daemonize a process.  A daemon is program that runs in the background (read more here).  On Unix systems, processes are usually created by forking the init process and then manipulating the process to your liking.  To create a daemon though, you need to get the init process to adopt your process.  To do that, as soon as you fork the parent process, you kill the parent.  Since you child process is parent-less, the init process generally adopts it.  Once that happens, your process has been daemonized.

What You Need To Know

In order to follow the example, you’ll probably want to read up on multiprocessing in PHP and using POSIX in PHP.  Aside from that, keep an open mind.  There are probably better ways to do this (Nanoserv), but I think that doing it manually is a great way to learn more about systems programming and PHP.

Step 1:  Fork It

The first thing that you need to do when daemonizing a process in PHP is fork the process.  After that, we promptly kill the parent process so that the child process can be adopted.

//Set the ticks
declare(ticks = 1);
 
//Fork the current process
$processID = pcntl_fork();
 
//Check to make sure the forked ok.
if ( $processID == -1 ) {
	echo "\n Error:  The process failed to fork. \n";
} else if ( $processID ) {
	//This is the parent process.
	exit;
} else {
	//We're now in the child process.
}

Step 2:  Detach It

Now that we have successfully forked the process and killed the parent, we need to detach the process from the terminal window.  We do this so that when the terminal window closes, our process doesn’t close with it. Once that’s done, we get our processes’ id.

//Now, we detach from the terminal window, so that we stay alive when
//it is closed.
if ( posix_setsid() == -1 ) {
	echo "\n Error: Unable to detach from the terminal window. \n";
}
 
//Get out process id now that we've detached from the window.
$posixProcessID = posix_getpid();

Step 3:  /var/run

Now that we have our processes’ id, we need to let the system know about it.  To do this, we create a file in /var/run.  This file can be named anything you want, just make sure that it’s unique and it ends with the .pid extension.  In that file, we place the pid of our process and that’s it.

//Create a new file with the process id in it.
$filePointer = fopen( "/var/run/phpprocess.pid" , "w" );
fwrite( $filePointer , $posixProcessID );
fclose( $filePointer );

Step 4:  Do Something

Now that all the hard stuff is done, you can get to work.  What do you want your process to do?  For this example, I have mine adding 1 + 1 every 10 seconds.  Nothing too difficult, but you can make your process do whatever you like.  For instance, you could set up a server of some sort.  Note that this the code is sitting in an infinite while loop.  This is done so that the process doesn’t exit naturally.

//Now, do something forever.
while (true) {
	$x = 1 + 1;
	sleep(10);
}

Step 5:  Run It

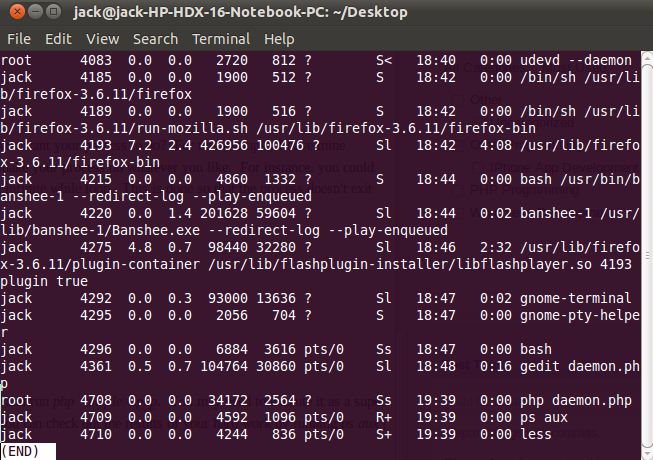
To run this process as a daemon, all you need to do is save you file and run php <myfile>.php.  You may need to execute it as a super user depending on how you permissions are set up.  Once it’s run, you can check out the results of your hard work by running ps aux | less.  Scroll to the bottom and your process should be there.  In the screen shot below, mine is 3rd from the bottom.

Daemonizing a ProcessNote:  Full source code for the example can be downloaded here.

Did you like this article?  Check out the rest of the Dark Arts.

Categories
PHP Programming

PHP Dark Arts: Sockets

Note:  Complete example code for this article is available here.

As an Internet user, you take part in many client-server relationships on a day to day basis.  Most of these relationships are abstracted away, but what if you wanted to make your own client?  Or your own server?  Well, if that’s the case then you’ll probably need to know some network programming.  What you’re really going to need is sockets.

A socket is a receptacle that provides a means of communication between two processes (or in this case, two computers).  Basically it allows you to accept or send information on any port you please (so long as they aren’t reserved or already in use).  So how are we going to use sockets?  Keep reading to find out.

The Server

There are a ton of different examples I could do for this, but I’m choosing to keep it simple.  The server is going to do the following:

  1. Create a socket on a specified port using socket_create_listen.
  2. Wait for incoming connections using socket_accept.
  3. Read data from the socket using socket_read.
  4. Echo the data, and then close the socket using socket_close.

Basically this amounts to creating a server, fetching data from a client, and dieing.  The code itself is very simple, so take a look.

//Set up some variables
$maxBytes = 5000;
$port = 33333;
 
//Create the socket on the specified port.
$socket = socket_create_listen($port);
 
//Wait for incoming connections.
$connection = socket_accept($socket);
print "Connection accepted\n";
 
//When a connection has been accepted, read up to $maxBytes
//then print the received message.
$bytes = socket_read($connection, $maxBytes);
echo "Message From Client: $bytes \n";
 
//Close the socket
socket_close($socket);

Notice that I set the port that I want the socket to bind on very high.  This generally a good idea, because lower ports are regularly used by other applications.  I also have the maximum number of bytes to read set fairly high.  I did this to simplify the example.

The Client

The client for this example is just as simple as the server.  It’s going to do the following.

  1. Bind to a socket using socket_create.
  2. Using the socket that was just created, connect to the server’s socket using socket_connect.
  3. Send a message to the server using socket_send.
  4. Close the connection using socket_close.
//Create a socket and connect it to the server.
$socket = socket_create(AF_INET, SOCK_STREAM, SOL_TCP);
socket_connect($socket, 'localhost', 33333);
 
//Create a message, and send it to the server on $socket.
$message = "This is a message from the client.\n";
socket_send($socket, $message, strlen($message), MSG_EOF);
//Close the socket.
socket_close($socket);

Running The Client & Server

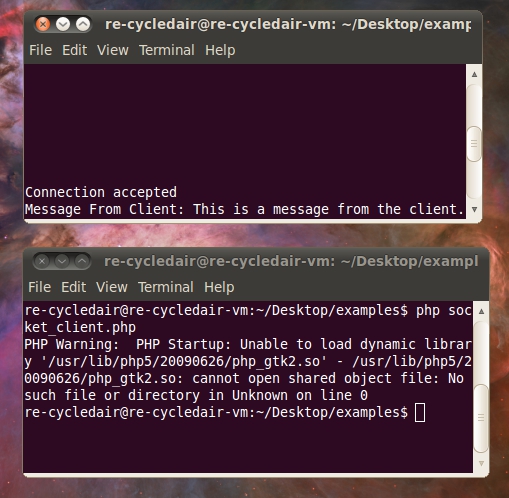
Running the code is easy.  Save your server code to socket_server.php and save your client code to socket_client.php.  After that, open two terminal windows.  In one window run php socket_server.php and in the other run php socket_client.php.  Your output should look like the following image.

PHP Sockets

Please ignore the library error, that’s actually unrelated to this example.  Look at the line above it.

Note:  Complete example code for this article is available here.

Did You Like This Article?

You’ll probably like these other articles from the Dark Arts series as well.

Categories
PHP Programming

PHP Dark Arts: GUI Programming with GTK

Note:  The examples mentioned in this article have source code available here.

PHP is not meant for desktop graphics programming.  It just isn’t.  PHP is web development language, or as you’ve seen in the PHP Dark Arts series, it can be used for some non-web related purposes.  But using PHP for GUI development just isn’t something people do, so naturally I had to give it a shot.  After much Google-fu I cam across the PHP-GTK project.

PHP GTK Logo
According to the PHP-GTK project site:

PHP-GTK is an extension for the PHP programming language that implements language bindings for GTK+. It provides an object-oriented interface to GTK+ classes and functions and greatly simplifies writing client-side cross-platform GUI applications

What Can You Do With It?

The first question that I had when I started looking at PHP-GTK was “What can I do with this?”.  Simple GUIs are very possible with PHP-GTK.  For example, you could easily build a questionnaire, a calculator, some sort of text editor, maybe a music library manager.  In short, you can build simple desktop applications.

Where To Get PHP-GTK

Getting PHP-GTK is easy.  Making it work for you is another matter.  I had originally hoped to get it running on my Ubuntu 9.10 virtual machine that I do all of my Re-CycledAir development work on, but that just wasn’t working for me.  I kept running into dependency issues and it just wouldn’t compile right.  After much pain and suffering I decided to just use the pre-compiled Windows binary which worked like a charm.  If you plan to follow any of these tutorials, I highly recommend that you use the Windows binary.

Once you have the Windows binary installed, just execute your GUI PHP programs using <path/to/phpgtk/>php.exe your_file.php.

Hello World

When I learn something new, be it a language or a library, I always like to start off with a simple “Hello World” program.  What follows is a simple “Hello World” program that creates a small window and displays some text.

set_title('Hello Re-CycledAir');
 
//Tell GTK to quit the main loop when we close the window.  This
//is what allows the program to exit fully.
$window-&gt;connect_simple('destroy', array('gtk', 'main_quit'));
 
//Create a simple label that displays "Hello Re-CycledAir!" and then
//add it to the window.
$labelHello = new GtkLabel("Hello Re-CycledAir!");
$window-&gt;add($labelHello);
 
//Make this window visible.
$window-&gt;show_all();
 
//Start the main loop.
Gtk::main();
?&gt;

If everything goes correctly, you should get something that looks like this.

Hello World PHP-GTK
Hello World 2

In this example, we place a button on this window instead of a label, which then triggers a modal pop-up window with a message.

//Check to see if PHP-GTK has been loaded correctly.
if (!class_exists('gtk')) {
     die("PHP-GTK has not been loaded in your php.ini file.");
}
 
//Create a new window and set it's title to "Hello Re-CycledAir".
$window = new GtkWindow();
$window-&gt;set_title('Hello Re-CycledAir');
 
//Tell GTK to quit the main loop when we close the window.  This
//is what allows the program to exit fully.
$window-&gt;connect_simple('destroy', array('gtk', 'main_quit'));
 
//Add an OK button, connect it to the ok function, and
//then add it to the window.
$buttonOK = new GtkButton("_OK");
$buttonOK-&gt;connect_simple('clicked', 'ok', $window);
$window-&gt;add($buttonOK);
 
//Make this window visible.
$window-&gt;show_all();
 
//Start the main loop.
Gtk::main();
 
function ok(GtkWindow $window) {
     $message = "Hello again!";
 
     //Create message dialog.
     $dialog = new GtkMessageDialog($window, Gtk::DIALOG_MODAL,
     Gtk::MESSAGE_ERROR, Gtk::BUTTONS_OK, $message);
     $dialog-&gt;set_markup(
     "You have received this message: \r\n"
      . "<span>" . $message . "</span>"
     );
 
     //Run the dialog
     $dialog-&gt;run();
     $dialog-&gt;destroy();
 
     //Destroy the original window.
     $window-&gt;destroy();
}
?&gt;

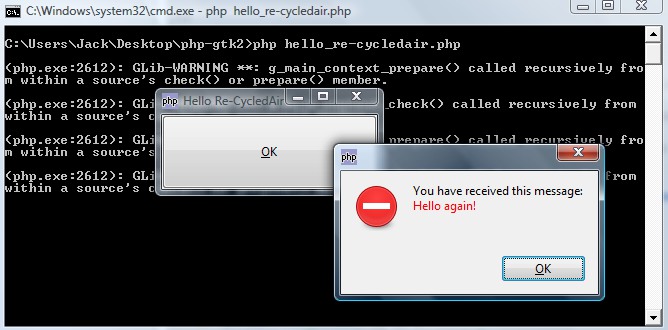
If all goes well with this example, you should get output that looks like this:

PHP-GTK ModalConlcusions

I am by no means a good GUI programmer.  In fact, the only GUI programming I have done outside of these examples is building a few simple interfaces using Swing in Java.  Your mileage may vary, but I found PHP-GTK to be a bit clumsy in how it handles things.  Perhaps with some more development time it could become a better library, but generally there are much better languages and libraries out there for GUI development.

Note:  The examples mentioned in this article have source code available here.

Did you like this article?  You’ll probably like these too.
Categories
PHP Programming

PHP: Echo Versus Print(f)

One of the things I remember about when I started programming in PHP was the confusion I ran in to when deciding how to print text.  Should I use the print construct?  Or maybe I should use the echo construct?  Perhaps the C-style printf function instead?  Eventually most people just latch on to the echo construct because “That’s what everyone else is doing”.  Is that the fastest method to use though? Well, that’s what I’m going to find out.

The Test

The test I decided to use loops 1000 times, and inside the main loop, there is a sub-loop creating the output which runs from 0 to N (where N is the value of the outer-loop counter).

1
2
3
4
5
6
7
$start = microtime(true);
for($i = 0; $i < 1000; $i++) {
     for($x = 0; $x < $i; $x++) {
          //Output here.
     }
}
$end = microtime(true);

After the test has been completed, I just wrote the times to a text file for collection later.

The Results

  • echo – 16.470 seconds
  • print – 16.473 seconds
  • printf – 16.432 seconds

As I expected, the difference between print and echo were negligible.  I suspect that they use the same underlying code.  The real surprise was from printf(), which is a function and is supposed to have taken longer because of the overhead of calling it.  I’m at a loss as to why it’s faster than the other two, but the difference isn’t really significant enough to worry about.  If someone wanted to be a bit more scientific about this, this program should be run probably a couple thousand times so that we can get a good sample and see what happens then.

If you would like to run this code yourself and let me know your results, it’s available for download here.