Categories
Wordpress Development

Securing Your WordPress Plugin: Nonces

So you’ve created an epic contact form plugin for your WordPress install.  It seems secure enough.  You’re validating input, checking input types, and doing everything else right.  After it’s been up for a few weeks, you take a look at your database and notice you’ve got a bunch of crap in there.  “How could this happen?!” you scream!

Well, it probably had something to do with a Cross Site Request Forgery (CSRF).  Cross site request forgeries happen when someone starts submitting information to your form’s processing controller from another domain.  This is easy enough to do, because you can set the action field of a form to anything you want.  If you aren’t careful how you process your form, CSRF attacks can be a huge problem.   So how can you secure your plugin against CSRF attacks?  By using a nonce (Number used once).

Nonces are unique identifiers that you can use to make sure your form is coming from the right place.  To use them, you follow three simple steps.

  1. Create the nonce identifier. (wp_create_nonce)
  2. Place the identifier in your form or query string.
  3. Verify that the nonce is correct. (wp_verify_nonce)

In practice, it looks something like this.

1
2
$nonce = wp_create_nonce("my-plugin-nonce");
echo "<a href='controller.php?nonce={$nonce}'>Click here!</a>";

And then in your controller/processor…

1
2
$nonce = $_GET['nonce'];
if(!$wp_verify_nonce($nonce, "my-plugin-nonce")) due("No CSRF for you!");

That’s really all there is to it.  In literally 4 lines of code, you can make your plugin that much more secure.  On a side note, if you are using ajax to submit a form or pull data, you can pass the nonce through as a form field (or as part of the query string), but you’ll need you use a different function to verify it (check_ajax_referer).

1
check_ajax_referer("my-plugin-nonce");

Additional Resources

Categories
PHP Programming

Search PDFs With PHP, MySQL, and PdfToText

Being able to search a PDF is a very useful feature on any web site.  The problem is that there aren’t many languages that give you the tools to do so right out of the box.  PHP is no exception to this.  If you want to search PDF files you’ll need some third-party tools and a little bit of ingenuity.

Pre-requisites

You’ll server will need to have the following configuration.

  • PHP (>=4)
  • MySQL (>=4)
  • Linux (Distro of your choice)

Step 1:  Download PdfToText

PdfToText is a program written in C that will quickly convert the contents of a PDF to text.  We’re going to use it just for that purpose.  You download the file at http://www.foolabs.com/xpdf/download.html.  Once you have downloaded the file, go ahead and place it somewhere in your web site directory and extract it (on most linux systems “tar -xzf [file]” will do the trick).  Once it’s unzipped, you’ll see a program called “pdftotext”, which is what we’re after.

Step 2:  Convert the PDF to Text

As an astute reader, you’ve probably noticed by now that PdfToText is not a PHP file.  So how are we going to use it?  Well, we’re going to use the “backtick” (the ~ [tilda] key) operator.

function convert_to_text($pdf) {
     $output = `./pdftotext {$pdf} temp.txt`;
     return $output
}

The backtick operator will execute any command on the command line, trap it’s output, and return it to the caller.  It’s worth noting that the backtick operator will only return output from standard out.

This is probably the hardest part of this tutorial.  There may be problems with write permissions on the directory, or ownership problems, but if you can get it to work, you’re all set.

Step 3:  Read the Text

Now that the PDF has been converted to a text file, we need to get that information back in to PHP.  To do that, we use the file_get_contents functions.

function get_text() {
     $text = file_get_contents("temp.txt");
     return $text;
}

Step 4:  Store the Data

This part of the tutorial assumes 2 things.  1) That you have a table named pdf_data, and 2) That the table has a column called pdf_contents that is full-text searchable (If you need help setting this sort of thing up, leave a comment).

function store_data() {
     $text = mysql_real_escape_string(get_text());
     $query = "INSERT INTO pdf_data (pdf_contents) VALUES ('{$text}')";
     mysql_query($query);
}

Step 5:  Search the Data

The final step is actually searching the data.  To do that, we’ll use the full-text searching capability of MySQL.

function search_data($term) {
     $term = mysql_real_escape_string($term);
     $query = "SELECT * FROM pdf_data MATCH(pdf_contents) AGAINST ('$term')";
     $result = mysql_query($query);
     while($row = mysql_fetch_array($result)) {
          //Do stuff with returned data.
     }
}

Where “Do stuff with returned data” is, you can do whatever you want.  MySQL is going to return the rows to you in order of relevance (descending).  The most relevant result will be first, followed by the second most, and third most, and so on.

Other Notes

  • PdfToText may or may not be the best way to do this, but it is one of the simplest.  There are a handful of libraries out there for creating PDFs in PHP, but surprisingly few for something as common as reading a PDF.
  • There are binaries and source files available for PdfToText on their web site(here).
  • This tutorial could be expanded a lot.  If you have questions or requests, please ask!
Categories
Wordpress Development

Enhancing the WordPress Code Editor

In all WordPress versions, there has been a severe dichotomy between text editors.  In one corner we have TinyMCE, which is a full-featured editor that is used when constructing pages and posts.  On the other hand we have what amounts to a text area, where you make changes to code in theme files.  I’ve always wondered why there isn’t some sort of syntax highlighting, tab support, or rudimentary auto-completion available in the default code editor.  As a developer, I realize how hard these features are to implement using nothing more than CSS and Javascript, but I thought some attempt may have been made by the core developers by version 3.

That has yet to materialize, but the community has come to the rescue.  A plugin called Power Code Editor exists that does simple syntax highlighting and improves font that is used in the editor.  After applying the plugin, your code editor will look like this.

Enhance WordPress Code Editor

If you’re interested, you can download the plugin here.  Or, from within the WordPress plugin installation menu search for “power code editor“.

Categories
PHP Programming Wordpress Development

$_SERVER Variables Are Unsafe For WordPress Plugins

Sometimes a plugin developer might want to submit a form back to itself.  Or perhaps they want to link back to the current page, except with a variable in the query string.  Often enough, you’ll seem them do it this way.

1
<form method=POST action='<=$_SERVER['PHP_SELF']?>'>

or

1
2
3
4
5
6
7
<a href='<?=$_SERVER['REQUEST_URI']?>'>Click Here</a>{/code}
 
The problem with this code is that it's easily exploitable.  Remember, the behavior for REQUEST_URI and PHP_SELF are to take whatever the entrance URL was and return it to the caller.  So how can this effect your pages?  Since the user can append anything that they'd like to the initial entrance URL, it becomes the vector for attack.
 
So how can you submit forms and links back to themselves without these variables?  For forms, just leave the action blank or don't include it at all.
 
<pre lang="html4strict"><form method=POST>
<form method=POST action=''>

And for links, using the # sign will link back to your current page.

<a href='#'>Click here!</a>

If a plugin developer absolutely MUST use server variables, just make sure to escape them accordingly.   Use the WordPress function esc_url().

1
<a href='<?=esc_url($_SERVER['PHP_SELF']?>'>Click Me!</a>

In reality, it’s bad practice to use the PHP $_SERVER variables at all.  So try to avoid doing it at all costs.

Categories
Wordpress Development

WordPress User Roles

By default, WordPress 3 ships with 6 (5 in your aren’t using MU features) roles that can be assigned to individual users.  Unless you’re browsing the codex or have been using WordPress for ages, it’s sometimes hard to understand the differences between user roles.  Many bloggers run their site on their own, so roles really don’t matter all that much.  However, for those who run sites with multiple contributing users, roles help keep the order.

The 6 default roles are Super Admin, Administrator, Editor, Author, Contributor, and Subscriber.

  • Super Admin – The Super Admin is a role only available in WordPress 3 when the multi-user (multi-site) features are turned on.  This role allows the super admin to administrate the entire network of sites.
  • Administrator – This role allows the user to access all of the administration features of a site, including themes, plugins, and comment moderation.
  • Editor – An editor can manage all pages, posts, and comments.  They don’t have to own them either, they can be authored by other users.
  • Author – An author is a user that you trust to publish their own posts.
  • Contributor – This is a user who is allowed to write posts, but they have to be approved by an editor before they get published.  This is handy if you have a guest that you would like to write an article, but want to review the content first.
  • Subscriber – This user is only allowed to edit and maintain their profile on your site.

If these roles aren’t enough to suit your needs (perhaps you need finer-grain permissions), there are plugins that exist in the WordPress Plugin Repository that can help.

Categories
Wordpress Development

How to Enable WordPress 3 Custom Menus

Prior to WordPress 3, if you wanted custom menus you had to code them yourself.  This generally involved editing your theme’s header.php file, knowledge of HTML, CSS, PHP, and probably SQL too.  Unsuprisingly, easy custom menus was a highly requested feature for WordPress 3 and it was delivered.

Unfortunately, most themes don’t have support for custom menus yet.  Wordpress makes it easy to add them as widgets, but if you want real menus, they need to be enabled in your theme.

Step 1:  Enable Custom Menus

The first thing that you need to do in order to get custom menus working in WordPress 3 is enable them.  To do that, open up your theme’s functions.php file, and drop in the following code.

1
2
3
4
function register_custom_menu() {
     register_nav_menu('custom_menu', __('Custom Menu'));
}
add_action('init', 'register_custom_menu');

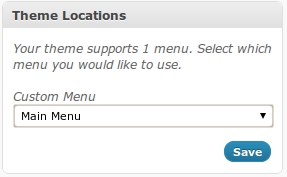
Once you have done that, go to Appearance -> Menus and you should see something like this.

Wordpress Custom Menu Theme Locations

Step 2:  Add the Menu to Your Theme

Assuming that you’ve created a custom menu and want to display it, you’ll need to add the display function to your theme.  In most cases, you’ll need to open up the header.php file, and the area that looks like a menu.  This changes for every theme, but it should be fairly obvious.  Once you find it, insert the following code.

1
<?php wp_nav_menu(array('menu' => 'custom_menu')); ?>

After that, you’re menu should display in your navigation bar.  Good luck!