Categories
PHP Programming

PHP Bitwise Operations

A bitwise operation is an operation that works on the individual bits of a number.  Yes, that means the binary(base 2) representation of a number.  These bitwise operations work by exploiting properties of binary numbers to their advantage.  For instance, if the binary representation of a number ends with a 1, it’s odd.

Base 2 Refresher

For those of us who don’t manipulate bits every day (including myself), I thought that a quick refresher on binary representation would be a good idea.  First, let’s create a table.

4 3 2 1 0
0 0 0 0 1

Each column in the table represents a power of 2.  The first column (from the right) represents 20, the second 21, and so on.  Notice that I have a 1 in the row below the 0 column.  That stands for 20, and 20 is equal to 1.  Therefore, the number represented above (00001) is equal to 1.  On to the next table.

4 3 2 1 0
0 0 1 1 1
Now the base-2 number in the bottom row is 00111.  This is equal to 22 + 21 + 20, or 4 + 2 + 1, which is equal to 7.  As you can see, using binary representation is pretty easy.  On to our final example.
4 3 2 1 0
1 1 0 0 1
This example a bit (har, har) trickier.  The base-2 number in the bottom row is 11001, which is  24 + 23 +20(16 + 8 + 1) = 25.  Notice if there are zeros in the columns, we just ignore them completely.
And that’s it!  Base-2 representation of numbers is easy, and critical for every programmer to understand.  Now on to some tricks.

Trick 1 : Odd / Even

One of the most useful bitwise tricks for web developers is for determining if a number is even or odd.

for($i = 0; $i < 10; $i++) {
     if($i & 1) {
          echo "This is odd.";
     } else {
          echo "This is even.";
     }
}
So how does help your web development?  Alternating rows.  If you deal with data in a tabular format, you nearly always need to alternate row color on a table.  Using the bitwise “AND” operator is a good way to accomplish this.

Trick 2 : Multiplication and Division

Using the left-shift (<<) and right-shift (>>) operators, we can easily divide and multiple by powers of two.  These operators aren’t limited to powers of two, but it makes things easier to understand.
//Example 1
$x = 2;
echo $x &lt;&lt; 1; //4
echo $x &lt;&lt; 2; //8
 
//Example 2
$x = 16;
echo $x &gt;&gt; 1; //8
echo $x &gt;&gt; 2; //4

In example 1, we left shift the number 2 one place.  By left shifting 1 place, it’s the same as multiplying that number by 2.  By left shifting 2 places, it’s the same multiplying the number by 2 twice.

Example 2 is doing bitwise division.  Right shifting by 1 place is the same as dividing the number by 2.  Right shifting by 2 places, is the same is the same as dividing the number by 2 twice.

Others

There are most definitely a ton of other uses for bitwise operators, however these are the ones I use the most.  If you happen to have a favorite, please let everyone know about it in the comments.

For a more in depth introduction to bitwise operations please check out http://en.wikipedia.org/wiki/Bitwise_operation and http://www.litfuel.net/tutorials/bitwise.htm
Categories
PHP Programming

PHP Dark Arts: Daemonizing a Process

Note:  Full source code for the example can be downloaded here.

One of the many things you don’t often do with PHP (actually, I’m not sure you do this much with any language) is daemonize a process.  A daemon is program that runs in the background (read more here).  On Unix systems, processes are usually created by forking the init process and then manipulating the process to your liking.  To create a daemon though, you need to get the init process to adopt your process.  To do that, as soon as you fork the parent process, you kill the parent.  Since you child process is parent-less, the init process generally adopts it.  Once that happens, your process has been daemonized.

What You Need To Know

In order to follow the example, you’ll probably want to read up on multiprocessing in PHP and using POSIX in PHP.  Aside from that, keep an open mind.  There are probably better ways to do this (Nanoserv), but I think that doing it manually is a great way to learn more about systems programming and PHP.

Step 1:  Fork It

The first thing that you need to do when daemonizing a process in PHP is fork the process.  After that, we promptly kill the parent process so that the child process can be adopted.

//Set the ticks
declare(ticks = 1);
 
//Fork the current process
$processID = pcntl_fork();
 
//Check to make sure the forked ok.
if ( $processID == -1 ) {
	echo "\n Error:  The process failed to fork. \n";
} else if ( $processID ) {
	//This is the parent process.
	exit;
} else {
	//We're now in the child process.
}

Step 2:  Detach It

Now that we have successfully forked the process and killed the parent, we need to detach the process from the terminal window.  We do this so that when the terminal window closes, our process doesn’t close with it. Once that’s done, we get our processes’ id.

//Now, we detach from the terminal window, so that we stay alive when
//it is closed.
if ( posix_setsid() == -1 ) {
	echo "\n Error: Unable to detach from the terminal window. \n";
}
 
//Get out process id now that we've detached from the window.
$posixProcessID = posix_getpid();

Step 3:  /var/run

Now that we have our processes’ id, we need to let the system know about it.  To do this, we create a file in /var/run.  This file can be named anything you want, just make sure that it’s unique and it ends with the .pid extension.  In that file, we place the pid of our process and that’s it.

//Create a new file with the process id in it.
$filePointer = fopen( "/var/run/phpprocess.pid" , "w" );
fwrite( $filePointer , $posixProcessID );
fclose( $filePointer );

Step 4:  Do Something

Now that all the hard stuff is done, you can get to work.  What do you want your process to do?  For this example, I have mine adding 1 + 1 every 10 seconds.  Nothing too difficult, but you can make your process do whatever you like.  For instance, you could set up a server of some sort.  Note that this the code is sitting in an infinite while loop.  This is done so that the process doesn’t exit naturally.

//Now, do something forever.
while (true) {
	$x = 1 + 1;
	sleep(10);
}

Step 5:  Run It

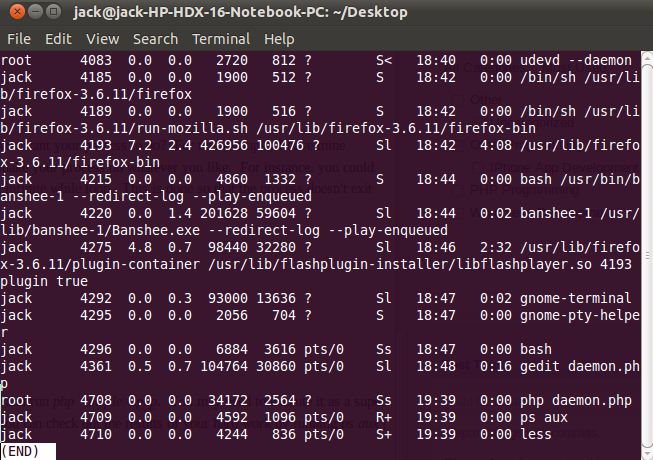
To run this process as a daemon, all you need to do is save you file and run php <myfile>.php.  You may need to execute it as a super user depending on how you permissions are set up.  Once it’s run, you can check out the results of your hard work by running ps aux | less.  Scroll to the bottom and your process should be there.  In the screen shot below, mine is 3rd from the bottom.

Daemonizing a ProcessNote:  Full source code for the example can be downloaded here.

Did you like this article?  Check out the rest of the Dark Arts.

Categories
PHP Programming

PHP Dark Arts: Sockets

Note:  Complete example code for this article is available here.

As an Internet user, you take part in many client-server relationships on a day to day basis.  Most of these relationships are abstracted away, but what if you wanted to make your own client?  Or your own server?  Well, if that’s the case then you’ll probably need to know some network programming.  What you’re really going to need is sockets.

A socket is a receptacle that provides a means of communication between two processes (or in this case, two computers).  Basically it allows you to accept or send information on any port you please (so long as they aren’t reserved or already in use).  So how are we going to use sockets?  Keep reading to find out.

The Server

There are a ton of different examples I could do for this, but I’m choosing to keep it simple.  The server is going to do the following:

  1. Create a socket on a specified port using socket_create_listen.
  2. Wait for incoming connections using socket_accept.
  3. Read data from the socket using socket_read.
  4. Echo the data, and then close the socket using socket_close.

Basically this amounts to creating a server, fetching data from a client, and dieing.  The code itself is very simple, so take a look.

//Set up some variables
$maxBytes = 5000;
$port = 33333;
 
//Create the socket on the specified port.
$socket = socket_create_listen($port);
 
//Wait for incoming connections.
$connection = socket_accept($socket);
print "Connection accepted\n";
 
//When a connection has been accepted, read up to $maxBytes
//then print the received message.
$bytes = socket_read($connection, $maxBytes);
echo "Message From Client: $bytes \n";
 
//Close the socket
socket_close($socket);

Notice that I set the port that I want the socket to bind on very high.  This generally a good idea, because lower ports are regularly used by other applications.  I also have the maximum number of bytes to read set fairly high.  I did this to simplify the example.

The Client

The client for this example is just as simple as the server.  It’s going to do the following.

  1. Bind to a socket using socket_create.
  2. Using the socket that was just created, connect to the server’s socket using socket_connect.
  3. Send a message to the server using socket_send.
  4. Close the connection using socket_close.
//Create a socket and connect it to the server.
$socket = socket_create(AF_INET, SOCK_STREAM, SOL_TCP);
socket_connect($socket, 'localhost', 33333);
 
//Create a message, and send it to the server on $socket.
$message = "This is a message from the client.\n";
socket_send($socket, $message, strlen($message), MSG_EOF);
//Close the socket.
socket_close($socket);

Running The Client & Server

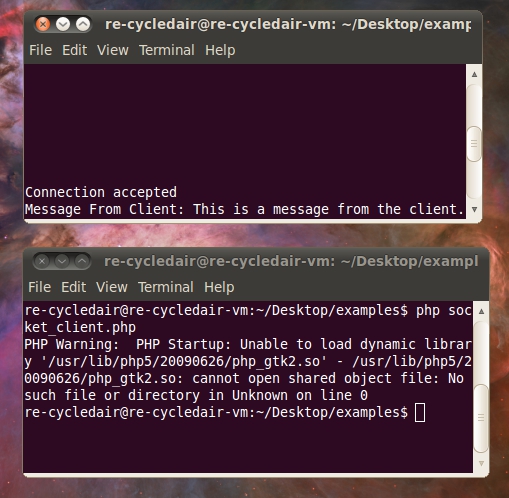
Running the code is easy.  Save your server code to socket_server.php and save your client code to socket_client.php.  After that, open two terminal windows.  In one window run php socket_server.php and in the other run php socket_client.php.  Your output should look like the following image.

PHP Sockets

Please ignore the library error, that’s actually unrelated to this example.  Look at the line above it.

Note:  Complete example code for this article is available here.

Did You Like This Article?

You’ll probably like these other articles from the Dark Arts series as well.

Categories
Other

It’s Not Enough

I’m 24 (almost 25, but lets not go there). In my life I’ve accomplished many things, but with the exception of one, they aren’t very important. I’ve graduated high school, graduated college, got accepted to grad school, got married (the important thing), and created a start-up that failed. I have a good paying job (for the region), doing something I love (web development), at an amazing company with smart co-workers. But I still feel unfulfilled. It just isn’t enough.

Don’t take this the wrong way. I’ve done a lot of stuff. It’s not easy to graduate college. Getting accepted to grad school is hard too. But the thing is, none of these things stand out. Everyone graduates from college these days, and dropping out of grad school isn’t exactly a stand out thing either. I half-assed a start-up that was doomed to failure too. Out of all these things, I learned the most from that failure. I learned that without the right motivation and passion I will not make a good product. I also learned the most import lesson of all: It’s ok to fail.

So here I am now, happily married and decidedly middle class. The American dream right? Not for me. It’s not enough. I want to be passionate about the things I do again. Aside from my wife, nobody in my family seems to understand this. Maybe it’s because I come from a poor family. They feel that because I have a good paying job I should be happy. But the thing is, I’m not. Money just isn’t enough for me to be happy. I need to be intellectually challenged, passionate about what I’m working on, and excited. Now that I’m at this point in my life, I’ve realized that the ceiling is much higher than I ever thought possible.

Where does this lead me? For me, it means starting something that I can be passionate about. Be it a blessing or a curse, the Hacker News community has put the entreupanurial spirit in me, so I’m going to do another start-up (“Do or Do Not. There is no try.”). This time with a long time friend and an idea that seems extremely viable. But why should it be different this time? Maybe it won’t be, but it feels different this time. It’s like when you go for a run, and within the first 10 steps you can tell if it’s going to be a struggle every step of the way or smooth sailing. This feels like smooth sailing, so I’m hopeful. Most importantly though, I’m excited.

I wonder if this new start-up will be enough to satiate my thirst for knowledge, adventure, and success. I hope it is, but I feel that nothing will ever be enough. I’ll always aspire towards the next level. I’ll always work late into the night until my wife comes in and tells me to go to bed. I’ll never be fully satisfied, but maybe some day I’ll be just just satisfied enough to be happy.

Categories
Other

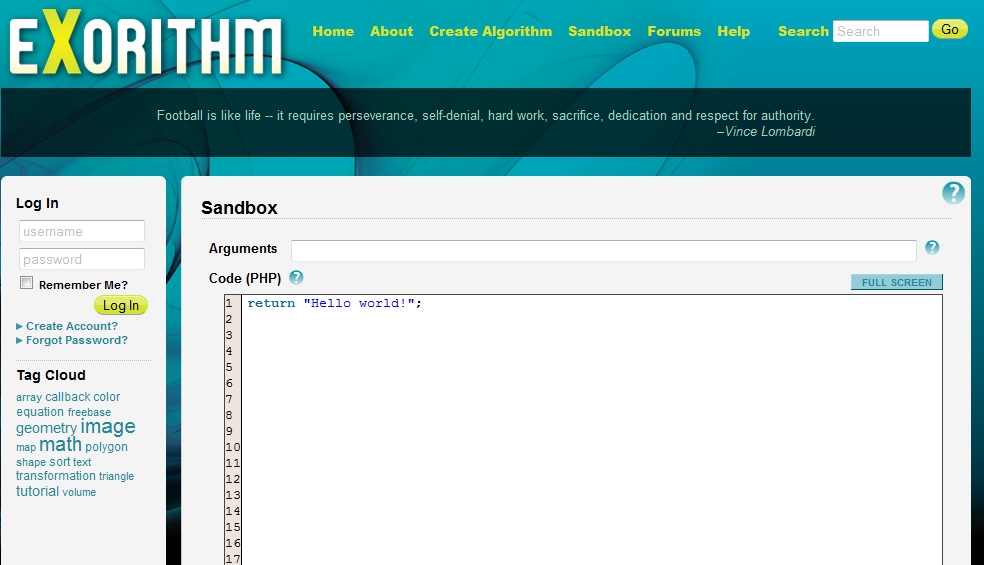
Exorithm – An Online PHP Playground

As I was cruising about the web this morning I stumbled upon Exorithm, an online PHP execution environment (or playground as I like to call it).  Actually, it’s a lot more than that.  It’s a hub for people to learn, create, and share.  Exorithm allows PHP developers to create functions that other people might find useful and share them.  For instance, just this morning there were algorithms on the site for reversing strings, drawing shapes, and sorting data.

It’s worth checking out.  I spent a good half hour just trying to break their evaluation environment (no luck!) and then another few minutes cruising the algorithms section.  Their web site is http://www.eXorithm.com.

Exorithm

Categories
PHP Programming

PHP Dark Arts: GUI Programming with GTK

Note:  The examples mentioned in this article have source code available here.

PHP is not meant for desktop graphics programming.  It just isn’t.  PHP is web development language, or as you’ve seen in the PHP Dark Arts series, it can be used for some non-web related purposes.  But using PHP for GUI development just isn’t something people do, so naturally I had to give it a shot.  After much Google-fu I cam across the PHP-GTK project.

PHP GTK Logo
According to the PHP-GTK project site:

PHP-GTK is an extension for the PHP programming language that implements language bindings for GTK+. It provides an object-oriented interface to GTK+ classes and functions and greatly simplifies writing client-side cross-platform GUI applications

What Can You Do With It?

The first question that I had when I started looking at PHP-GTK was “What can I do with this?”.  Simple GUIs are very possible with PHP-GTK.  For example, you could easily build a questionnaire, a calculator, some sort of text editor, maybe a music library manager.  In short, you can build simple desktop applications.

Where To Get PHP-GTK

Getting PHP-GTK is easy.  Making it work for you is another matter.  I had originally hoped to get it running on my Ubuntu 9.10 virtual machine that I do all of my Re-CycledAir development work on, but that just wasn’t working for me.  I kept running into dependency issues and it just wouldn’t compile right.  After much pain and suffering I decided to just use the pre-compiled Windows binary which worked like a charm.  If you plan to follow any of these tutorials, I highly recommend that you use the Windows binary.

Once you have the Windows binary installed, just execute your GUI PHP programs using <path/to/phpgtk/>php.exe your_file.php.

Hello World

When I learn something new, be it a language or a library, I always like to start off with a simple “Hello World” program.  What follows is a simple “Hello World” program that creates a small window and displays some text.

set_title('Hello Re-CycledAir');
 
//Tell GTK to quit the main loop when we close the window.  This
//is what allows the program to exit fully.
$window-&gt;connect_simple('destroy', array('gtk', 'main_quit'));
 
//Create a simple label that displays "Hello Re-CycledAir!" and then
//add it to the window.
$labelHello = new GtkLabel("Hello Re-CycledAir!");
$window-&gt;add($labelHello);
 
//Make this window visible.
$window-&gt;show_all();
 
//Start the main loop.
Gtk::main();
?&gt;

If everything goes correctly, you should get something that looks like this.

Hello World PHP-GTK
Hello World 2

In this example, we place a button on this window instead of a label, which then triggers a modal pop-up window with a message.

//Check to see if PHP-GTK has been loaded correctly.
if (!class_exists('gtk')) {
     die("PHP-GTK has not been loaded in your php.ini file.");
}
 
//Create a new window and set it's title to "Hello Re-CycledAir".
$window = new GtkWindow();
$window-&gt;set_title('Hello Re-CycledAir');
 
//Tell GTK to quit the main loop when we close the window.  This
//is what allows the program to exit fully.
$window-&gt;connect_simple('destroy', array('gtk', 'main_quit'));
 
//Add an OK button, connect it to the ok function, and
//then add it to the window.
$buttonOK = new GtkButton("_OK");
$buttonOK-&gt;connect_simple('clicked', 'ok', $window);
$window-&gt;add($buttonOK);
 
//Make this window visible.
$window-&gt;show_all();
 
//Start the main loop.
Gtk::main();
 
function ok(GtkWindow $window) {
     $message = "Hello again!";
 
     //Create message dialog.
     $dialog = new GtkMessageDialog($window, Gtk::DIALOG_MODAL,
     Gtk::MESSAGE_ERROR, Gtk::BUTTONS_OK, $message);
     $dialog-&gt;set_markup(
     "You have received this message: \r\n"
      . "<span>" . $message . "</span>"
     );
 
     //Run the dialog
     $dialog-&gt;run();
     $dialog-&gt;destroy();
 
     //Destroy the original window.
     $window-&gt;destroy();
}
?&gt;

If all goes well with this example, you should get output that looks like this:

PHP-GTK ModalConlcusions

I am by no means a good GUI programmer.  In fact, the only GUI programming I have done outside of these examples is building a few simple interfaces using Swing in Java.  Your mileage may vary, but I found PHP-GTK to be a bit clumsy in how it handles things.  Perhaps with some more development time it could become a better library, but generally there are much better languages and libraries out there for GUI development.

Note:  The examples mentioned in this article have source code available here.

Did you like this article?  You’ll probably like these too.

Categories
Other

Traffic Analysis (Hacker News & Reddit Focus)

Over the past month I’ve started pulling in some modest traffic to this blog.  Now that I’ve gotten a few thousand visitors over that past few weeks, I thought it might be time to do a quick analysis of my traffic.

Overview

As you can see, my traffic goes in spikes.  Each of those spikes corresponds to when a new article is published.  Without the outliers, there is still a steady increase in traffic.  I’ve also noticed that over the past several weeks my average time on site has increased to over 1 minute ( it was somewhere near 45 seconds before I started posting articles frequently).  The best stat on here for me is that I actually have returning visitors.  Granted, they only make up ~16% of the traffic, but it’s still good to see.

Reddit -vs- Hacker News


As you can see, I clearly have Reddit and Hacker News to thank for my traffic numbers.  Without you guys (and girls), it wouldn’t be nearly as fun to write.  However, there is some interesting info tucked away in that table.  The most important piece is “Avg. Time On Site”.  Reddit’s average time is only 27 seconds, as opposed to Hacker News which is nearly 2 minutes.  This tells me that the typical Reddit user probably has no attention span (likely) and I should probably add a TLDR block at the beginning of each article (I won’t, don’t worry).   On the other hand, this might just mean that Hacker News users open up a ton of tabs and it takes 90 seconds on average to get to mine.  I tend to think it’s just lower brow traffic from Reddit, but I’ll give them the benefit of the doubt.

The bounce rate from Hacker News is also slightly better, but still nowhere near as good as traffice from PHPDeveloper.org or StumbleUpon.

OS & Browsers


There aren’t any surprises here.  Windows + Firefox is leading the pack, with Windows + Chrome closing in right behind them.  Mac users are also making a strong showing.  As this is a technical blog, this doesn’t surprise me at all.

Categories
PHP Programming

Document Your Code

When you started learning to program, documenting your code was the last thing on your mind. You’re were here to learn, and learn is what you did. As your programs started to grow in complexity, your college professors preached to you “You must document your code! What if you have to come back to it in 6 months? Will you remember how everything works?”. So, you dutifully documented your code. But then something strange happened: you got a job. In the real world there are deadlines, and that extra minute you should have taken to document the code is gone. But the thing is, you MUST document your code. If not for you, do it for me. Because guess what, I’m the one that has to go in and fix it, and knowing what’s going on would make my life a lot easier.

A Story

When I started my current job, one of the other programmers was assigned to get me up to speed with our CMS. My first question was “Is there any documentation I can go over?”, to which he responded “Nah, just dive in and you’ll be fine.”. So I dove in and it only got worse from there. As I looked through the code, nothing was documented. Nothing! I spent the next 3 months sifting through code trying to figure out how it all works. I eventually did figure it all out, but it was 3 months where I was working at maybe 50%-60% of my maximum efficiency. Having any sort of documentation would have made this process much easier. Not only that, but because of the lack of documentation we constantly create duplicate functionality. After all, how are you supposed to know what functionality exists if there no documentation on it?

Now that I’ve been at my current job awhile, I’ve decided to change things. I’ve started taking 15 to 30 minutes a day to document our CMS using the PHPDoc format. It may or may not catch on with the rest of the programmers, but I know that every function and class that I write has full documentation, and it feels good when the documentation gets generated with PHPDoc. I believe the quote is “You need to be the change you believe in”.

How to Document Your Code

It’s easy. Really easy actually.

/**
* Function short description
*
* This is a long description of the function.  Discuss what this function does in
* any detail that is necessary.
*
* @global void $globalVariable
* @param int $aParameter This is the description of the parameter.
* @param mixed $bParameter This is the description of another parameter.
* @return bool This is a description of the return variable.
* @todo Does something need to be done?  Put it here.
*/
function my_function($aParameter, $bParameter) {
     global $globalVariable;
 
     //If you are doing something extra complicated, make a comment inside the
     //function.  Otherwise, you code should speak for itself.
     for($i=0; $i &lt; 20; $i++) {
          echo $i;
     }
 
     return true;
}

That’s it. That’s all you need to get started documenting PHP code. There’s a lot more you could be doing, but it’s not all that important. So long as you document the parameters, the return type, and write a description about what the function does, you have the important bits.

So next time you think to yourself “I’ll document it later.”, just take the time to do it now. Because guess what? You aren’t going to go back. Something else is going to come up, and then the rest of us will suffer.