At my day job I’m really the only person that knows how to write WordPress plugins, so when I write one it’s usually sand-boxed on my machine where nobody can touch it. However, in a side endeavor I’m part of we have a team of 3 people developing on one plugin. As I’m the most experienced plugin developer amongst our team, I was tasked with coming up with a development style and plugin architecture that would work for us.
Development Style
Everyone will be running a local copy of WordPress and making their changes to the plugin locally. The plugin itself will be under version control using Git, and developers will push/pull changes from either a self-hosted Git server or Git Hub. Database schema will be tracked in a file called schema.sql. When someone makes a change to the schema, it goes into that file at the bottom with a comment about why the schema changed. We’ll being jQuery as our Javascript framework of choice, and we’ll be writing all of our Javascript in CoffeeScript (see my previous entries).
Plugin Architecture
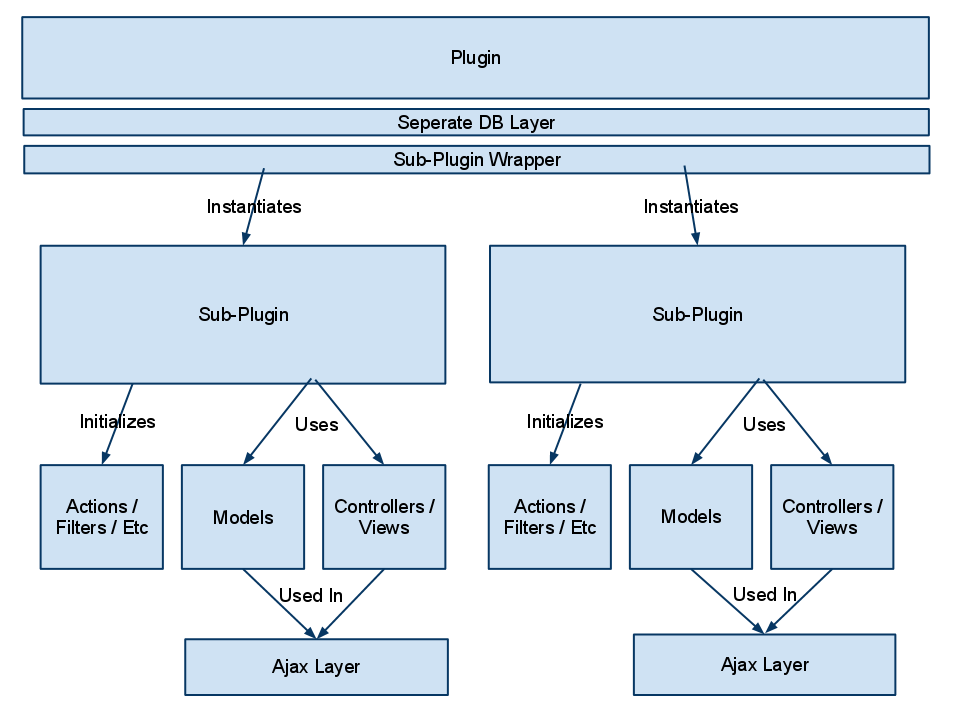
The more difficult aspect of developing this plugin as a team is the sheer size of the plugin. Realistically this could probably be split into about 6 different plugins by functionality, but we want to keep everything together in one tidy package. To illustrate the architecture, I made a quick drawing.
The first layer of the plugin is essentially a wrapper. It initializes the ORM that we are using to access the database (we are using a separate database for this plugin’s data), and includes the wrapper class. The wrapper class is where developers drop their sub-plugin include file and instantiate it’s main object. For instance, for each sub plugin there will probably be two classes instantiated in the wrapper. One being admin related functionality, and the other being for front-end display functionality. My thinking with this architecture was that we could all work on separate sub-plugins without crossing paths too frequently. This also allows us to separate the different functionality areas of the plugin in a logical manner. The other benefit to architecting the plugin like this is that it will be very easy to port to a different architecture in the future. I’m well aware that WordPress probably isn’t the best tool for the job, but it is the best tool for the team with the deadline that we have.
Thoughts
While thinking about WordPress Plugin Architecture, I cruised the source code of a lot of plugins and it seems that everyone goes about it in a different way. If you’ve ever developed a large-scale plugin with a team, how did you go about doing it? Did you run in to any problems that you didn’t foresee at the beginning of the process?
One neat feature of WordPress plugins is shortcode. Shortcode enables a user to put something like “[myplugin]” in their posts or pages and have it display content from their plugin. Making WordPress shortcode work for you isn’t terribly difficult, but without some help it can be confusing. In this tutorial, I’ll show you how to use shortcode in your plugins.
Shortcode Example
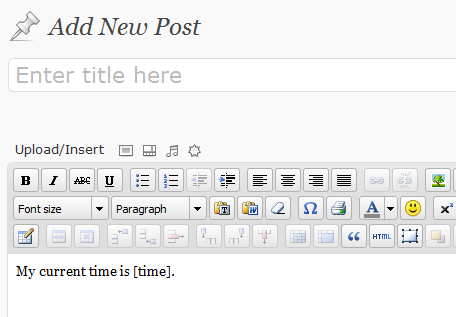
Let’s say you want to print out the current time anywhere in your post where you put “[time]”. Easy enough! Open up your theme’s functions.php and enter the following.
function time_func($atts){$thetime=time();returndate("g:i A",$thetime);}
add_shortcode('time','time_func');
So now, “[time]” will be replaced with the current server time formatted like hour:minute AM/PM. But what if you aren’t sure what format you want the time to come out in? Well, you just need to add an attribute. I’m going to be using PHP’s date() function formatting in this example.
function time_func($atts){extract(shortcode_atts(array('timeFormat'=>'g:i A'),$atts));$thetime=time();returndate($timeFormat,$thetime);}
add_shortcode('time','time_func');
function time_func($atts) {
     extract(shortcode_atts(array(
          'timeFormat' => 'g:i A'
          ), $atts));
     $thetime = time();
     return date($timeFormat, $thetime);
}
add_shortcode('time', 'time_func');
What the above code does is add the possibility of an attribute to your shortcode. So you could use it like “[time timeFormat=’d.m.Y’]”, which return today’s date. In the extract function, you can specify the default value (which I set as hour:minute AM/PM). You can add as many attributes as you need to your shortcode.
In all WordPress versions, there has been a severe dichotomy between text editors. In one corner we have TinyMCE, which is a full-featured editor that is used when constructing pages and posts. On the other hand we have what amounts to a text area, where you make changes to code in theme files. I’ve always wondered why there isn’t some sort of syntax highlighting, tab support, or rudimentary auto-completion available in the default code editor. As a developer, I realize how hard these features are to implement using nothing more than CSS and Javascript, but I thought some attempt may have been made by the core developers by version 3.
That has yet to materialize, but the community has come to the rescue. A plugin called Power Code Editor exists that does simple syntax highlighting and improves font that is used in the editor. After applying the plugin, your code editor will look like this.
If you’re interested, you can download the plugin here. Or, from within the WordPress plugin installation menu search for “power code editor“.
More often then we would like to admit, we are unwilling or unable to submit our WordPress plugins back to the repository for everyone to use. But how do you exclude your plugin from WordPress updates? As usual, the answer is with filters. Check out the code below to see how.
1
2
3
4
5
6
7
8
9
10
11
function exclude_my_plugin($r,$url){if(0!==strpos($url,'http://api.wordpress.org/plugins/update-check'))return$r;$plugins=unserialize($r['body']['plugins']);unset($plugins->plugins[ plugin_basename(__FILE__)]);unset($plugins->active[array_search( plugin_basename(__FILE__),$plugins->active)]);$r['body']['plugins']=serialize($plugins);return$r;}
add_filter('http_request_args','exclude_my_plugin',5,2);
Attribute: This code is originally from a lead WordPress Developer, Mark Jaquith (thanks Mark!)
But how does this exclude your plugin from the update? First, it takes the HTTP Request args and unserializes the [‘body’][‘plugins’] part of it. From there, it’s as simple as unsetting your plugin from the array, then re-serializing the request args. Also the first part checks to see if this is actually and update check. If it’s not, you exit the function.
The default behavior in WordPress when an image is clicked is to open another page of your blog. Sometimes though, you want a more elegant solution. One of the more trendy ways to open an image of the past few years has been using something called a lightbox. A lightbox dims the screen via a modal window, and then displays your image. If you would like something of this nature to be your default image behavior, check out Lightbox 2 (http://wordpress.org/extend/plugins/lightbox-2/). Don’t just take my word for it though, try out this WordPress lightbox by clicking the image below.
Note: The full source code for this plugin can be found here.
Every time you go to WordPress blog and see items in the sidebar, it’s likely that they are widgets. There are thousands of them for download on WordPress.org, but what if you want to create your own? How would you code it? That’s what I will answer in this quick How-To.
Step 1: Create The Plugin
We’re going to start out by creating a simple plugin. It’s only purpose is to initialize our widget.
1
2
3
4
5
6
7
8
9
10
11
12
13
14
15
16
<?php/*
Plugin Name: Sweet Math Widget
Plugin URI: https://re-cycledair.com
Description: A math widget that takes the post id and multiplies it by 5.
Author: Jack Slingerland
Version: 0.1
Author URI: https://re-cycledair.com
*/function sweetMathWidget(){global$post;echo"{$post->ID} x 5 = ";echo$post->ID*5;}?>
<?php
/*
Plugin Name: Sweet Math Widget
Plugin URI: https://re-cycledair.com
Description: A math widget that takes the post id and multiplies it by 5.
Author: Jack Slingerland
Version: 0.1
Author URI: https://re-cycledair.com
*/

function sweetMathWidget() {
     global $post;
     echo "{$post->ID} x 5 = ";
     echo $post->ID*5;
}
?>
Step 2: Add & Register the Widget
The nex step is the add the widget to WordPress and then register it. Add this code to the plugin that you already have going.
1
2
3
4
function sweetMathWidgetInit(){
register_sidebar_widget(__('Sweet Math Widget'),'sweetMathWidget');}
add_action("plugins_loaded","sweetMathWidgetInit");
function sweetMathWidgetInit() {
     register_sidebar_widget(__('Sweet Math Widget'), 'sweetMathWidget');
}
add_action("plugins_loaded", "sweetMathWidgetInit");
Step 3: Add Theme Compatibility
You want everyone you use your plugin right? Well if it isn’t compatible with any themes nobody is going to use it. To add theme compatibility we need to modify the first function we wrote to look like this.
1
2
3
4
5
6
7
8
9
10
function sweetMathWidget($args){global$post;extract($args);echo$before_widget;echo$before_title;echo"<h2> Sweet Math Widget </h2>";echo$after_title;echo"{$post->ID} x 5 = ";echo$post->ID*5;echo$after_widget;}
function sweetMathWidget($args) {
     global $post;
     extract($args);
     echo $before_widget;
     echo $before_title;
     echo "<h2> Sweet Math Widget </h2>";
     echo $after_title;
     echo "{$post->ID} x 5 = ";echo $post->ID*5;
     echo $after_widget;
}
Step 4: Upload & Add The Widget
Now that you’re done, save the file as sweet_math_widget.php and then zip the file using WinZip (or a similar tool). Upload the plugin to your WordPress install and then activate. If everything goes well, you’ll have a new widget in you Appearance -> Widgets area.
Drag “Sweet Math Widget into your sidebar and you’re done. Go to a post on your blog and you should see something like this.
You can download the full source code for this widget here.
One of the things that is seemingly lacking in WordPress is a way to restrict page access for authenticated users. Sure, you can password protect posts, but what if you want to restrict a page or post to only authenticated users? Or restrict a page or post to only a certain group of people? Without a 3rd party plugin, this isn’t possible.
With the User Access Manager plugin, you can restrict your posts and pages easily with WordPress. It’s a fairly robust plugin, and allows you to create user groups, set access by category, and even limit access to uploaded files. Check out the screen shots below to see it in action.
Sometimes WordPress just doesn’t do what you want it to do. When that happens, you turn to plugins for help. But sometimes, the WordPress plugin repositories don’t have what you need either. In those cases, it’s time to pull up your sleeves and get to work. In this tutorial, I’m going to go through the process of creating a simple WordPress plugin from scratch. I created this plugin as a proof of concept awhile ago, and thought that it would make a great learning tool now.
Step 1: What are you’re making anyways?
This plugin does one thing only, and it does it well. It will place a “Submit to Hacker News” button on all of your posts. While this tutorial is only for a simple plugin, it could easily be extended to include other news aggregation services and social networks.
Step 2: Creating the plugin.
Now that we know what we’re going to create, we need to create the plugin. To do that, simply create a file called wp-hacker-news.php and then add the following to it.
1
2
3
4
5
6
7
8
/*
* Plugin Name: WP Hacker News
* Version: 0.1
* Description: Adds a "Submit to Hacker News" button to your posts.
* Author: Jack Slingerland
* Author URI: https://re-cycledair.com/
* Plugin URI: https://re-cycledair.com/wp-hacker-news
*/
/*
* Plugin Name: WP Hacker News
* Version: 0.1
* Description: Adds a "Submit to Hacker News" button to your posts.
* Author: Jack Slingerland
* Author URI: https://re-cycledair.com/
* Plugin URI: https://re-cycledair.com/wp-hacker-news
*/
The lines above are all required for a WordPress plugin to function correctly. Below is a quick run-through of what each of these means.
Plugin Name – This is the name of your plugin. It is how it will appear in the WordPress back-end administration panels.
Version – The version number. I always start a 0.1 to start, and then increment like 0.1.1 for small changes.
Description – This is the description of your plugin. Feel free to be verbose here, as this is how people will know what your plugin does.
Author – This is you! Put your name or the name of your team here.
Plugin URI – The web page for your plugin. Here, I’m linking it to the original announcement I made for this plugin.
Step 3: Creating a display function.
So you finally have a WordPress plugin. That’s great and all, but it doesn’t do anything yet. What you need now is to create a function that displays the “Submit To Hacker News” link. To do that, add this below the comment section:
1
2
3
4
5
6
7
8
9
10
11
12
13
14
15
16
17
18
19
//Function to show the HN Link.function WPHackerNews_link(){global$post;$link=urlencode(get_permalink($post->ID));$title=urlencode($post->post_title);$formattedLink="
<div style="float: right; margin-left: 10px; margin-bottom: 4px;">
<a href="http://news.ycombinator.com/submitlink?u=$link&t=$title"><img src="https://re-cycledair.com/wp-content/uploads/2010/03/hn.jpg" alt=""/></a><span style="font-size: 9px;"><a href="http://news.ycombinator.com/submitlink?u=$link&t=$title">Submit to HN</a></span><a href="http://news.ycombinator.com/submitlink?u=$link&t=$title"></a></div>";
return $formattedLink;
}
//Function to show the HN Link.
function WPHackerNews_link() {
     global $post;
     $link = urlencode(get_permalink($post->ID));
     $title = urlencode($post->post_title);
     $formattedLink = "
     <div style="float: right; margin-left: 10px; margin-bottom: 4px;">
          <a href="http://news.ycombinator.com/submitlink?u=$link&t=$title">
               <img src="https://re-cycledair.com/wp-content/uploads/2010/03/hn.jpg" alt="" />
          </a>
          <span style="font-size: 9px;">
               <a href="http://news.ycombinator.com/submitlink?u=$link&t=$title">Submit to HN</a>
          </span>
          <a href="http://news.ycombinator.com/submitlink?u=$link&t=$title"></a>
     </div>
";

     return $formattedLink;
}
The code above explains itself pretty well. But I’ll break it down a bit anyways.
We set the global post variable. It holds all of the information about the post we’re currently on.
Store the current post’s permalink and title in variables.
Using some in-line css and good old HTML, we get the Y Combinator logo to float on the right side of the post.
Return the HTML for the button to the caller of the function.
Step 4: Displaying your plugin.
Everything is going great, but now we need this to actually show up in posts. To do that, we register a display function with WordPress. With a bit of logic, we can make it only display on posts.
1
2
3
4
5
6
7
8
9
10
11
//Integrate with Wordpress.function WPHackerNews_ContentFilter($content){if(is_single()){return WPHackerNews_link().$content;}else{return$content;}}//Add the filter
add_filter ('the_content','WPHackerNews_ContentFilter');
//Integrate with Wordpress.
function WPHackerNews_ContentFilter($content) {
     if(is_single()) {
          return WPHackerNews_link().$content;
     } else {
          return $content;
     }
}

//Add the filter
add_filter ('the_content', 'WPHackerNews_ContentFilter');
The above code isn’t self-explanatory at all, so here’s how it works.
When we create the function, we make sure to pass it “$content”. “$content” is a variable that holds the content of the post that the user is on.
We then check to make sure that we are on a single post with the function “is_single()”.
If so, we return our button by calling “WPHackerNews_link()” and appending “$content” to it.
If not, just return the original un-altered content.
The final step is to use the “add_filter” function to add this plugin into WordPress. The first argument describes where our plugin should be used (“the_content”), and the second argument is what function it should use (“WPHackerNews_contentFilter”).
Step 5: You’re Done!
That concludes this tutorial on creating a simple WordPress plugin. All you need to do now is drop this file in your wp-content/plugins directory and then activate it in the admin. As usual, if you run in to any errors or notice any problems, please let me know and I’ll help the best I can.